 FREE 1 to 3-Day Delivery on Orders $149+ Details

How to Install an Off Road Only LiteDOT LitePANEL Kit on your 2007-2015 Jeep Wrangler JK
Installation Time
1 hours
Tools Required
- 3/16 allen wrench/driver
- #2 phillips screwdriver
- Wire stripper
- Heat gun
This installation document is to document the installation of the ORO LitePANELs for the Jeep Wrangler JK models. Along with the LitePANELs, installation will cover the LIteDOTs and the LiteBOXs as the complete install as designed utilizes all of these products.
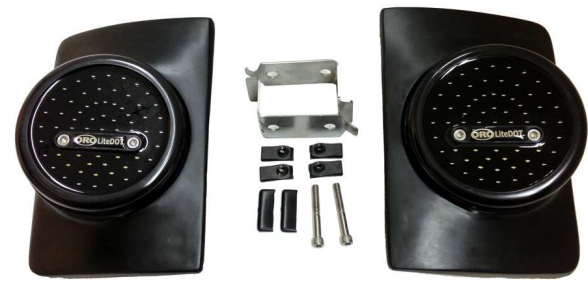
The LitePANELs are designed to be right and left and will fit to the Stock Jeep sheet metal, if you have corner guards installed you may experience installation issues.
Installation:
The installation of this product simply requires removal of the stock taillights, and replacement with these supplied parts.
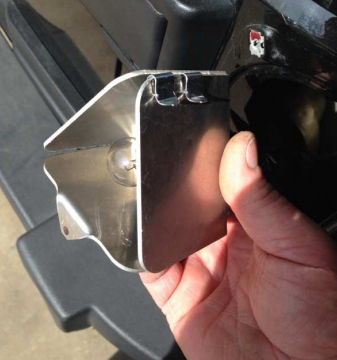
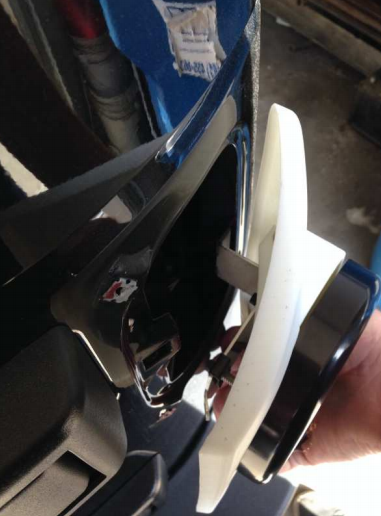
Remove the stock taillights. With a phillips screwdriver, remove the 2 screws on the tailgate side of the taillights. The outer screws do nothing to remove the taillights from the vehicle.
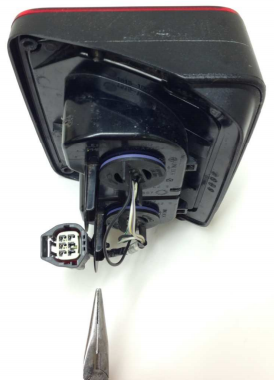
Once the screws are removed, the taillights pull away from the body on the tailgate side. The outside edge there is no fasteners, just the molded edge that clips behind the sheet metal. With the taillight off the vehicle, you can either remove the bulbs from the taillight (will also need to remove the retainer holding the harness to the taillight, notice the point where the needlenose pliers is pointing in the image to the right) or disconnect the connector to the main harness.
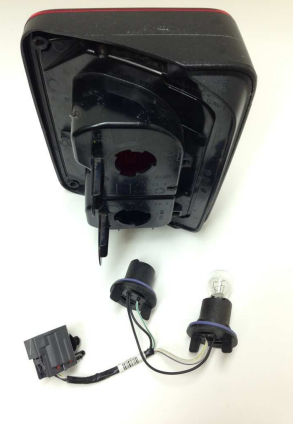
Next, you will unplug the bulbs from the stock taillight. Turn the sockets counter clockwise to remove them from the housing.
The backup bulb can be removed from the socket, that’s the one with the single filament. The dual filament bulb is the one that needs to stay in the socket. In the image to the left the backup bulb has been removed, the turn signal bulb remains. You will reuse this harness with the installation.
LiteBOX Installation
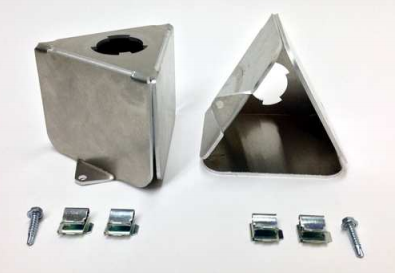
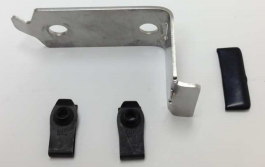
The turn signal flash rate will be maintained by keeping the turn signal bulb in the circuit. This means that the bulb needs to be mounted so it can remain lit inside the fender well, while protecting the harness and other items from the heat. That’s the reason for the LiteBOX’s, the aluminum triangle shaped boxes you see in the kit. The parts are shown in the image to the right.
Notice that the odd shaped cutout will accept the socket for the turn signal bulb.
These LiteBOX’s, one per side, will be mounted inside the wheel well area, thru the taillight opening. When mounted this will give the bulb a spot to sit and not bounce around as well as the aluminum will help to disperse the heat generated. Try to mount so that there is no harnesses resting directly on the aluminum.
To mount the LiteBOX’s, there are 4 clips supplied. These clips slide easily over the edge of the aluminum and then will allow you to slide them over an edge of sheet metal inside of the wheel well, easily holding them in place. You may also screw them in place with the supplied screw should you wish to do that. In the image to the right, you can see where we slide the clips on and ready the LiteBOX for installation on the passenger side.
Before you mount this, you may wish to wire the taillight in, as you will connect the wires between the bulb and the connector, and upon installing the aluminum box you may find it a challenge to make that connection inside the wheel well.
LiteBOX positions, you can mount them wherever you see fit inside the wheel well. We have found the following places to work the best. On the driver side, we attach to a sheet metal piece that allows the box to be positioned below the gas filler
tube, down low. On the passenger side we find an area above the tailgate hardware (pay attention to the moving pieces inside this area, open/close tailgate before you mount) and attach it high to the outside of the Jeep.
Once you have prepped the LiteBOXs and have determined where you will mount them, it’s time to start assembling the LitePANEL retaining hardware.
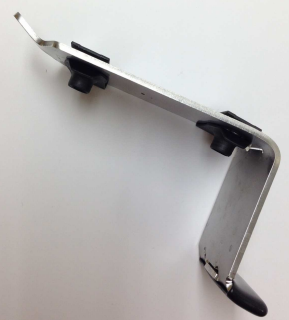
The 2 slide on U-nuts will be positioned over the 2 mounting holes, but we need to pay attention to which side the threaded side gets placed on. The black plastic cover will slide over the long tab almost equal in size to itself.
In the next image you can see the plastic cover installed on the wide end and the U-nuts installed. The U-nuts can be in installed over either edge, BUT THE IMPAORTANT part is to get the threaded side on the side shown in the image to the right. IF you slide them on wrong, you will need to lift the little retainer tab that locks them into the holes to allow it to slide off. You don’t need to lift the tab far or hard, just enough to slide the u-nut off the bracket.
Once the retainers are assembled, it is time to pre- assemble the LiteDOT, LitePANEL and the retainer to prepare it for assembly onto the vehicle.
The LiteDOTs are left and right specific. The mounting holes thru the face of the LiteDOT are designed to be below center of the LiteDOT. When held this way, there will be side lights on either the left or right side. Obviously the left LiteDOT will have the side lights on the left in this position. See the image to the right, the right LiteDOT has the side lights on the right side.
The wires going into the back of the LiteDOT will be below the 2 mounting bolts. You will determine the left or right panel by placing the left or right LiteDOT upon the panel, and when correct the holes for the mounting bolts and wires will line up.
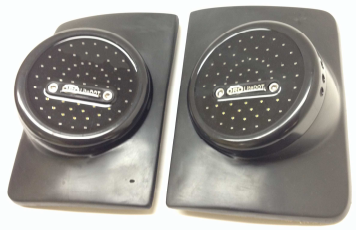
NOTE: We used a white panel to aid in making the pictures easier to see for installation purposes.
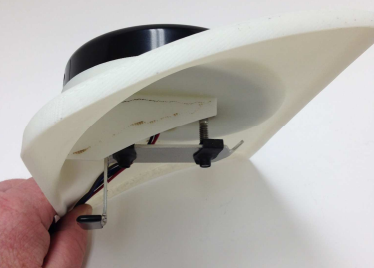
Now, we need to assemble the LiteDOT to the LitePANEL and using the 2” long Stainless socket head bolts start the threads of the bolts into the u-nuts. Looking at the image to the right, you will be able to see the stainless bracket and its orientation to the molded LitePANEL. Notice the direction that the u—nuts as well as the way the stainless retainer is positioned so that the plastic coated edge is to the side of the panel that will be to the outside of the Jeep
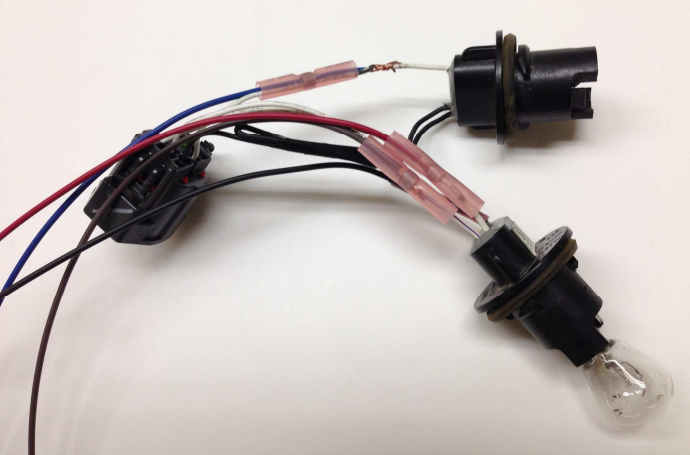
Once the units are assembled as shown, then it is time to do the wiring. We recommend to make the electrical connections between the original taillight bulb sockets as the connection to the full Jeep harness.
On the LiteDOTs, there is 4 wires each;
Red Turn/Brake
Brown Tail
Blue Reverse
Black Ground
On the harness, 4 colors as well, multiple blacks;
White with yellow trace Turn/Brake
White with violet trace Tail
White with green trace Reverse
Black Ground
With the kit will be small pink “solder seal” connectors. These tubes of shrink wrap have a ring of solder in them, and using a high heat hair drier or an industrial heat gun will result in the shrink tube shrinking and the ring of solder will melt. Do not use a flame to melt, open flame will burn the shrink before it melts.
Easiest way to make the connections, halfway between the OEM harness connector and the tail light bulbs, simply cut the 3 colored wires and any one of the blacks.
Strip about ½” insulation on each end of the cuts.
Before the next step, make sure that you have the LiteDOTs preassembled on the LitePANEL as shown in the last picture, make sure you have the left and right sides in the correct places. The net step is to make the electrical connections and if you don’t have the wires going thru the LitePANEL before you finalize the connection, you will need to disconnect and start over.
Now with the LiteDOT assembled to the LitePANEL, and the LiteDOT wires going thru the LitePANEL, you will prepare them for connection to the factory harness.
Same as the wires you just cut, strip ½” insulation from the LiteDOT wires, cut the black wire to the same length as the colored wires and strip that as well.
Now, as shown in the above image, twist the colored LiteDOT wire with the connector end of the factory harness, slide the solder seal over it as shown on the very top connection in the above photo.
Then twist in the bulb end of the wire to complete the circuit.
Slide the solder seal down so the ring is over the twisted part of the wire.
Then apply heat with the heat gun and the shrink will shrink, glue will ooze out and when warm enough, the ring of solder will start to shift. Stop heating at this point, give the connection a moment to cool before handling.
Repeat for the remaining connections.
If you haven’t already done so, remove the bulb for the backup light, the top one shown in the image. You don’t need to leave that bulb in the system.
Once these connections are done all that is left electrically is to plug the harness in and test.
When the testing it proven to work, next step is to plug the taillight bulb into the LiteBOX and mount that into the inner fender well. Ensure that any extra wiring is not resting on the aluminum box, zip tie wires as necessary to keep them in check.
Now, the step remaining is to mount the assembly to the Jeep.
This process is pretty simple. With the stainless retaining bolts just barely started in the threads of the u-nuts, hold the assembly so that the LiteDOT is sitting tight to the LitePANEL, and the screws are pushed flush into the face of the LiteDOTs. This will push the retaining bracket as far away from the LitePANEL as possible.
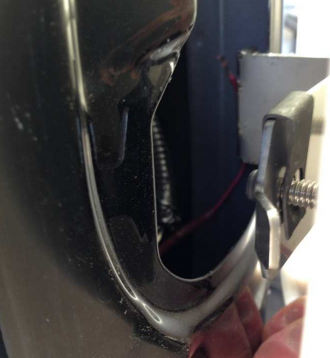
The process now will be to insert the plastic coated edge of the stainless bracket behind the opening edge of the JK sheetmetal.
Hold the assembly so that this is done just above the lowest point possible. Once the stainless bracket is behind the surface of the sheet metal, move the assembly to the outside of the vehicle, until the stainless bracket makes contact with the edge of the sheet metal.
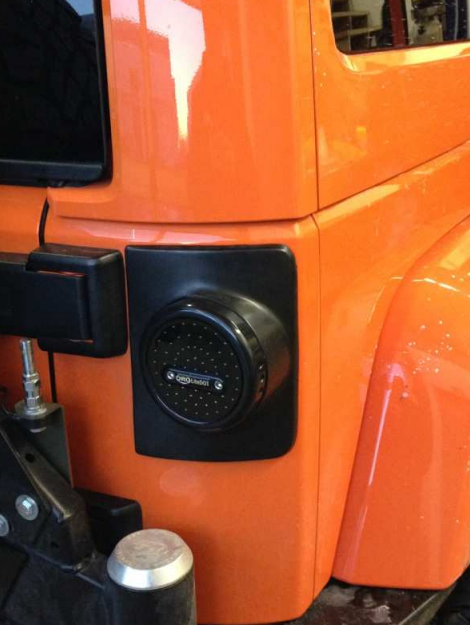
At this point, the tailgate side of the stainless bracket should be able to clear the opening as you push the assembly towards the Jeep. Once it gets behind the sheet metal, raise the assembly into the proper position, the top of the LitePANEL should be about 1/8” below the body line when positioned properly.
Once you have the panel in place, Simply tighten the mounting bolts with the 3/16” allen wrench. As you tighten the bolts you can fine tune how it sits on the vehicle, rotate it and raise or lower to get the best fit as necessary. When finished, the top of the LitePANEL should be appx 1/8” below the top body line and parallel with the vertical body line on the outside edge of the Jeep.
Thank you for your purchase of the OffRoadOnly LiteDOT, LitePANEL and LiteBOX products.

