FREE 1 to 3-Day Delivery on Orders $149+ Details

How to Install MORryde Side Mount Tray (07-18 Wrangler JK) on your Jeep Wrangler

Shop Parts in this Guide
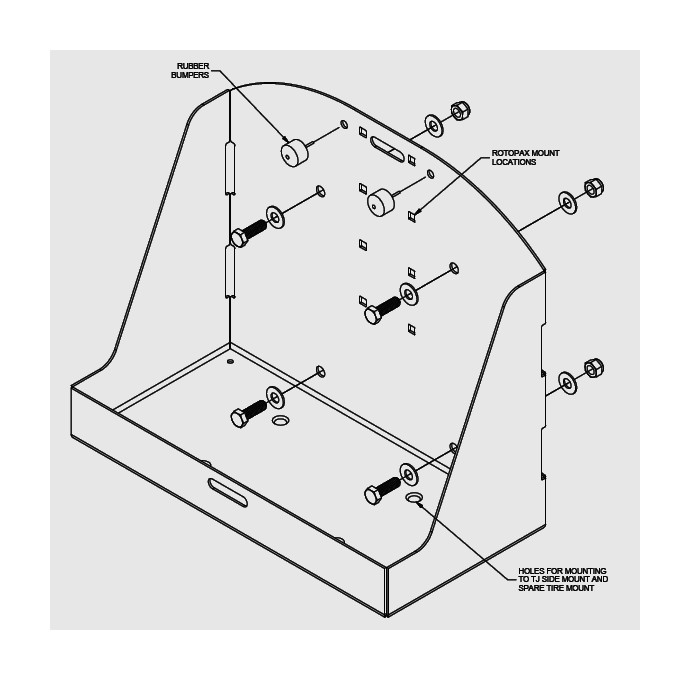
IF BEING USED WITH SIDE MOUNT FOR JK WRANGLER
Use provided hardware to attach tray to the mount in the configuration shown above.
Rubber bumpers and foam rubber pad should be used to protect fuel can and minimize rattling. Use the included ratchet strap to secure the fuel can to the tray.
IF BEING USED WITH A TJ SIDE MOUNT OR A SPARE TIRE MOUNT
Use existing hardware to connect the tray.
If Rotopax mount is to be used, attach Rotopax mount to one of three positions depending on can size.
The rubber bumpers, foam rubber pad, and ratchet strap are not needed when using a Rotopax (JK and TJ).
If using with standard fuel cans, rubber bumpers and foam pad are recommended.
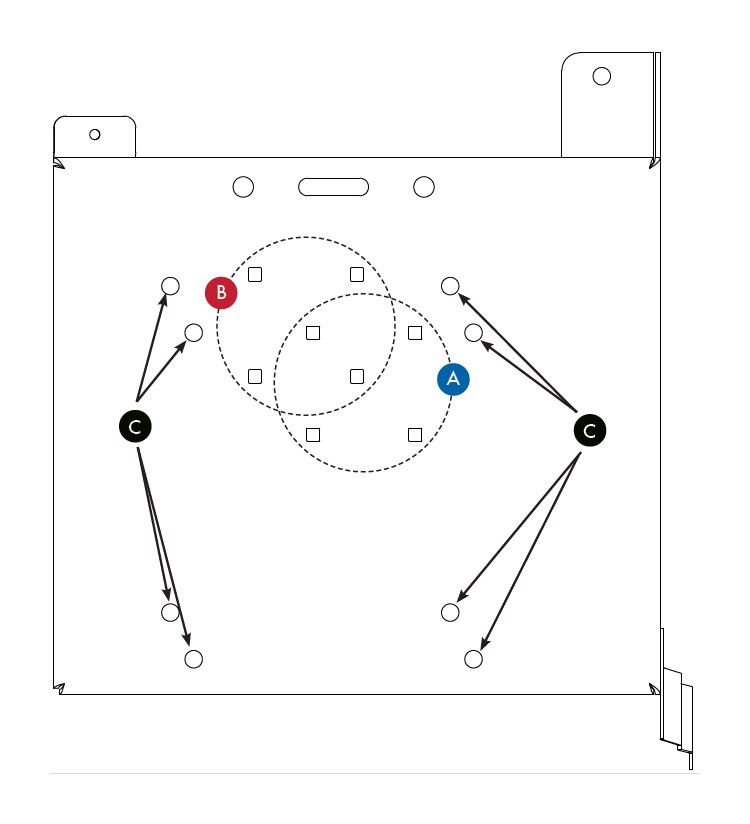
MOUNTING HOLE LOCATIONS
A. Rotopax mount position for 1, 1.75 and 2-gallon containers.
B. Rotopax mount position 3-gallon containers. 1.25” higher and 1.25” further forward than position A.
C. Universal Fuel Carrier Tray mount position: Two sets of mounting holes are provided - some larger fuel containers may contact the rearview mirror when the door is fully open, so before installing the tray to the mount, verify which set of mounting holes is appropriate for the type of container to be carried.
INSTALLATION INSTRUCTIONS (DRIVER SIDE SHOWN)
1. Install Rotopax mount or Universal Tray (both sold separately) to the mount.
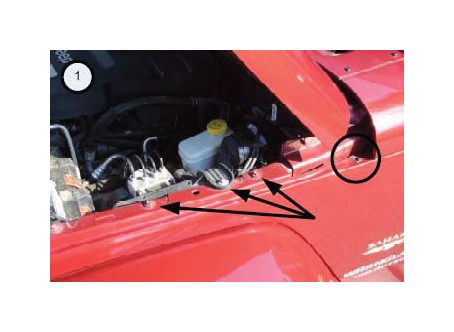
2. The first time the side mount panel is installed, a j-nut needs to be installed in a pre-existing hole in the fender (photo 1). Temporarily removing several of the fender bolts will allow the fender to be moved outward slightly, making it easier to slip the j-nut in place.
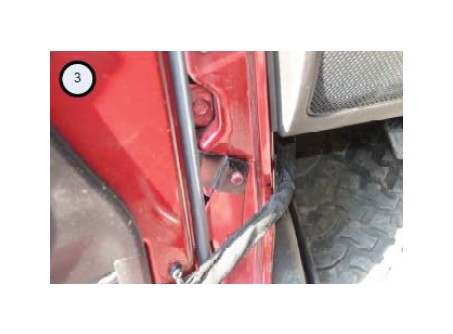
3. Remove the bottom Torx screw from the windshield bracket (photo 2) and the upper bolt of the lower door hinge (photo 3).
4. Position the mount over the three screw locations (on the Passenger side, the antenna needs to pass through the hole at the top of the mount). The door will need to be open to slide the door hinge bracket between the door and fender. Install all three screws loosely at first, and then tighten all three.
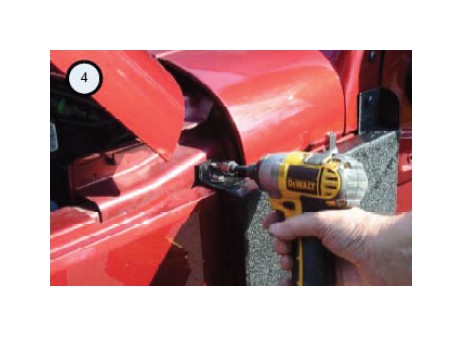
5. (Optional) Installing the self-drilling screw in the bracket hole under the hood using a socket in an electric driver will make the process easy (photo 4). This screw isn’t strictly necessary, but it does improve the overall strength of the mount, so it is highly recommended.
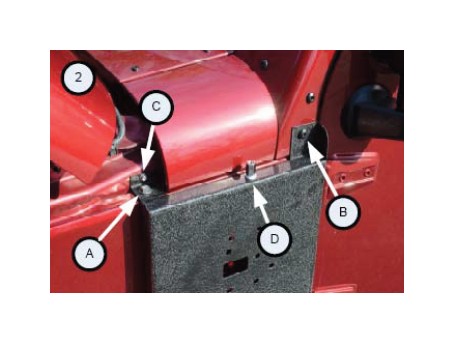
Left: There is an existing hole in the fender into which a j-nut needs to be inserted (circled). It may be necessary to temporarily remove the fender bolts indicated by the arrows, so the fender can be flexed outward slightly to allow clearance for the j-nut to be installed.
A: 5/16 bolt inserted in the j-nut (shown in photo 1)
B: The lower Torx screw on windshield bracket is removed and re-used.
C: Optional self-drilling screw (photo 4)
D: Hole that can be used to mount a CB antenna on the Driver Side. On the Passenger Side, the existing radio antenna passes through this hole.
Left: The top bolt of the lower door hinge is removed and reinstalled to secure the bottom tab.
Removal Instructions: The Side Mount is designed so that it can be easily and quickly removed when carrying extra fuel isn’t necessary - just remove the 3 screws/bolts (or 4 if you’ve installed the optional self-drilling screw). The hinge bolt and the Torx screw should be reinstalled when the Side Mount is removed, and it’s a good idea to reinstall the 5/16" bolt and the self-drilling screw so they don’t get lost for the next time you install the Side Mount.
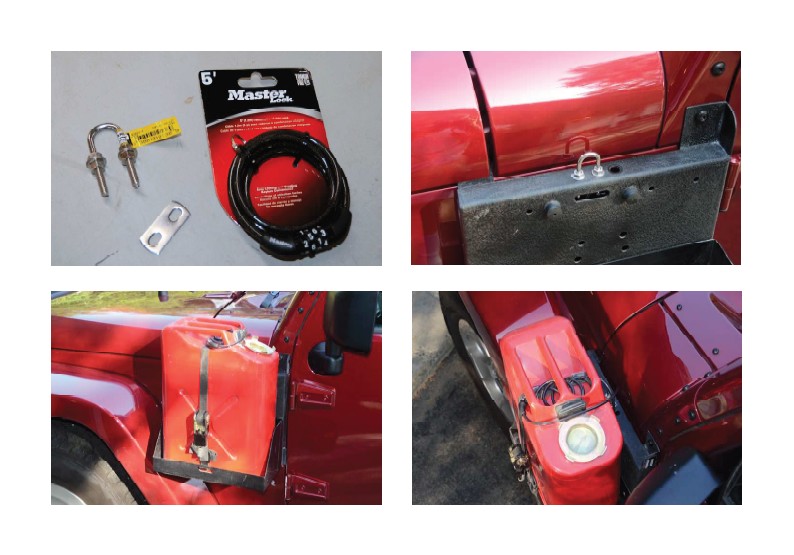
The side-mount comes with an excellent ratchet strap that does a great job of securing the can so that it doesn’t move around or rattle, but it doesn’t have a provision for locking. Here’s a locking solution that can be implemented for about $7 including the lock. It’s an easy DIY project, just requires a drill and a 1/4” drill bit.
Supplies Needed:
• Small u-bolt. A Stanley/National #112 is a good choice, which should be available in most hardware stores for maybe $2.00 with a zinc-plated finish. It’s also available in stainless for about $2 more. This comes with 2 nuts; for this application 4 nuts are required; they’re very common 1/4-20 nuts so most DIY’s would likely have two on hand. It’s also a good idea to use washers, one under each nut.
• Bike lock or chain lock. A Master 8152D combination lock that retails for around $5 is a good choice.
The photo below shows the u-bolt as used, with the extra nuts and washers. The strap that comes with the u-bolt can be used if you like, but is not necessary in this application.
The u-bolt gets installed in the top of the side-mount main frame as shown below. Two holes are drilled, and nuts are placed on both the outside and the inside of the frame and tightened down.
The lock cable is then threaded through the handle of the jerry can and the u-bolt.
The u-bolt is secure because the nuts are inside the main panel of the side-mount and can’t be accessed when the side-mount is installed. The side-mount itself is secure because one of the nuts attaching it to the Jeep is inside the door opening and inaccessible with the door is closed and locked; one of the other bolts is under the hood so if you’ve got a good lock that one’s inaccessible too.