FREE 1 to 3-Day Delivery on Orders $149+ Details

How to Install Mopar Front Off-Road Bumper w/o Winch Mount (07-17 Wrangler JK) on your Jeep Wrangler
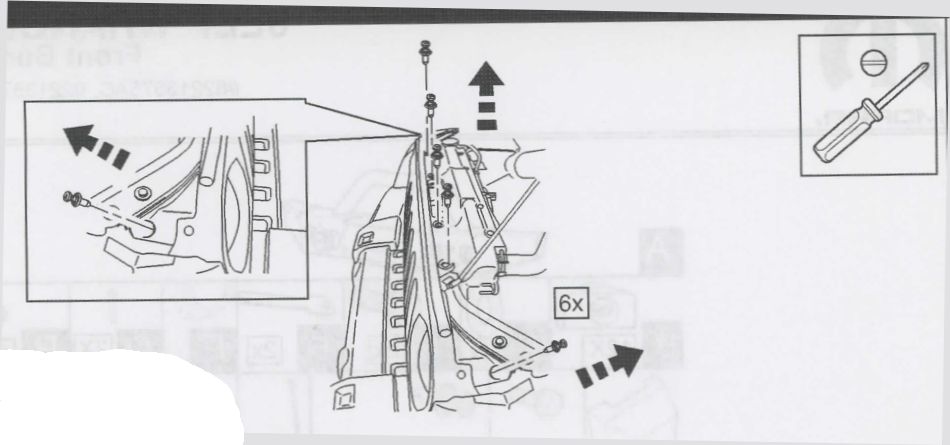
1. Remove grille panel.
1. Remove grille panel.
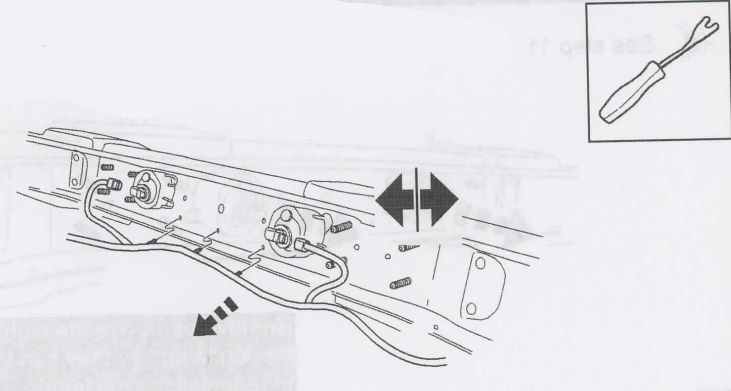
2. Disconnect bulb assembly on each side.
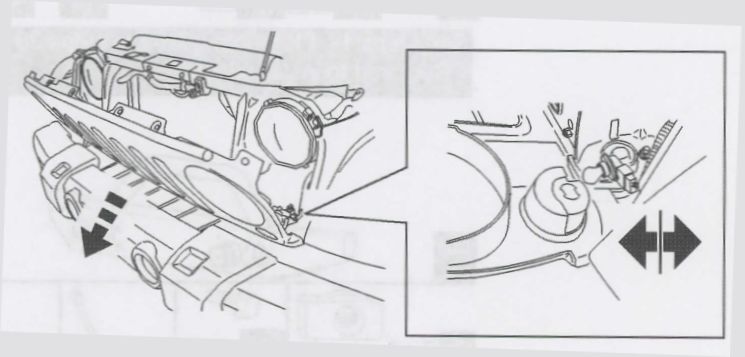
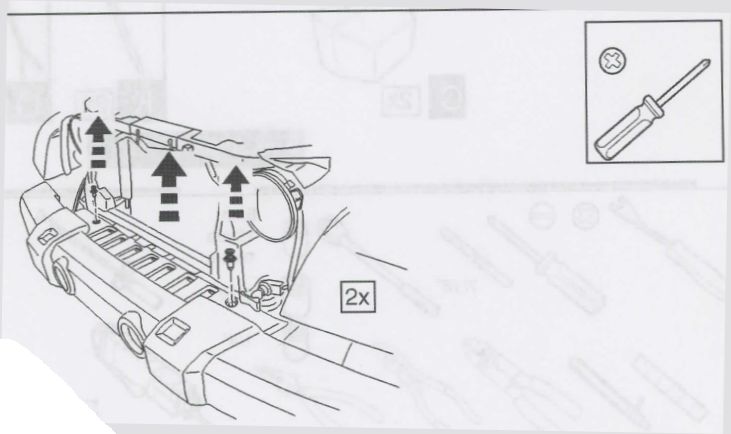
3. Remove bumper applique.
4. Remove lower splash shield.
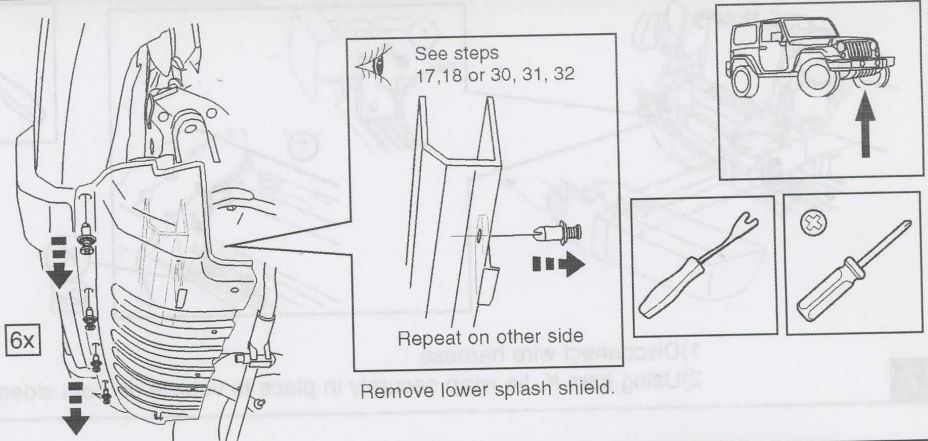
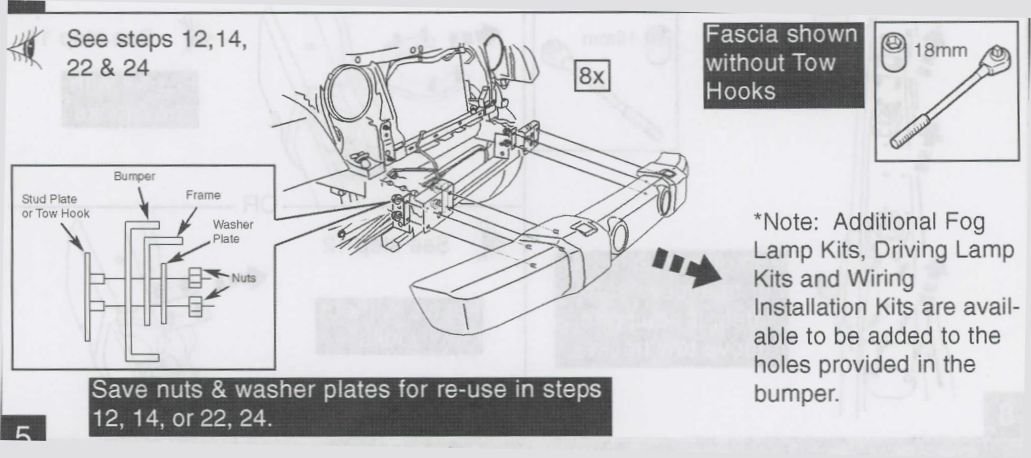
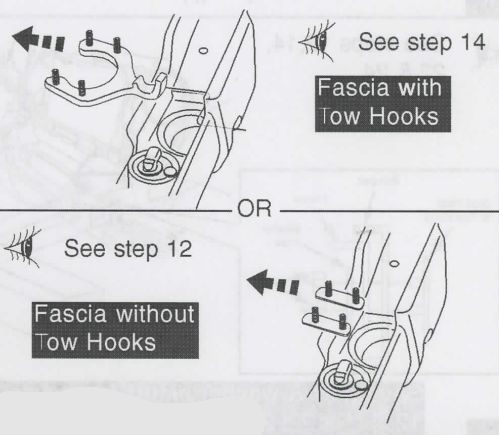
5. See steps 12, 14, 22 & 24.
*Note: Additional Fog Lamp kits, Driving Lamp Kits, and Wiring Installation Kits are available to be added to the holes provided in the bumper.
6. Disconnect harness from fog lamp if equipped and place fascia assembly on the floor.
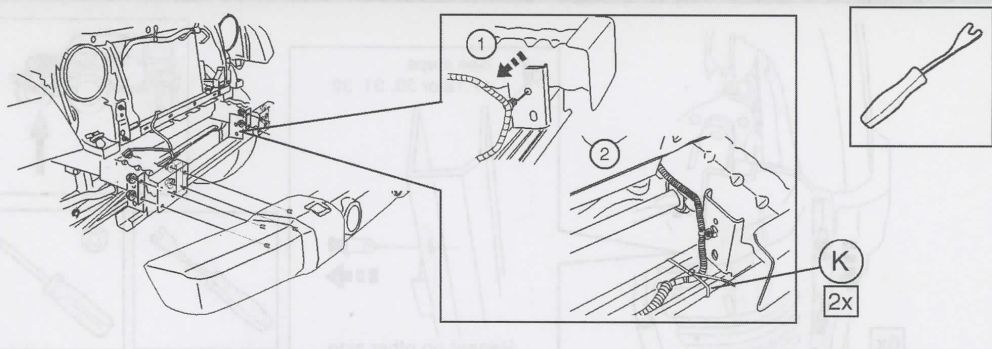
7.
1. Disconnect wire harness.
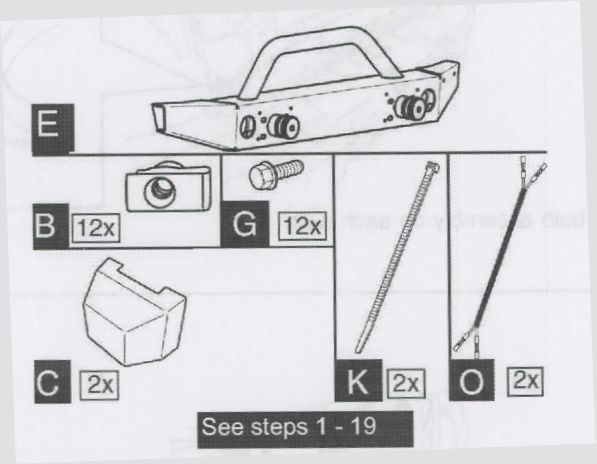
2. Using Item K, tie wrap securely in place to vehicle on both sides.
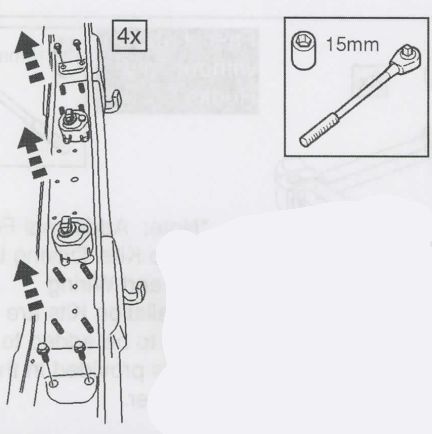
8. Remove the crossmember to access stud plates. If equipped, remove tow hooks.
9. See Step 12. Repeat on other side.
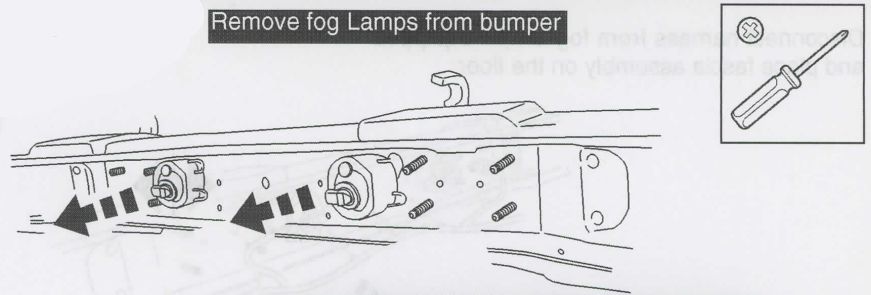
10. Remove fog lights from bumper.
Remove and save the eight fasteners from the fog lamps so they can be reused later to re-install the fog lamps.
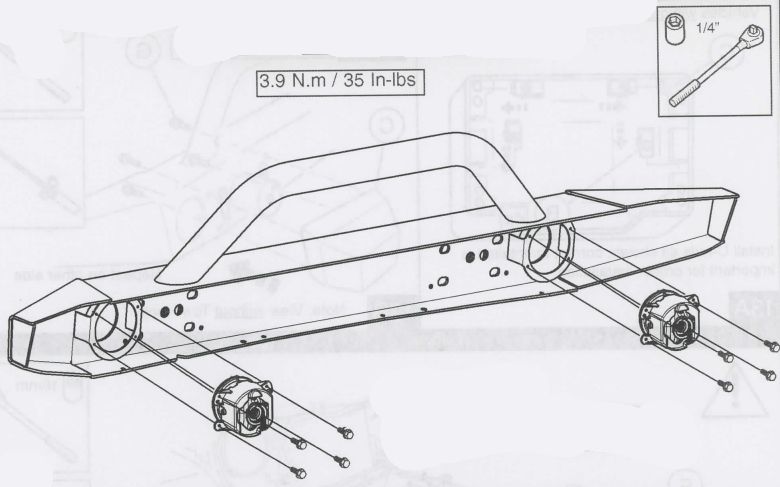
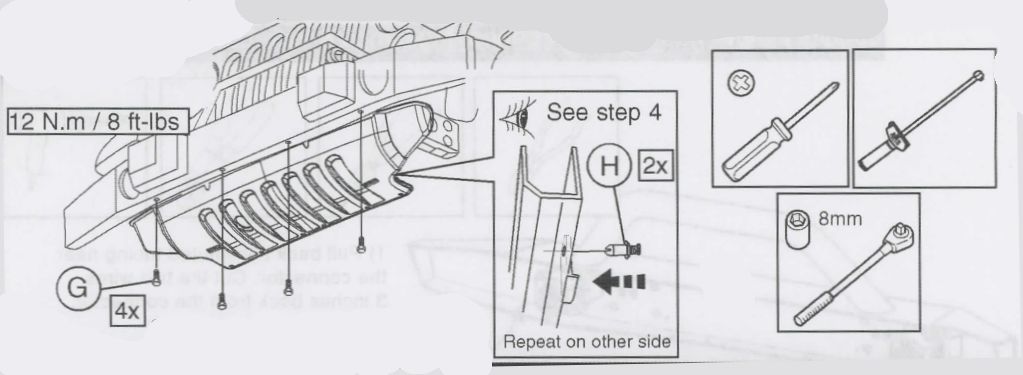
11. Install fog lamps to bumper & torque.
Use the saved fasteners from the previous step.
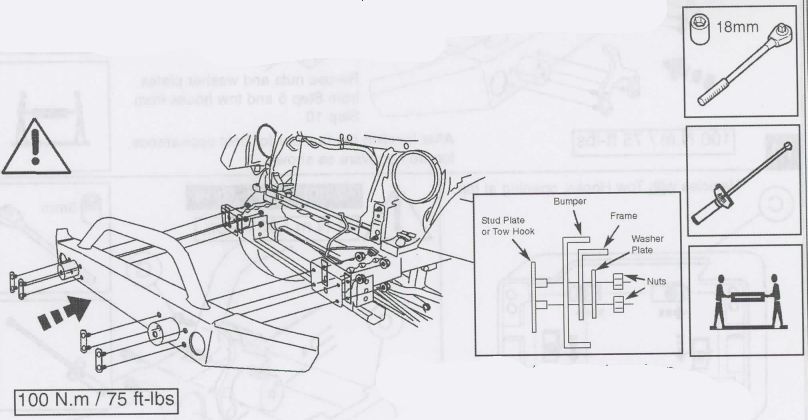
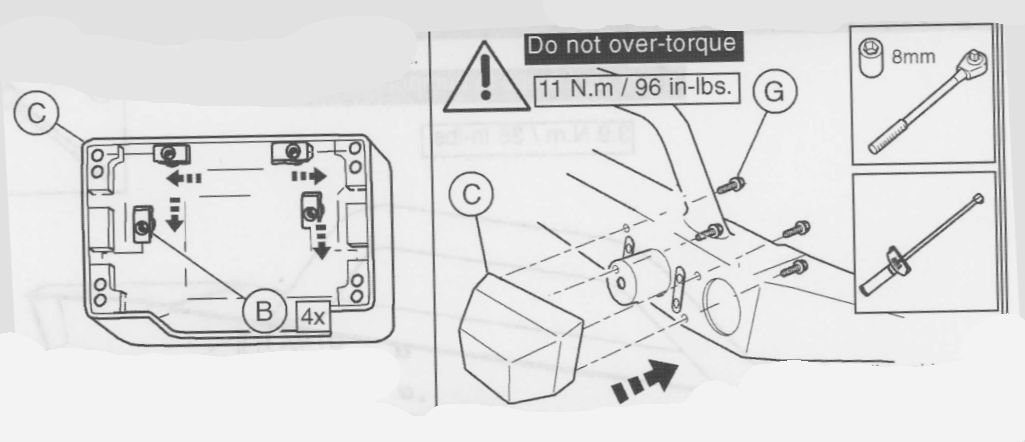
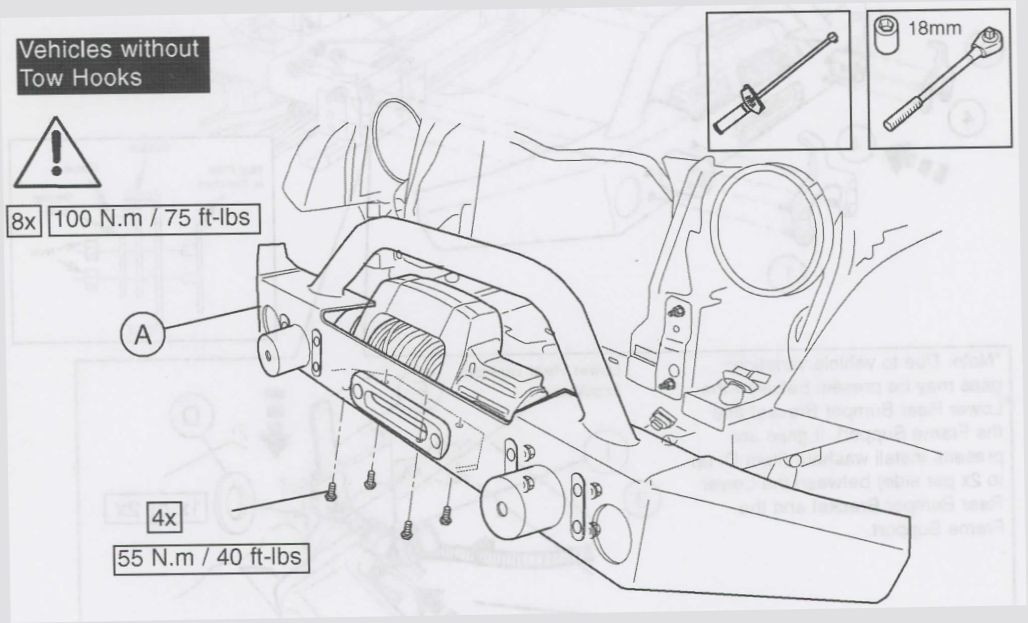
12. Re-use nuts and washer plates from Step 5 and stud plates from Step 9.
After leveling the bumper for best appearance, torque hardware as shown.
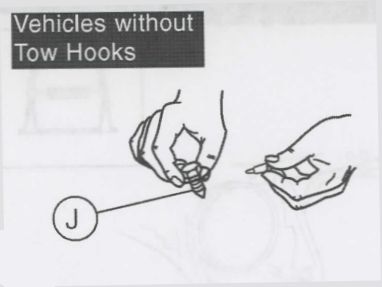
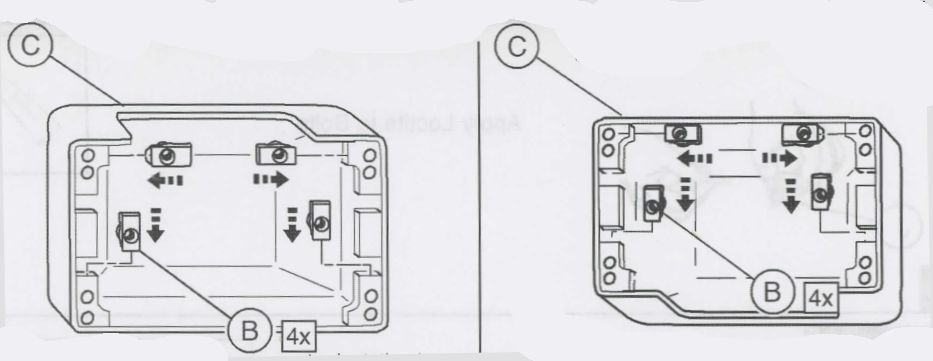
Vehicles without tow hooks, opening at the bottom
13A. Install U-nuts as shown, correct orientation is important for proper installation.
13B. Repeat on other side.
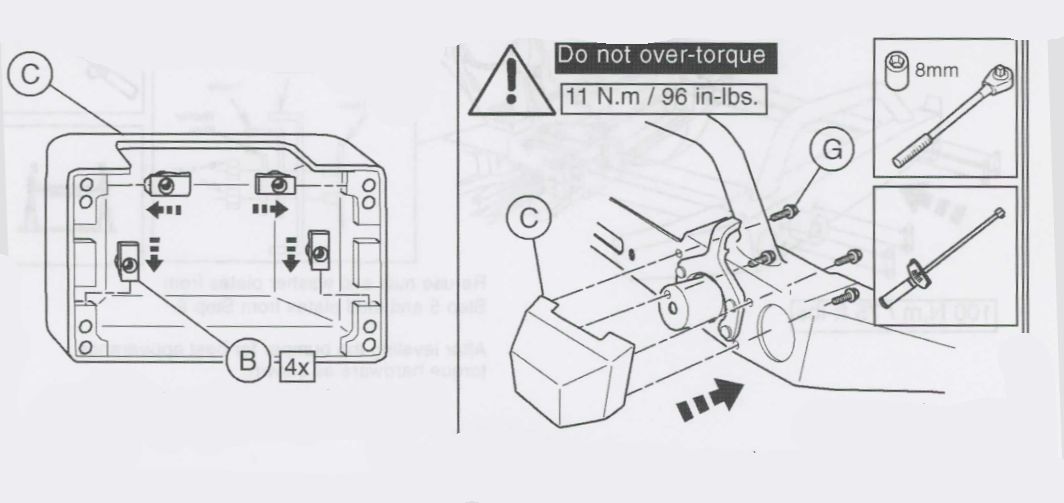
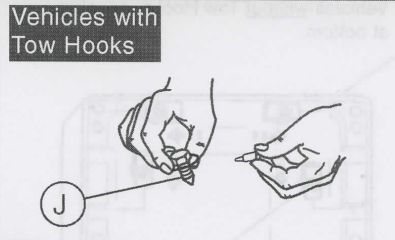
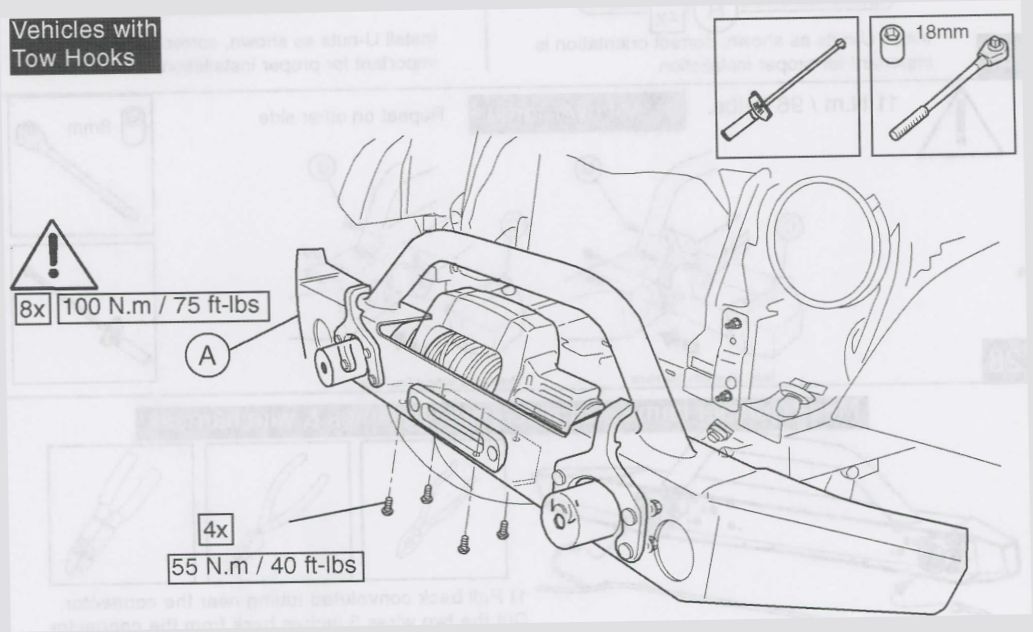
14. Vehicles with tow hooks.
Re-use nuts and washer plates from Step 5 and tow hooks from Step 10.
After leveling the bumper for best appearance, torque hardware as shown.

15A. Vehicles with tow hooks, opening at top.
Install U-nuts as shown, correct orientation is important for proper installation.
15B. Repeat on other side. Note: view with tow hook.
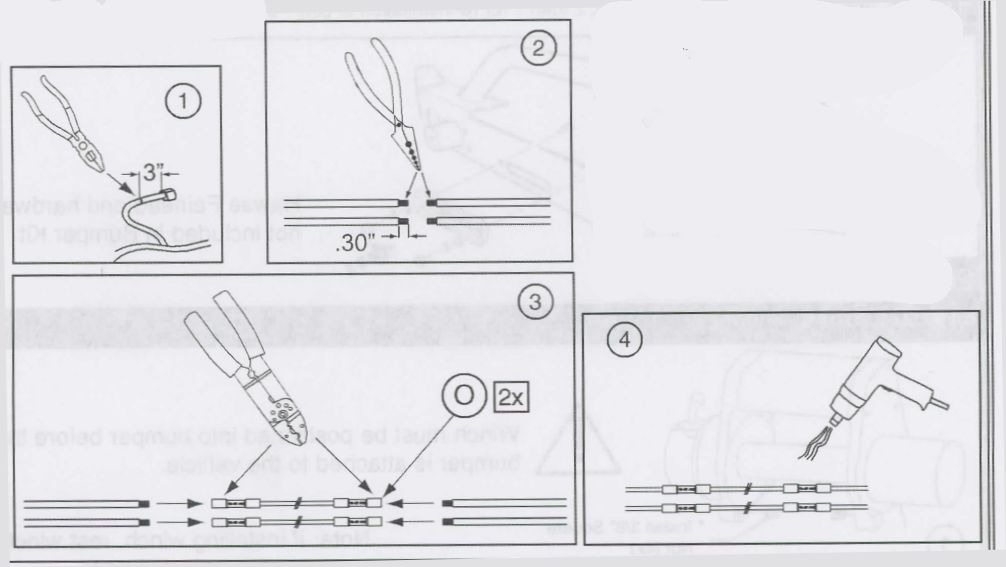
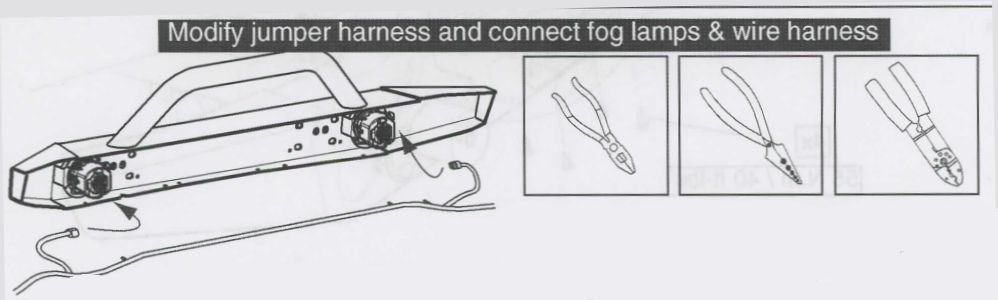
16. Modify Jumper Harness and Connect Fog Lamps & Wire Harness
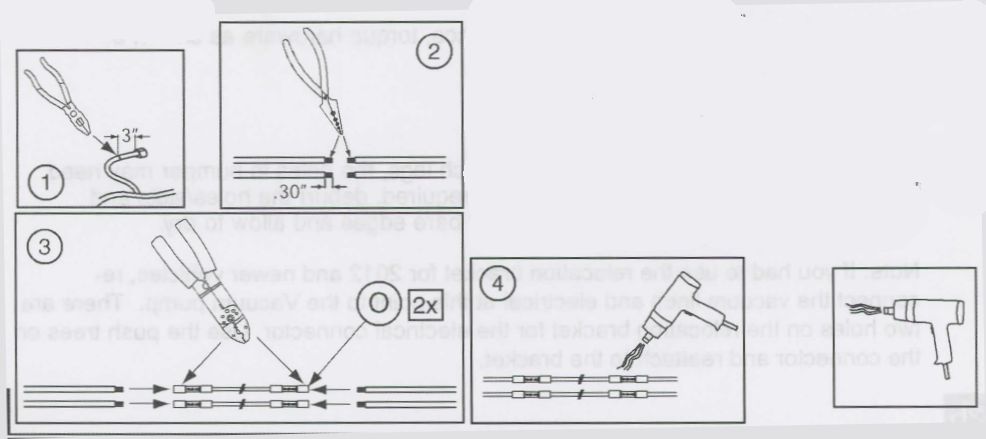
1. Pull back convoluted tubing near the connector. Cut the two wires 3 inches back from the connector.
2. Strip all four wire ends 0.30".
3. Using wire harness (Item O), crimp the White wire on the harness to each stripped end of the White wire on the vehicle harness. Repeat process using the Black wire on the harness and vehicle harness.
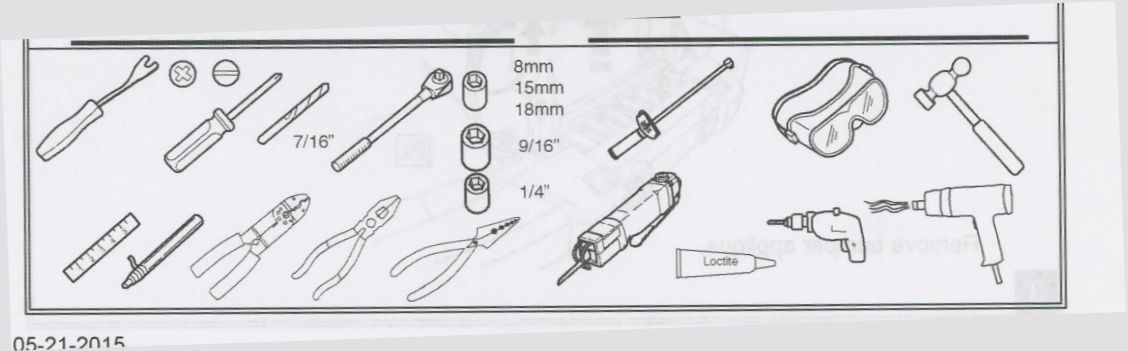
4. Using a Heat Gun, shrink the butt connectors to the wires. Replace any convoluted tubing. Place provided convoluted tubing over the spliced wires.
5. Repeat process for other side of harness.

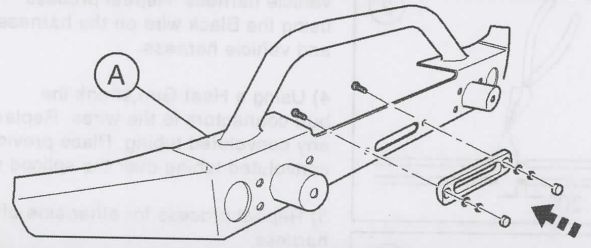
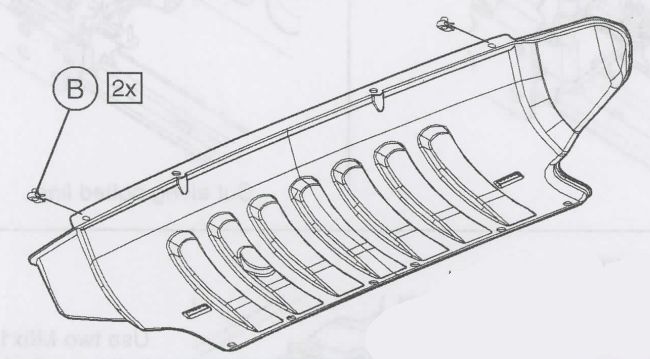
17. Install (4) U-nuts (item B).
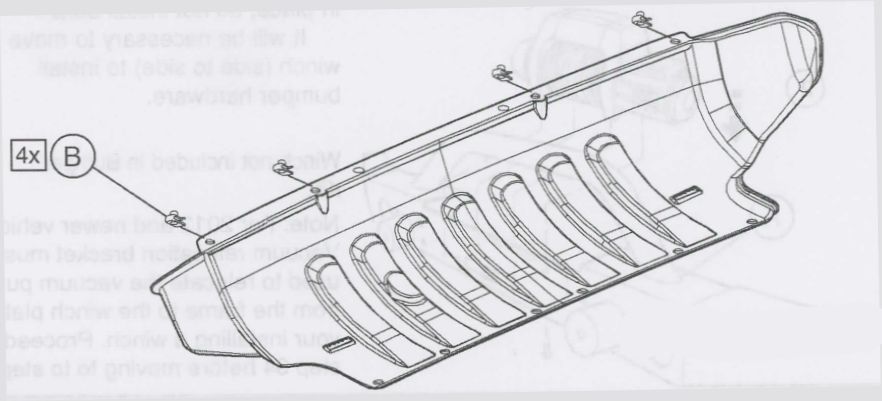
18. Splash shield is designed to be positioned above rear bumper flange.
19. See Steps 1-3. Reverse Steps 3, 2, and then 1 for re-installation of Grille Panel and Bumper Applique.
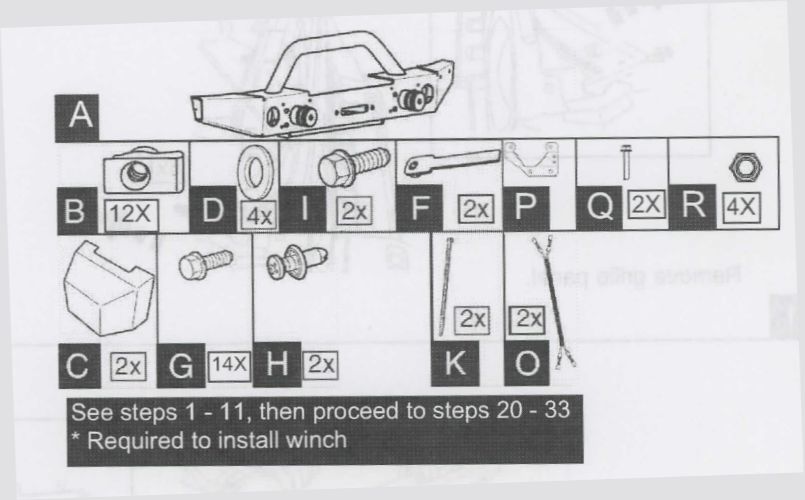
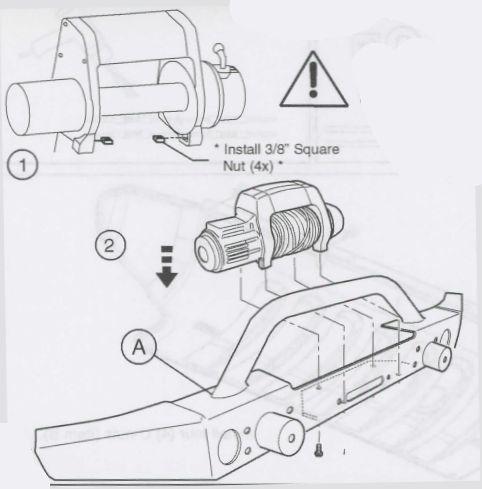
20. Hawse Fairlead and hardware not included in Bumper Kit.
21. Winch must be positioned into bumper before the bumper is attached to the vehicle.
Note: if installing winch, rest winch in place, do not install bolts. It will be necessary to move winch (side to side) to install bumper hardware.
Winch not included in bumper kit.
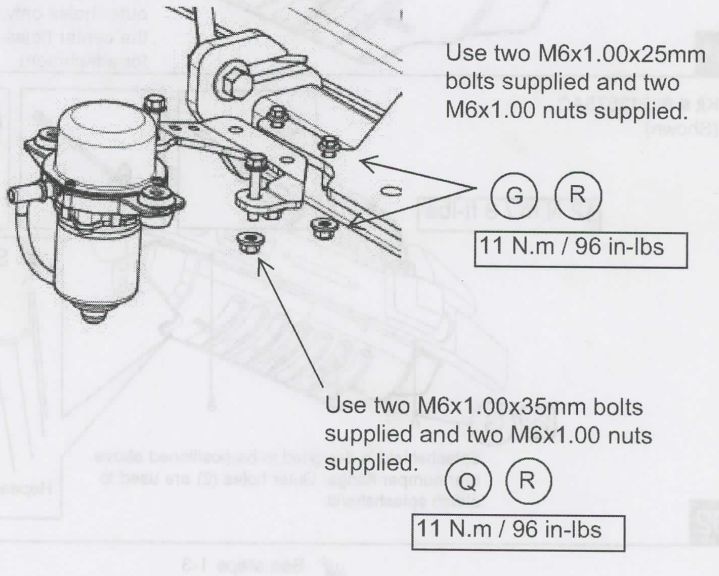
Note; For 2012 and newer vehicles a Vacuum relocation bracket must be used to relocate the vacuum pump from the frame to the winch plate if you're installing a winch. Proceed to Step 34 before moving to Step 22.
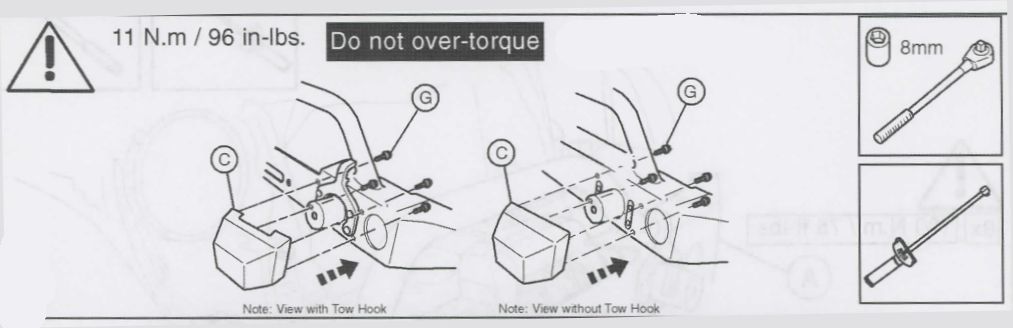
22. Rotate Bumper under frame extension to align lower rear bumper bracket slots to frame support hole (see frame 7) and then loosely install two tow hooks with nuts and washer plates (removed in Step 5). Now loosely install bolts (item I) to handle nuts (item F). Due to vehicle variations, washers (item D) are supplied to eliminate gaps.
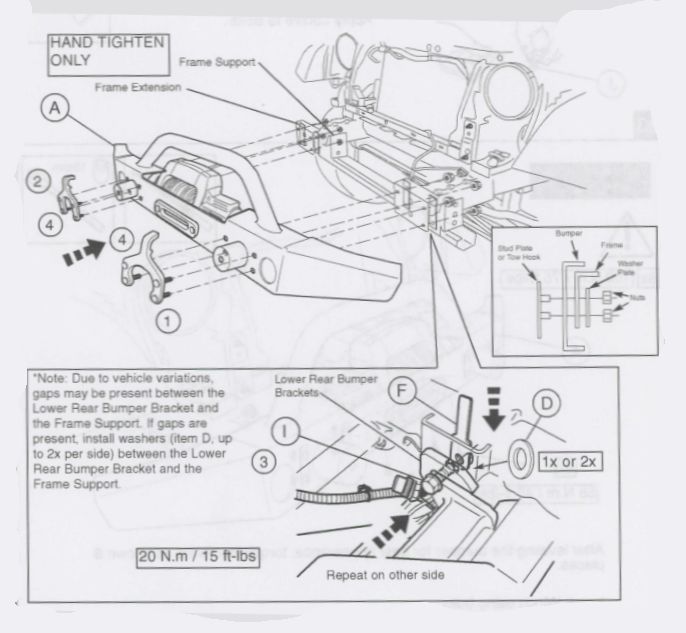
23. Apply Loctite to bolts.
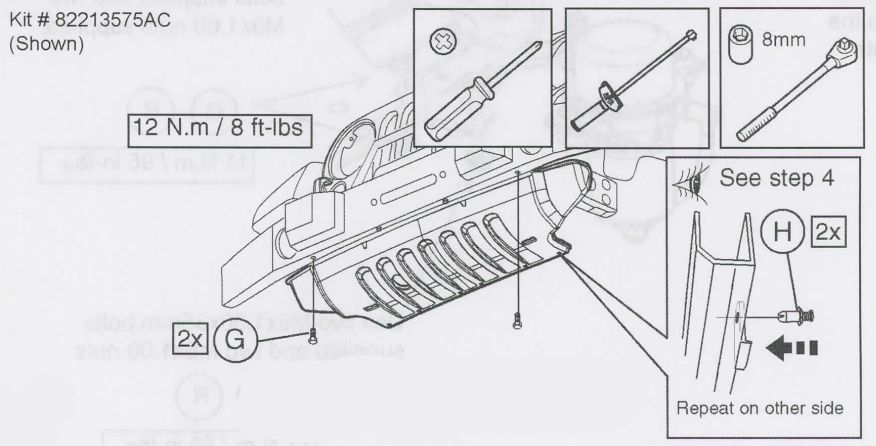
24. After leveling the bumper for best appearance, torque hardware as shown 8 places.
Install Winch using bolts.
Note: If bolts do not align to nuts in the winch legs, the holes in Bumper may need to be enlarged slightly. If this procedure is required, deburr the holes/slots and apply Mopar Rust Inhibitor 82300508 to all bare edges and allow to dry.
Note: If you had to use the relocation bracket for 2012 and newer vehicles, re-connect the vacuum lines and electrical at this point to the Vacuum pump. There are two holes on the relocation bracket for the electrical connector. Use the push trees on the connector and reattach to the bracket.
25. Apply Loctite to bolts.
26.
After leveling the bumper for best appearance, torque hardware as shown 8 places.
Install Winch using bolts.
Note: If bolts do not align to nuts in the winch legs, the holes in Bumper may need to be enlarged slightly. If this procedure is required, deburr the holes/slots and apply Mopar Rust Inhibitor 82300508 to all bare edges and allow to dry.
Note: If you had to use the relocation bracket for 2012 and newer vehicles, re-connect the vacuum lines and electrical at this point to the Vacuum pump. There are two holes on the relocation bracket for the electrical connector. Use the push trees on the connector and reattach to the bracket.
27. Vehicles with Tow Hooks, opening at top.
Install U-nuts as shown, correct orientation is important for proper installation.
Vehicles without tow hooks, opening at bottom.
Install U-nuts as shown, correct orientation is necessary for proper installation.
28. Repeat on the other side.
29. Modify jumper harness and connect fog lamps & wire harness
1. Pull back convoluted tubing near the connector. Cut the two wires 3 inches back from the connector.
2. Strip all four wire ends 0.30".
3. Using wire harness (Item O), crimp the White wire on the harness to each stripped end of the White wire on the vehicle harness. Repeat process using the Black wire on the harness and vehicle harness.
4. Using a Heat Gun, shrink the butt connectors to the wires. Replace any convoluted tubing. Place provided convoluted tubing over the spliced wires.
5. Repeat process for other side of harness.
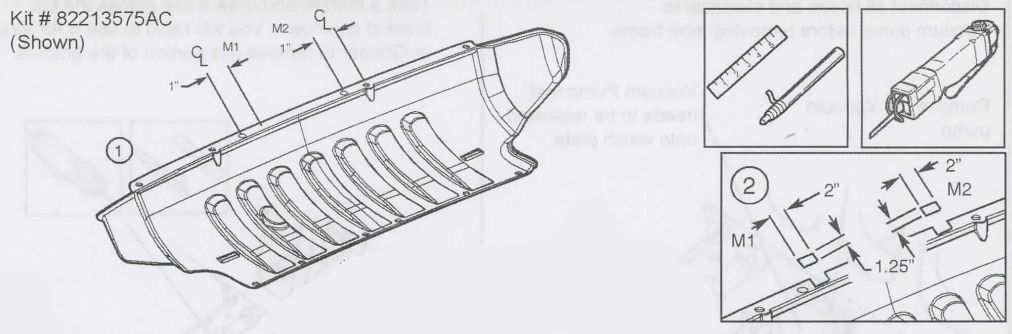
30.
1. Measure 1" inboard from center line of holes and mark locations (M1 and M2).
2. Notch locations 2" wide and 1.25" deep.
31. Install two (2) U-nuts (item B) to the outer only, for the Winch Bumper the center holes do not require U-nuts for attachment.
32. Splashshield is designed to be positioned above rear bumper flange. Outer holes (2) are used to attach splashshield.
33. See steps 1-3.
Reverse Steps 3, 2, then 1 for re-installation of Grille Panel and Bumper Applique.
34. Disconnect all hoses and electrical to vacuum pump before removing from frame.
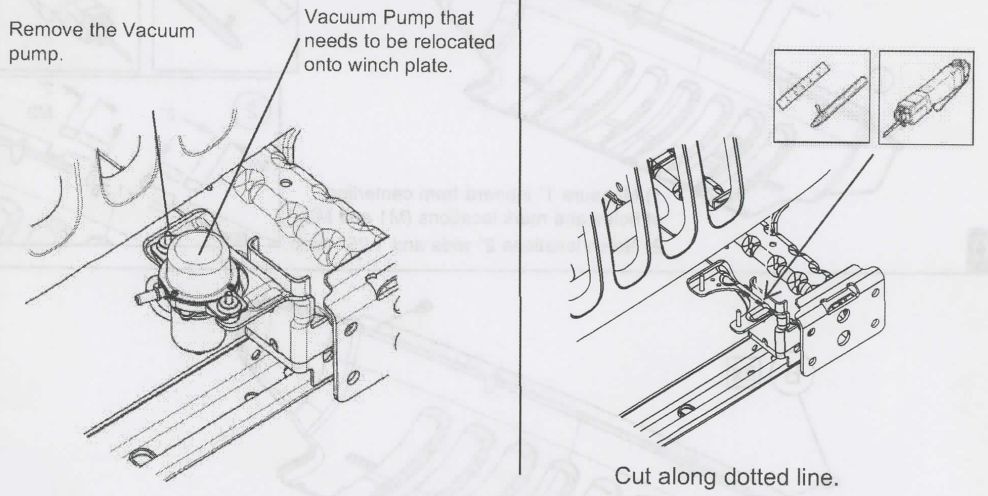
Take a marker and draw a line across the OE bracket as shown. You will need to use an air saw or Grinder to remove this portion of the bracket.
35. *Exploded View for Clarity
Take and install the installation bracket to the winch plate.
Once completed installing relocation bracket and pump for 2012 and newer vehicles proceed back to step 22.
35. *Exploded View for Clarity
Take and install the installation bracket to the winch plate.
Once completed installing relocation bracket and pump for 2012 and newer vehicles proceed back to step 22.