

How to Install MGP Caliper Covers - Jeep Logo Matte Black (07-17 Wrangler JK w/ 18 In. Wheels) on your Jeep Wrangler
Installation Time
1 hours
Tools Required
- 3/8 wrench
- pliers
- .013 feeler gauge (or business card)
For different applications, MGP uses two patented clip types: slot and stud. Each has a different installation procedure.
Instructions for slot-type install are shown below. Instructions for stud-type are on reverse page
IMPORTANT
When installing covers, be sure to keep the steel clips for the front and rear caliper covers separate as they are different. Before starting install, measure the gap between your wheel and the brake caliper. You will need 1/8 inch clearance.

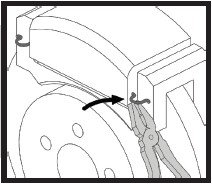
* Some brake pads have retainer wires that may interfere with proper caliper cover installation. Use pliers to bend and atten these wires so that they do not protrude past the front of the caliper. This will not damage or affect your brakes.
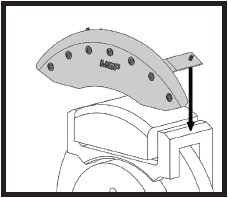
1. Place the caliper cover on the brake caliper. Cover should be centered across the front. Caliper cover bridges should be positioned against the brake caliper bracket.
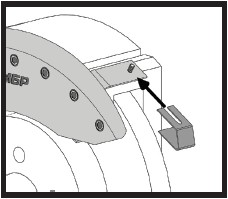
2. Slide the stainless steel clips over the bridges and caliper brackets and around the threaded studs to fasten the cover. Fit should be snug and secure.
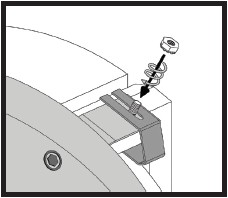
3. Install the supplied locknuts onto the threaded studs to secure clip to bridge. Tighten with 3/8-inch wrench or socket to 25 inch - pounds (about 1/4 turn past finger-tight). Do not over tighten.
4. Use feeler gauge (or business card) to check the clearance between clip and brake rotor. A gap of at least .013 inch (.32 mm) is recommended (enough to slide a strip of business card paper in and out without sticking) . Re-install wheel and tighten lugnuts per manufacturer’s specification.
INSTRUCTIONS FOR CALIPER COVERS WITH STUD-TYPE CLIP
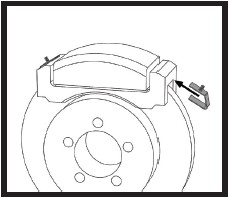
1. Slide the stainless steel clips on each side of the brake caliper bracket. Fit should be snug and secure.
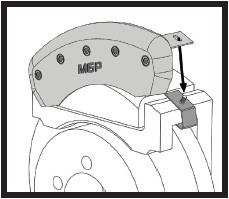
2. Place the cover over the caliper and position hole in bridge over the threaded stud and onto the clip (may require some force to pull second hole over stud).
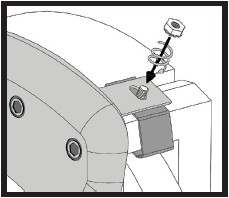
3. Install the supplied locknuts onto the threaded studs to secure bridge to clip. Tighten with 3/8-inch wrench or socket to 25 inch-pounds (about 1/4 tur r-tight). Do not over tighten.
4. Use feeler gauge (or business card) to check clearance between clip and brake rotor (disc). A gap of at least .013 inch (.32 mm) is recommended. Re-install wheel and tighten lugnuts per manufacturer's specification.
Troubleshooting Guide
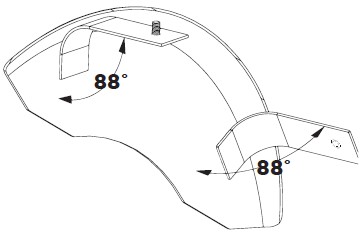
1. Caliper Fitment
Caliper Cover should rest directly against the face of the brake caliper. The installer should verify that the bridges are set to 88° as depicted on image. Installer may adjust as needed.
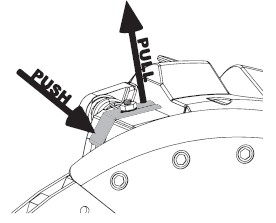
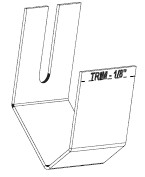
2. Clips Rubbing Rotor
- Use .013 feeler gage to inspect
clearance between clip and rotor.
- Reform bridges to 88° per step 1.
- Manipulate angle of clip.
Trim clip 1/8” maximun.
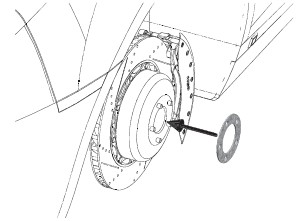
3. Wheel Clearance
- Wheel diameter must meet minimum wheel diameter listed for fitment.
- Wheel weights might have to be moved
inboard if they interfere with Caliper Cover.
- Hub area of wheel near lug nuts is rubbing Caliper Cover. Verify Adjust bridges 88° or contact MGP Tech for more help.
- 3mm Spacer might be required to create space.

