 FREE 1 to 3-Day Delivery on Orders $149+ Details

How to Install MCE Gen II 3 in. Flat Fender Flares - OE-Style Finish on your Wrangler
Tools Required
- Cutting device for sheet metal (reciprocating saw, cut-off wheel, etc.)
- Drill
- Center punch
- 1/4” drill bit
- 13MM wrench or socket (for OE fender-grille bolts)
- 3/8” wrench
- 1/8” Hex wrench (for cap screw)
- Ink marker (for marking cut lines)
Safety First!: When cutting sheet metal, make sure to wear eye protection and gloves at the very minimum of Personal Protection Equipment (PPE). Cut metal can be sharp and rough, and be aware that sheet metal can have a small amount of “spring” to it at the end of the cut. If this is your first time cutting sheet metal, start at a slow pace that you are comfortable with. However, do not fear- with the above PPE and going at your own pace, even your first cuts will look professional.
1. REMOVE THE OE TRIM, FLAIRS, AND HOOD LATCHES
Remove all remnants of the OE plastic flair/marker lights, hood latches, and rubber hood stops. If there are any nut-serts behind the flares, these can be removed as well.
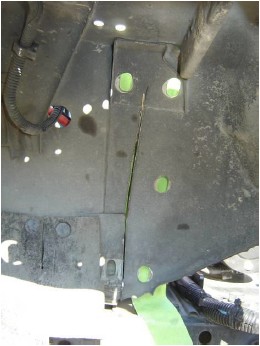
2. REMOVE THE 5 BOLTS HOLDING THE OE FENDER TO GRILLE
Remove the 5 forward bolts that vertically run down the sides of the grille. This will also remove the fender support tube.
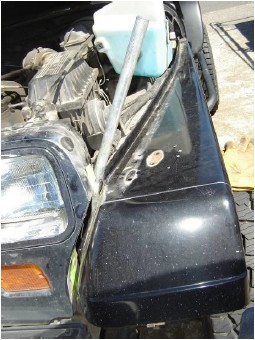
3. MARK YOUR TRIM LINE
Using a pair of scissors, carefully cut out the paper template on the outside edge of the lines (the lines should still be visible on the template once it is cut out). Once the template is cut out, place it on top of the OE Jeep fender so that the hood latch holes line up. The solid line should be touching, or very close to touching, the ridge of sheet metal that separates the inner and out fender. A few pieces of tape will aid in holding the template in place while tracing. Trace along the dotted line. The line can then go straight down to the top corner of the wheel well, or the back edge of the wheel well can be trimmed for more tire clearance.
Also, refer to Fig. 1 & 2 for some examples of how the cut needs to be made. It may be easiest to chop the whole front of the fender off first, before cutting the rest of the fender.
Fig. 1 & 2
4. CUT ALONG YOUR LINES
*NOTE: We strongly recommend pulling the fender out away from the grille about 1” and wedging something (such as a pickle fork) between the fender and grill. Make sure to allow enough space to cut the fender but not the grille. If the fenders cannot be pulled out enough (such as using a reciprocating saw), the fender or grille may need to be removed from the vehicle. Or, the cut could be made along the front edge of the grille, however, the cut edge could be more visible this way.
Using the cutting tool(s) of your choice, cut along the lines which you have just drawn. Once completed, we recommend filing any sharp edges and applying primer paint to the exposed metal surfaces. This prevents rust and makes the job more professional. Be conservative with your cutting. Remember, you can always trim more if needed. Once you are finished cutting, re-attach the bolts that hold the fender(s) to the grille. Note that you will only be using 2 of the 5 bolts now.
5. INSTALL THE RUBBER GROMMET AND SPACER
In the large hole towards the bottom of the MCE fender, push the rubber grommet in place. Once the grommet is in place, push the spacer into the hole so that it is flush on the outer surface.
6. MARK AND DRILL HOLE FOR LOWER BRACKET AND FASTENERS
Install the bracket onto the MCE fender by running the 1” button head fastener through the grommet/spacer, then bracket, and use a washer and nut. Tighten just so there is no more slop, and make sure the side of the bracket which will attach to the Jeep is flush with the edge of the fender. Place the MCE fender onto the OE fender and install the hood latch snugly. Make sure the MCE fender is sitting on the Jeep properly (push inward if needed), then with a pen mark where the hole needs to be drilled. Remove the MCE fender for drilling the hole. However, before removing the fender, mark the rest of the holes. With the fender then removed, center punch the holes and drill to ¼” diameter.
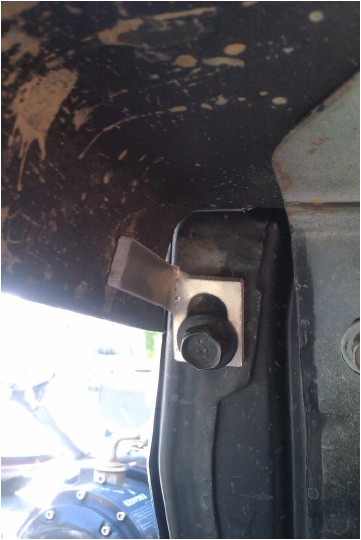
7. MARK AND DRILL HOLE IN MCE FENDER FOR GRILLE BRACKET
(Refer to FIG. 3) This bracket acts as another mount for the plastic, as well as ties the front corner of the fender to the grille for added stability at high speeds. A wing nut is supplied for an option to quickly detach the fender from this bracket for heavy-impact situations off-road, so the fender can easily flex. Due to vehicle tolerances, the hole for this bracket must be drilled into the MCE fender by the installer.
Place the MCE fender back into position on the OE fender. Apply slight downward pressure, if needed, on the inside front corner (nearest the head lights) of the MCE fender, in order for it to sit flat onto OE fender (Sometimes during shipping, the fenders can acquire a slight bow in this area, which will be automatically straightened once the fender is fastened down). Install hood latch if necessary to hold the fender in place. With the fender in proper place, hold the grille bracket in place so that the OE upper grille bolt can be inserted into the larger hole, and install OE upper grille bolt. The bolt hole in the bracket is oversized to provide ample room for adjustability. The surface with the smaller hole should be resting flat against the inside of the front surface of the MCE fender.
*NOTE: The bracket must fit flat against the MCE fender. If it does not, it will preload the plastic in this area and cause it to not look right. Depending on tolerances from vehicle to vehicle, slight tweaking of the aluminum bracket may be needed for proper fitment. Since the bracket is aluminum, this can be done with a pair of pliers, or tap with a hammer, etc. Taking a little extra time here, if need be, will assure a proper fitting and looking MCE fender
With the bracket in proper placement, mark where the hole lands on the MCE fender. Then, remove the MCE fender and drill the hole to ¼”.
FIG. 3
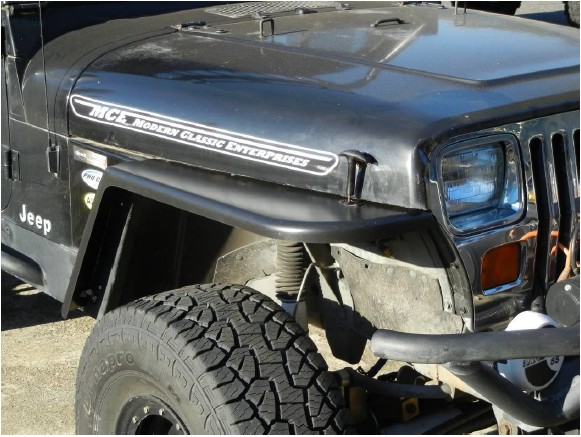
8. INSTALL FENDER
Place the MCE fender back on the Jeep and install the fasteners and hood latch. One of the 1” button head fasteners goes on the lower bracket mount, and the remaining countersunk fasteners go through the top of the MCE fender in the countersunk holes. We recommend that the fasteners are not tightened fully until all of them are installed in order to aid in everything lining up.
Up at the grille bracket, install a ¾” button head fastener through the MCE fender and bracket, so that the nut is on the inside of the fender. The oversized hole in the grille bracket should provide ample room for any last adjustments, if need be, for proper aesthetics of the fender.
9. Install Flare Backing Strip (Optional)
This plastic strip goes on the side of the OE fender, and up against the inside of the MCE flare where it meets the body behind the tire. With the MCE fender sitting on the OE fender, place the backing strip so that it touches the inside of the flare, and slide it down the side of the Jeep until it makes contact with the MCE angle bracket. Mark the location of the backing strip, and remove the MCE fender one last time. With the MCE fender out of the way and the backing strip held in place with your marks, drive in 3 each of the self tapping screws, evenly spaced over the strip.
Fig. 6
Move to the next side and install in the same manner.
Congratulations, you are done!


