Talk to a Gladiator Sales Tech
1-877-870-8556
M-F 8:30A-11P, Sat-Sun 8:30A-9P
Logo Image
$20K Sweeps! 10 Chances to Win! Enter Daily >

Class III Trailer Hitch (20-24 Jeep Gladiator JT)

Item JG2670
Verify parts fit and get product recommendations.
Gladiator Sales Techs: Connect Now M-F 8:30A-11P, Sat-Sun 8:30A-9P
$0.00
Our Price

$183.95 (kit)

FREE Shipping Market Price $212.99 You Save 14% ($29.04) Up to 10% off for Military & First Responders! See Details

Open Box from $110.37

Will this fit your Vehicle?

Select a different vehicle Help?
Update or Change Vehicle
Ship to: Ashburn - 20149
Sorry, please enter a valid US or CA postal code
We're sorry, zip can't be updated at this time.
Recommended Install Shops
How It Works
Install Shops are available near Ashburn - 20149

Add Local Shop Installation

Total cost of service $129.00
    Create a list
    Add to New List

    Saved - View your saved items

    We're sorry. We couldn't save this product at this time.

    or use

      Video Review & Installation

      Merideth: If your 2020 or newer JT Gladiator didn't come with a hitch from factory and you're in search of one, this Class III Trailer Hitch will be a great solution. Now, hitches are great for so many different things like hauling your trailers, equipment, storage racks, bike racks, accessories, and even to use as a recovery point. Now, this particular hitch will be a reliable and a pretty affordable option for the JT owner who wants to keep it pretty simple and needs that ability to carry everything they need with them on their adventures, whether it's every day or just once in a while.Now, this hitch is gonna be perfect for day-to-day towing and hauling, featuring a 2-inch receiver, so the options with this are pretty much limitless when it comes to what you wanna mount up to it. Now, this hitch will be rated for up to 5,000 pounds of gross trailer weight and 500 pounds of ton weight, but keep in mind that the trailer hitch rating is limited to the Jeep's stated capabilities, which this hitch is well within those limits. Nonetheless, this will be reliable, thanks to the SAE safety testing for some peace of mind, and it's gonna have an open back design for cleaning to make sure that this stays in optimal condition.Now, this will be strong with the carbon steel construction and quality welds for strength that you can count on. Now, the hitch will have a co-cured liquid A-coat to prevent rust and corrosion and will have a high gloss black powder coat finish on top, more of a polished appearance, and, of course, a durable outer shell. Now, the best part of all is that this won't require any modification or drilling, but I do wanna mention that this will not come with the wiring harness, but if you are in need of one for whatever you're hauling, we do have those available right here on our site.Now, this kit will come in at about $250, which is right on par for a hitch like this. This, however, will save you a bit of cash compared to some larger options. So, if you like that lower profile appeal, you don't wanna do any drilling, and are remaining within the limits of this hitch rating, then this is gonna be a perfect setup for you. Not to mention, this will hold up incredibly well with the in-depth design and tough manufacturing and testing, making it a no-brainer if you need an easy and reliable way to haul all of your things for your next adventure.Install will be a one out of three wrenches on the difficulty meter, taking you about 30 minutes to get the job done. Now, speaking of the install, one of our customers has installed this on their Gladiator and is gonna walk you through all of the steps in detail. So, that's gonna wrap it up for me. Let's go ahead and jump into the install.Man: The tools needed for the install, now some of these are optional. You have the needle-nose pliers and the flashlight that I found useful when trying to pull the fish wire out of the small access hole underneath. You need a 3/8 ratchet and a 3/4-inch socket, a drill to use your 2-inch circular bit, a torque wrench to tighten down everything, a 1/2-inch hex socket to tighten the large 3/4-inch bolt. And if you do end up using an impact driver to help tighten everything, then you'll want one of these impact to 3/8 drive adapters. And that is everything you will need.This is the CURT trailer hitch install on your 2020 and newer Jeep Gladiator. The first step is going to be taking your 2-inch hole saw and drilling into your stock bumper. I'm gonna get a little closer and show you what I mean. There's a small dimple in the center of the bumper right here, and that's where your pilot bit goes and then you're drilling out this circular hole. Maybe drill a little more slowly than I did. As you see, the bumper goes pretty fast. Now you have this hole that your large bolt will go in.It's going to be using the included fish wire to fish a bolt and spacer through the side of the frame and out the bottom so you can access your bolts. You'll do that by threading the bolt into the fish wire, like so, and then fishing the fish wire through the spacer. And then just put a little kink in the fish wire to keep it separate from the bolt.So, you're going to be going through this access hole and you'll be fishing it this way and out right here. There's two small holes, I don't know how well you can see them. There's two small holes in the bottom of the frame that the bolts will pop out of. So, we're going to fish the fish wire through this hole, and it is going to come out over here. I find something helpful is to stick your pinky finger or whatever finger is smallest into the hole, and you can kind of feel the fish wire coming through so you don't pass it or pass the hole, I mean. So, let me see if I can feel it coming by.Something that's also helpful is a flashlight sticking up through the hole from the bottom. It helps you identify the wire as it's passing so that you don't overshoot it. So, it is right... I'm very close. And you're just kind of fishing here. There's nothing too fancy you can do, unfortunately.Here's an idea I just had. Fish the other wire up through the bottom, and then when it pops out of the frame rail, you can twist the front of your guide wire to it. I'm just going to do, like, a little simple X-type twist. You should only need one or two wraps max. And then you can pull, and then, hopefully, it'll help us to get the wire we're looking for. And it did.So, we now have our guide wire sticking out of the correct hole, which is what we wanted. I'm now going to use the kink I made in the line to separate the spacer from the bolt, like so, and then like so. And then I'm going to slowly pull the bolt and the spacer through the hole, and they should come out this hole where I am over here. You may need to use the flashlight again for this part.So, now you have the spacer through the hole and the bolt is sticking out at the bottom. Just be careful to not lose it. You don't want to knock it back up into the frame. So, my advice here is as you're pulling off the fish wire, and by that I mean you're just pulling and unwrapping the fish wire from the bolt, but my advice would be to go ahead and thread on your nut just a few turns while you do the other side to ensure that you don't lose the bolt in the frame rail because you'll never get it back.So, now we're going to take the other fish wire and thread the bolt into it as we did the first time, like so. And then we're gonna do the same thing with the spacer. Thread it up through. And then we're just going to add a little kink at the end close to where the bolt is but not on the bolt, and this will keep the spacer separated by just a little bit, just like this. It'll just keep the bolt separated just a little bit as we pull it through the frame. Push out of the hole in this side and then twist with our guide wire. I'm going to use needle-nose pliers here actually to help with the twisting of the wires so that, hopefully, we don't get another issue like last time where it comes apart. So, I just got it twisted two or three times there. I'm gonna do it one more time with my needle-nose pliers.And now I'm going to pull through, and we should have the same result as we did on the other side where we get our fish wire to come out. And here I can see it's very close. So, I'm going to grab it this time with the needle-nose pliers. We did get it through. So, now I'm going to put the spacer up at the kink that we made, just like last time, and then we're going to feed it a spacer first, very slowly, then the bolt through this hole, and we'll pull it out of this one, this side, just like this.So, now I'm going to grab the hitch. I'm going to reset the camera. So, the hitch assembly is going to slide right here, up, and those bolts are going to go in these two holes. The nuts are going to go on the bottom, and then your larger bolt, which is this one, is going to thread into the top through the hole that you drilled in your bumper earlier. So, I'm going to start by carefully undoing this fish wire so as not to lose the bolt in the frame. I may even actually just use this needle-nose to hold it just to ensure I don't lose it. And now I'm just unwrapping the fish wire.Now I'm going to remove the nut from the other side. And again, you want to be very careful to not knock the bolts up into the frame because you will never get them out. So, I'm going to just very gently start to raise this through the bolts. And as soon as I can, I'm going to begin threading one nut. So, I got one on one side and I'm gonna thread this other nut while supporting it with my hand. And again, just very gentle here to get the nut started, and then you can snug it up by hand. And that space in there is what's keeping the nut from spinning.So, now I'm going to take my large bolt. And you'll see on top it is lined up. Just kind of get that started by hand. And then you'll want to use your 1/2-inch hex socket. I'm going to use an impact to get this snug up the best I can and then use a torque wrench to tighten it down. So, this is snug. Now I'm going to go and snug up these bolts. For that, I'm going to use a 3/8 ratchet and 3/4-inch socket. Now that side is pretty good. Get this side. One more over here. All right. I'm going to hit this top bolt one more time with the impact. I'm not going anywhere.Finally, you want to torque your bolts. The spec for the large 3/4-inch bolt is 320 foot-pounds, the 1/2-inch bolts on the bottom are 110 foot-pounds. So, the 3/4-inch socket is going to be the 1/2-inch bolt. So, I'm going to use my torque wrench here and set it to 110 foot-pounds. So, this will be pretty snug, one. And check this one one more time, and that's two. I do not have a torque wrench that goes to 320 foot-pounds for the large bolt up top, but you would follow the same procedure. So, I'm gonna set my wrench to 150 foot-pounds, which is the most it will go to, and then give it a rip on the top and see if I can make it go any further. So, that's 150. I'm going to see if I can get any more than that. And that is as tight as I can get it, but if you wanted to get closer to spec you could purchase a torque wrench that had a 300-foot-pound capacity. That will complete the install.Merideth: So, that's gonna wrap it up for my review and the install of this Class III Trailer Hitch, fitting all 2020 and newer JT Gladiators. And remember, for all things Jeep, keep it right here at extremeterrain.com.

      Product Information

      Features, Description, Reviews, Q&A, Specs & Installation

      Features

      • Class III Trailer Hitch
      • Enables Proper Towing Function
      • Allows Use of Multiple Hitch Accessories
      • Maximum Gross Trailer Weight Capacity of 5,000 Pounds
      • Maximum Tongue Weight of 500 Pounds
      • Standard 2-Inch Hitch Receiver Design
      • Open Back Design for Easy Maintenance
      • Sturdy Steel Construction
      • Multi-Step Gloss Black Powder-Coat Finish
      • Hassle-Free Installation
      • Sold Individually
      • Made in the USA
      • Fits All 2020-2024 Jeep Gladiator JT Models

      Description

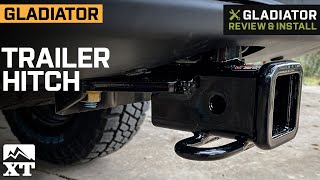
      Maximum Towing Capability. If you’re looking for a trailer hitch to replace your damaged or worn out factory counterpart, then this Class III Trailer Hitch is just for you. This trailer hitch combines an OE design and sturdy all-steel construction. The result is a hitch assembly that offers a gross trailer weight rating 5,000 pounds and a tongue weight capacity of 500 pounds. This allows you to tow a standard trailer as well as other accessories like bike racks and basket carriers. Moreover, this component features an open back design which makes for easy maintenance.

      Sturdy Build Quality. This trailer hitch is made from high-grade steel, providing exceptional durability. This component is then precision-fabricated and fully welded for added rigidity and an accurate fit when installed. Finally, this hitch is treated to a liquid Bonderite coating before being finished in a durable black powder coating for maximum rust resistance and sleek looks.

      Hassle-Free Install Procedure This trailer hitch is designed to mount onto factory locations on your Jeep. Minor drilling may be necessary to affect a proper fit. Other than this step, installation is a relatively hassle-free procedure that requires just standard hand tools to complete.

      Application. The Class III Trailer Hitch fits all 2020-2024 Jeep Gladiator JT models.

      Fitment:

      Details

      CA Residents: WARNING: Cancer and Reproductive Harm - www.P65Warnings.ca.gov

      Installation & What's in the Box

      Installation Info

      What's in the Box

      • (1) Hitch Assembly
      • (1) Cap Screw
      • (2) Flange Bolts
      • (2) Hole Spacers
      • (2) Flat Washers
      • (2) Fishing Wires
      4.9

      Customer Reviews (31)

        Questions & Answers

        10 More Questions

        Will It Fit My Gladiator

        • 3.0L V6 EcoDiesel - 23
        • 3.6L V6 - 23