 FREE 1 to 3-Day Delivery on Orders $149+ Details

How to Install a Hyline Offroad Standard Tire Carrier Assembly on your 2007-2017 Jeep Wrangler JK
Installation Time
1 hours
Tools Required
- 13mm Socket
- 3/4" Socket
- 1/2" Socket
- 9/16" Socket
- T20 Torx Bit
- Grease Gun
- Lithium Grease
- 1/2" Wrench
- 3/4" Wrench
- 7/16" Wrench
- Wire Cutters
- 5 lb. Hammer
- Or Heavy Duty Vise
Congratulations on your purchase of the Hyline Offroad Gen II Swingout Tire Carrier. Our Products are completely manufactured in our facility located in Perkasie, PA. They are designed and engineered by Offroad enthusiasts just like you to be rock solid at an affordable price. Hyline Offroad would like to thank you for your recent purchase and look forward to serving you in the future.
- Hyline Offroad Staff
PLEASE READ INSTRUCTIONS BEFORE BEGINNING INSTALLATION
Generation II Swingout Tire Carrier Installation
Step 1 – If you have not already installed your Hyline Offroad Rear Bumper that accepts this tire carrier please do so using the Installation Instructions for P/n JK-20SRB(T).
***BEFORE INSTALLING TIRE CARRIER ON THE BUMPER ***COMPLETE STEPS 2 & 3
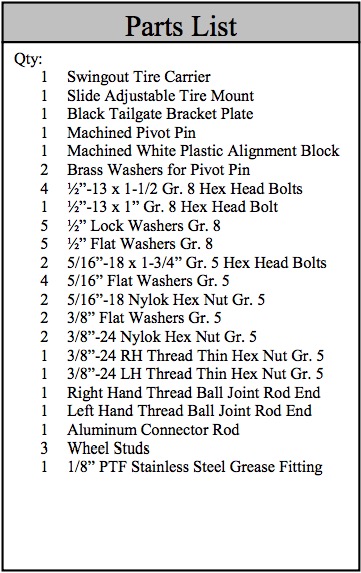
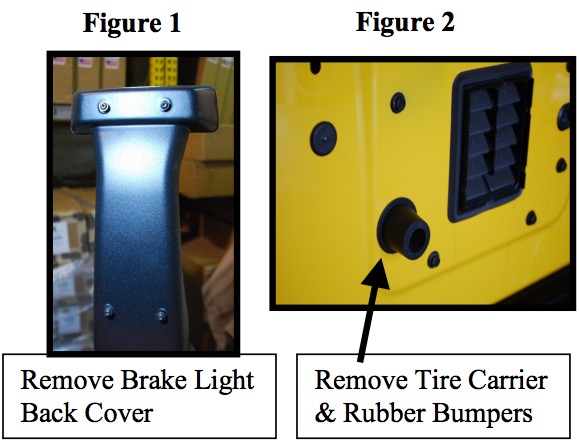
Step 2 – First remove the Brake Light Back Cover by unscrewing the 4 torx screws using the T20 bit (Fig.1) & unplug wires. Wires should hang freely. Then, remove the stock Tire Carrier by unbolting the eight bolts using the 13mm” Socket. Then remove the 2 black rubber mounts that the stock tire pressed against. These remove by simply pulling them away from the body on an angle. (See Fig.2)
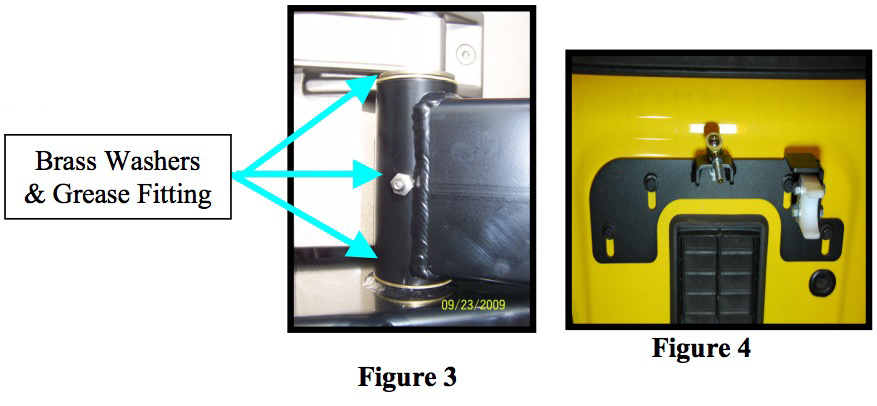
Step 3 – Install the Stainless Steel Grease Fitting using the 7/16” Wrench. The grease fitting has pipe threads which are tapered to obtain a leak free seal. Because of the tapered threads you may not be able to completely screw in the grease fitting. Note: Location of fitting might vary from picture in Figure 3.
Step 4 – Install the supplied tailgate bracket using 4 bolts that were previously removed from stock tire carrier (Do Not Tighten Yet). Install Rod End Fitting using one 3/8” flat washer & 3/8”-24 hex Nut & tighten. Also install the white plastic Alignment block using two-5/16” bolts, four-5/16” flat washers & two-5/16” hex lock nuts.
Note: Two Plastic Alignment Blocks have been provided. Use whichever block works best to align swingout carrier parallel to the tailgate. Typically 2012-Present JK’s will use the shorter block.
***INSTALL TIRE CARRIER ONTO BUMPER***
Step 5 – Apply a thin layer of quality white lithium grease onto the entire shaft of the Pivot Pin before inserting into Tire Carrier. Insert the Pivot Pin through the Tire Carrier tube with the keyed end facing down. Make sure you have installed the Brass Washers properly. (Refer to Figure 3). With the Pivot Pin protruding through the Tire Carrier tube you can now slide the Pivot Pin down inside the bumper tube. The keyed notch on the Pivot Pin will slide into the cutout in the bottom of the bumper tube. Once you have the Pivot Pin seated properly you can now install the supplied ½”-13 x 1” Gr 8 Hex Head Bolt, Lock Washer and Flat Washer up through the bottom of the bumper and thread into the Pivot Pin.
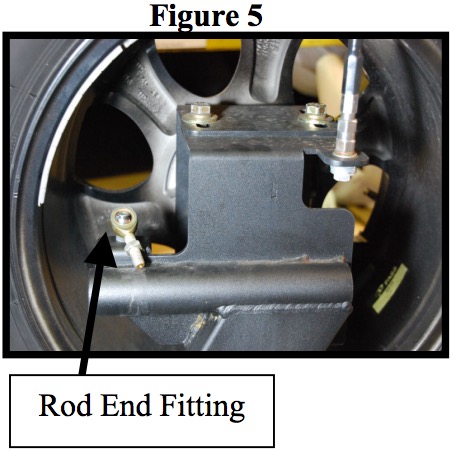
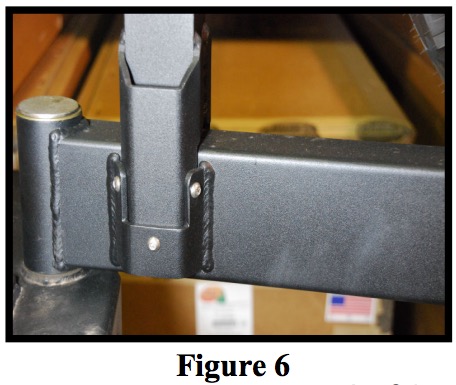
Step 6 – Install the other Rod End Fitting onto the Tire Carrier & tighten. (Fig. 5) Now is also a good time to install the Accessory Holder Bracket if you purchased one. (See Fig.6 & Install Instructions for JK-20AM)
Step 7 – Now Install the 3 Wheel Studs into the Slide Adjustable Tire Mount. Make sure you place wheel studs in the correct holes for your hole pattern. You can use either a mechanical press, hammer or bench vise to install the wheel studs.
Install the Slide Adjustable Tire Mount to Tire Carrier using the four supplied ½”-13 x 1-1/2” Gr 8 Hex Head Bolts, Lock Washers and Flat Washers.
DO NOT TIGHTEN BOLTS YET
Install your spare tire. With the tire installed you can now adjust the sliding mount to the best position for your size tire. Once the position is set, Tighten all four bolts. Note: Tire should be tight against swingout base arm. This will help to keep the tire from vibrating.
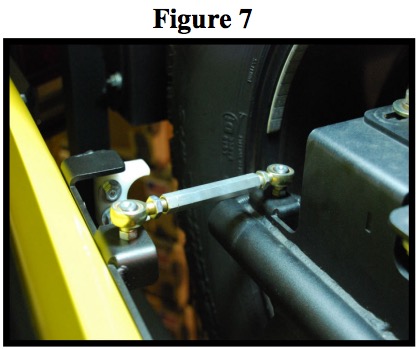
Step 8 – Install the 3/8”-24 Thin Hex Nuts onto each Rod End Fitting & Assemble the Aluminum Connector Rod to End Fittings. Note, the connector rod and end fittings are machined with right and left hand threads. They can only be assembled one way. Just start the threads into the connector rod in this step. (See Figure 7)
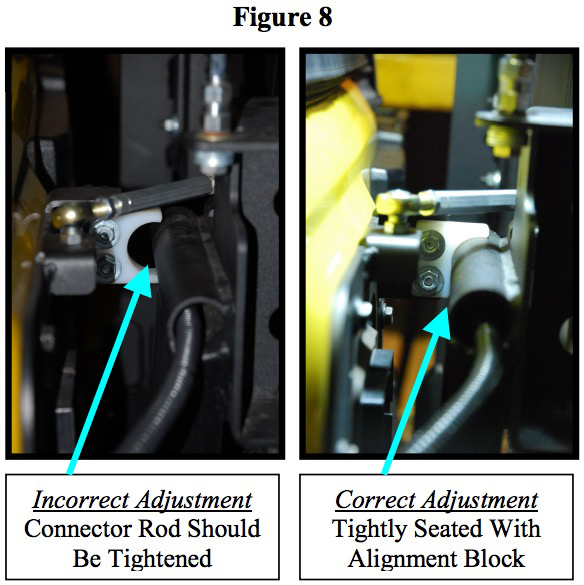
Step 9 – With the tailgate in the closed and latched position, you can turn/tighten the connector rod until the Tire Carrier draws in tight to the plastic alignment block. You can adjust the alignment block up or down in order for it to align with the round tube on the Tire Carrier. (See Figure 8 For Proper Tightening)
Step 10 – Tighten 5/16” bolts in Alignment Block & tighten 3/8” thin hex nuts against the connector rod. This will keep the connector rod from unthreading. You can also tighten the four Tailgate Bracket bolts.
Step 11 – Use a Grease Gun with quality White Lithium Grease sold at almost any automotive or hardware store. While pumping in grease, continually rotate the tire carrier as far closed and open as possible. This will help spread the grease evenly throughout the Pivot Pin. From time to time you will need to re-grease the Pivot Pin. Doing so will prolong the life of your tire carrier.
***After Driving a couple days, Check All Bolts and Connections Re-tighten As Necessary***
Send your OFFROAD pictures to [email protected] . If we choose any one of your pictures to be used on our website, We send you a FREE Hyline Offroad T-Shirt.

