FREE 1 to 3-Day Delivery on Orders $149+ Details

How to Install a Hyline Offroad Standard Front Bumper Assembly on your 07-18 Jeep Wrangler JK; 2018 Jeep Wrangler JL
Installation Time
2 hours
Tools Required
- Ratchet
- 18mm Deep Socket
- 6" Extention
- 11/16" Deep Socket
- 5/8" Socket
- 11/32" Deep Socket
- Torque Wrench
- 5/8" Wrench
- Phillips Screwdriver
Congratulations on your purchase of the Hyline Offroad Standard Front Bumper. Our Bumpers are completely manufactured in our facility located in Perkasie, PA. They are designed and engineered by Offroad enthusiasts just like you to be rock solid at an affordable price. Hyline Offroad would like to thank you for your recent purchase and look forward to serving you in the future.
- Hyline Offroad Staff
PLEASE READ INSTRUCTIONS BEFORE BEGINNING INSTALLATION
If Applicable
Disconnect all Aftermarket External Lighting Wiring that is presently attached to existing bumper.
Front Bumper Installation
Step 1 – Remove plastic factory frame rail cover by unscrewing two plastic screws. Be careful while unscrewing these. The plastic is very weak and is easy to strip out. You will NOT be reusing this cover. Also remove the factory plastic air dam, which is located underneath the bumper.
Step 2 – If your vehicle is equipped with factory fog lights you will need to unplug them. Pull out or cut the plastic wire ties that are holding the wires in place (3 Wire Ties) DO NOT CUT WIRES. Then, slide stock bumper out far enough to unplug the fog lights.
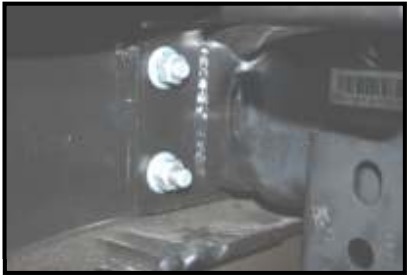
Step 3 – Remove Stock bumper by unbolting the eight (8) 18mm nuts From backside of bumper. Nuts are located on the inside and outside of frame rails (See Figure 1 - Outside frame rails shown) Say goodbye to that flimsy plastic stock bumper.
Figure 1
Step 4 – If applicable, Unscrew Factory Fog Lights at this point using phillips screw driver. (4 on each light)
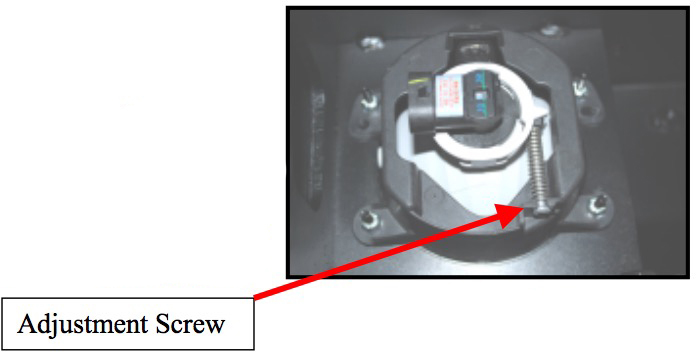
Step 5 – Install factory fog lights into Hyline Front Bumper. Make sure the adjustment screw is facing toward the bottom of the bumper. There is a hole in the bumper to allow adjustment after Installation. Assemble fog lights using supplied 8-32 Lock Nuts and Flat Washers. Tighten the nuts with 11/32” Deep Socket or Nut Driver. (See Figure 2)
Figure 2
Step 6 – Install Hyline Front Bumper onto vehicle. Two people are recommended for this step. Use supplied 7/16-20 Grade 8 Bolts, Lock Washers and Flat Washers to assemble bumper to frame. (See Figure 3) Install the outside bolts first. This will align the other holes inside the frame rails so you don’t have to struggle. After all eight bolts are hand threaded you may tighten all bolts to 78 ft/lb torque.
Figure 3

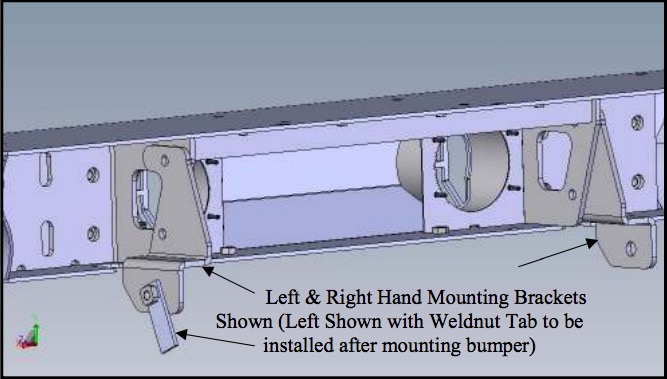
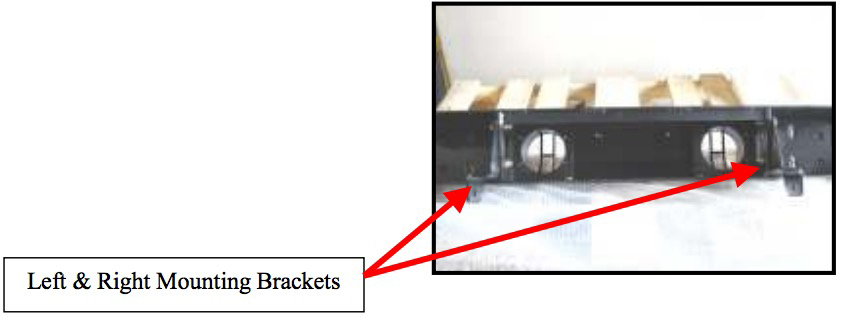
Step 7 – Install Mounting Brackets using supplied 7/16-20 Grade 8 Bolts Lock Washers, Flat Washers, & Nuts. (See Figure 4, 5 & Supplement Diagram 1 on Page 5) These figure are shown with the bumper off the vehicle, however you must have the bumper installed on vehicle prior to assembling brackets.
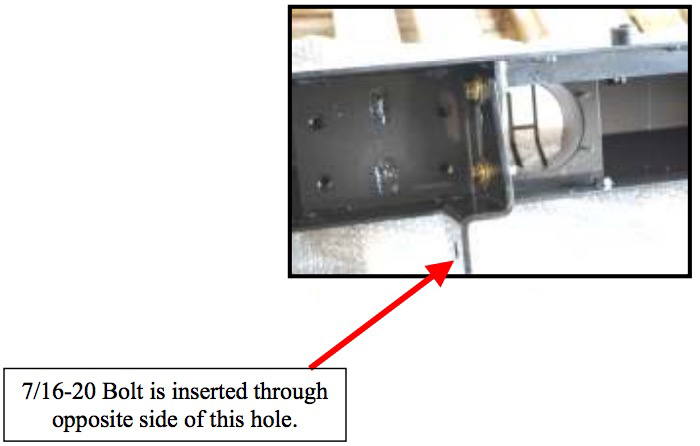
Figure 4
Use the 5/8” Wrench on the bolt head and the 11/16” Deep Socket to tighten the nut. It’s going to be a little tight, but is easy once you’re positioned correctly.
Step 8 – Install the last two 7/16-20 Grade 8 bolts on each brackets with Lock Washers & Flat Washers and the Weldnut Tabs. Weldnut Tabs are placed up inside the square tube that is attached vertically to the vehicles’ frame. (See Figure 5)
Step 9 – Plug in factory fog lights again. Tighten all 7/16-20 Bolts to 78 ft/lb torque and recheck other bolts for tightness.
Optional Winch Installation
Step 1 – Bolt on Fairlead supplied with winch, to the Winch Plate supplied with Bumper. Tighten Bolts
Step 2 – Mount Winch and Winch Plate onto Bumper using supplied hardware with winch.
Step 3 – Tighten all Winch Bolts to manufacturers torque specifications.
Now you’re ready for the ROCKS!!
Send your OFFROAD pictures to [email protected] . If we choose any one of your pictures to be used on our website, We send you a FREE Hyline Offroad T-Shirt.
Attention
Installation instructions provided must be read and followed exactly when installing product. Failure to do so could potentially result in injury or death of any occupants in the vehicle. WEAR SEAT BELTS AT ALL TIMES WHEN DRIVING!
Though our products are rugged, they are primarily designed and built to enhance the appearance of the vehicle and will not protect from death or injury in the event of an accident. Adhere to all vehicle manufacturers specifications
SUPPLEMENT DIAGRAM 1