 FREE 1 to 3-Day Delivery on Orders $149+ Details

How to Install a Hyline Offroad Hood Louver Panel on your 2007-2017 Jeep Wrangler JK
Installation Time
4 hours
Tools Required
- Ratchet & Sockets
- 3/8"
- 9mm
- 10mm
- T-50 Torx
- File OR Sandpaper
- Drill
- 1/16"
- 3/16" & 1/4" Bits
- 1" Hole Saw
- Jig Saw OR
- Cut Off Wheel
- Painters/Masking Tape
- Safety Glasses
- Clear Rust Inhibitor
- Spray
PLEASE READ INSTRUCTIONS BEFORE BEGINNING INSTALLATION
If you ordered the Hood Louver Panel raw you should paint, anodize, powder coat, etc. now before installation onto vehicle. PEEL OFF THE VINYL PROTECTANT COVERING BEFORE PAINTING OR FINISHING (If Necessary). If Hood Louver Panel was was ordered black powder coated your now ready to continue to step 1.
Hood Louver Panel Installation
Step 1 – As a safety precaution - Remove the hood from your vehicle before drilling or cutting. First, remove the engine grounding strap using 10mm Socket, hood light, and/or windshield washer hose from hood. Then unbolt the 4 Torx bolts from the hood hinges using the T-50 Torx. Hood should now be free to remove from vehicle.
Step 2 – Once the hood is removed, place the hood on a flat, solid work area. Then remove u-shape tie down bracket using the 9mm Socket. You do not need to remove the windshield bumpers or the washer nozzel.
Step 3 – Place painters/masking tape either on the hood or backside of the steel template to prevent any scratching.
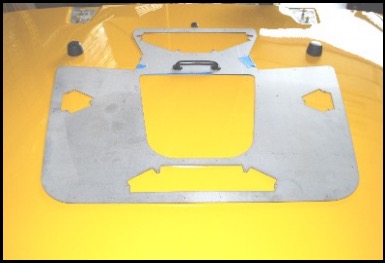
Step 4 – Place one piece steel template in the center of hood as shown in (Figure 1). Reinstall the u-shape tie down bracket. This will locate the template in the appropriate location.
Figure 1
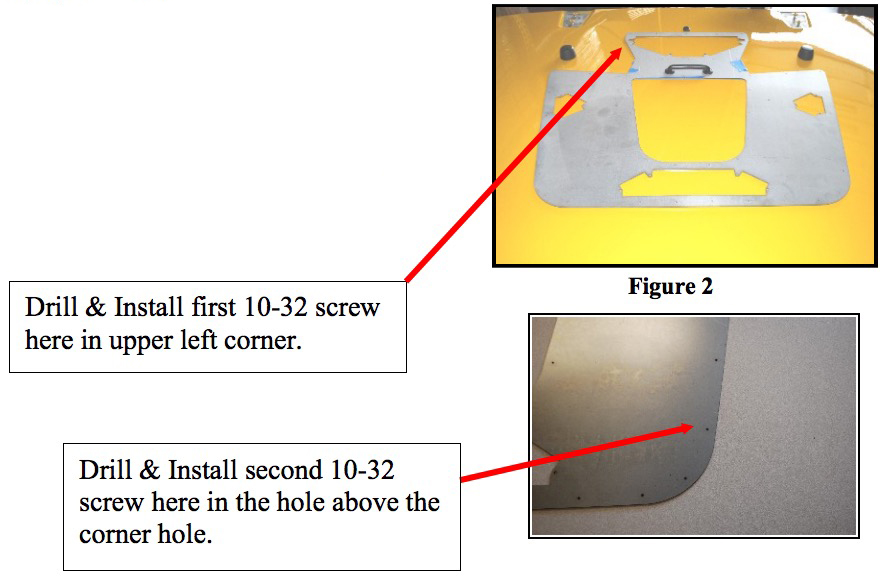
Step 5 – Using 3/16” Bit, drill one hole through the template and hood at one corner, as shown in (Figure 2). Install and tighten the supplied 10-32 screw and nut. Then drill a second hole in the opposite corner of template and install and tighten supplied 10-32 screw and nut. This will ensure template stays in place while drilling and cutting.
Figure 2
**Important** DO NOT MOVE TEMPLATE UNTIL STEP #7
NOTE: USE 1/16” DRILL BIT AS PILOT HOLE FOR 1/4” DRILL BIT TO ENSURE BETTER ACCURACY!
Step 6 – Drill through all the holes in the template using the 1/16” bit.
Step 7 – Using a marker or scribe trace the cutouts onto the hood. Once you remove the template you’ll be able to use these lines to cutout the air vent panels.
Step 8 – After all holes are drilled using 1/16” pilot bit and cutouts are traced, you may now remove the template. Now use the ¼” Bit to drill out the pilot holes 60 Holes Total.
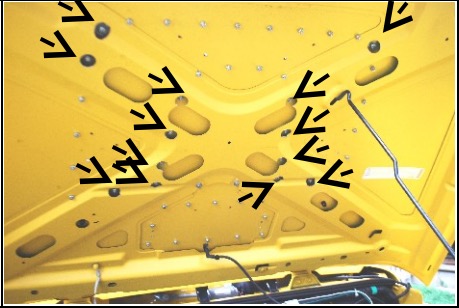
**NOTE** You will need to use the 1” hole saw to expand some holes drilled in the hood support frame from underneath the hood, 13 times. See (Figure 3)
Figure 3
Step 8 – Once drilling is completed, Use 1” Hole saw and drill each corner of the 4 cutouts (14 times total). You can then use the jigsaw or cutoff wheel and cut each air vent panel out.
Step 9 – Use a file or sandpaper to deburr any sharp edges from panel cutouts and/or drilled holes. Remove masking tape also if necessary.
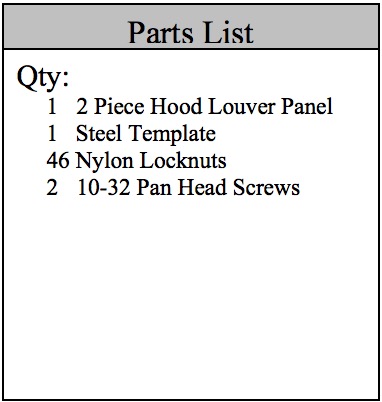
Step 10 – Install the Hood Louver Panels onto hood and assemble nylon locknuts to threaded studs. Tighten nuts just enough until they touch the steel hood.
DO NOT OVERTIGHTEN NUTS. Overtightening will cause distortion on Hood & Louver Panel.
Step 11 - Re-install hood onto vehicle and re-mount u-shape tie down bracket.
Send your OFFROAD pictures to [email protected] . If we choose any one of your pictures to be used on our website, We send you a FREE Hyline Offroad T-Shirt.
Attention
Installation instructions provided must be read and followed exactly when installing product. Failure to do so could potentially result in injury or death of any occupants in the vehicle. WEAR SEAT BELTS AT ALL TIMES WHEN DRIVING!
Though our products are rugged, they are primarily designed and built to enhance the appearance of the vehicle and will not protect from death or injury in the event of an accident. Adhere to all vehicle manufacturers specifications

