 FREE 1 to 3-Day Delivery on Orders $149+ Details

How to Install a Hyline Offroad Front Bumper on your 1987-2006 Jeep Wrangler YJ & TJ
Installation Time
2 hours
Tools Required
- Ratchet
- 3/8" Socket
- 3/4" Socket
- T-55 Torx Socket
- Torque Wrench
- Tape Measure
- Safety Glasses
Congratulations on your purchase of the Hyline Offroad Standard Front Bumper. Our Bumpers are completely manufactured in our facility located in Perkasie, PA. They are designed and engineered by Offroad enthusiasts just like you to be rock solid at an affordable price. Hyline Offroad would like to thank you for your recent purchase and look forward to serving you in the future.
- Hyline Offroad Staff
PLEASE READ INSTRUCTIONS BEFORE BEGINNING INSTALLATION
***IMPORTANT*** Unlike many other designs, Our ORIGINAL design allows you to install your winch AFTER installing the bumper. So if you wanted to add a winch down the road our design allows you to do so without removing your bumper. To install your winch after mounting the bumper follow the insturctions starting on Page 4.
If Applicable
Disconnect all External Lighting Wiring that is presently attached to existing bumper.
Front Bumper Installation
Step 1 – Remove Stock bumper by unbolting the six (6) T-55 Torx Bolts. Two on the top of each side of the bumper and one on the Bottom of each side. Say goodbye to that flimsy stock bumper.
Step 2 – Remove plastic factory sway bar cover by unbolting four (4) 3/8” Bolts from each side of cover. Do Not Throw This Cover Away.
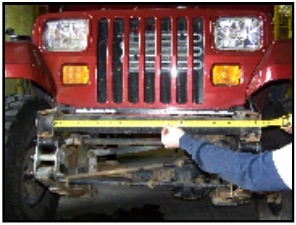
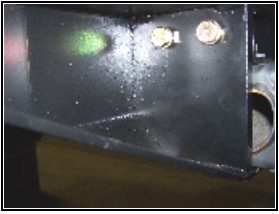
Step 3 – Using tape measure, find the center point in between frame rails by Measuring the total width from inside frame rails. Mark the center Point. (See Figure 1)
Figure 1
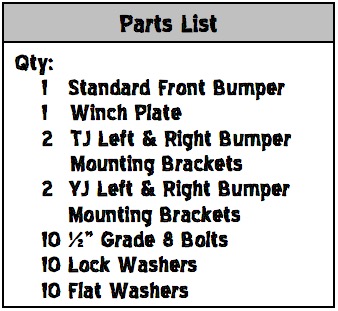
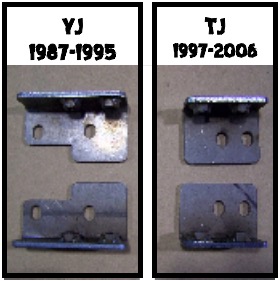
Step 4 – Install proper Bumper Mounting Brackets (See Figure 2) using four (4) Supplied ½” Bolts, Lock Washers, and Flat Washers. Brackets are Located with the vertical flanges toward outside of frame rails. DO NOT TIGHTEN BOLTS YET
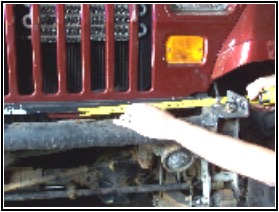
Step 5 – Measure from center point (measured in Step 3) to outside of the Vertical flange on bracket. Locate bracket at 16 7/8” from center point. Repeat to opposite side bracket. (See Figure 3) This step will ensure The bumper slides over the brackets easily. Once brackets are in proper position Torque all four (4) bolts to 119 ft./lbs.
STOP
You may at this point install winch with bumper off vehicle OR you can wait until after bumper is mounted on the vehicle. We recommend installing the winch after mounting the bumper so you’re not lifting so much weight.
Step 6 – Slide front bumper over brackets. Install Four ½” Bolts, Lock Washers, And Flat Washers through 5/8” Shackle Plates and thread into weld nuts on Mounting Brackets. You may need to rock bumper back and forth slightly to start the bolts in the weld nuts. DO NOT TIGHTEN BOLTS YET. (See Figure 4)
Step 7 – Install the two remaining ½” Bolts, Lock Washers, and Flat Washer on bottom of the bumper.
Step 8 – Tighten all ½” Bolts to 119 ft./lbs.
Step 9 – If re-installing Plastic Factory Sway Bar Cover you will need to notch out areas where winch feet are positioned.
Optional Winch Installation
Step 1 – Bolt on Fairlead supplied with winch, to the Winch Plate supplied with Bumper. Tighten Bolts
Step 2 – Mount Winch and Winch Plate onto Bumper using supplied hardware with winch. Install the two bolts. closest to the grille first. You may have to tip the winch forward slightly to get bolts started in the winch feet holes. Do Not Tighten Bolts Yet.
Step 3 – Using a Ratchet Extention (Approx 12”) with correct short socket for winch bolt, thread the 2 front bolts into winch feet.
Step 4 – Tighten all Winch Bolts to manufacturers torque specifications. Now you’re ready for the ROCKS!!
Send your OFFROAD pictures to [email protected] . If we choose any one of your pictures to be used on our website, We send you a FREE Hyline Offroad T-Shirt.
Attention
Installation instructions provided must be read and followed exactly when installing product. Failure to do so could potentially result in injury or death of any occupants in the vehicle. WEAR SEAT BELTS AT ALL TIMES WHEN DRIVING!
Though our products are rugged, they are primarily designed and built to enhance the appearance of the vehicle and will not protect from death or injury in the event of an accident. Adhere to all vehicle manufacturers specifications
