FREE 1 to 3-Day Delivery on Orders $149+ Details

How to Install Large Hi-Flow Louvers on your 87-18 Jeep Wrangler YJ, TJ, JK & JL

Shop Parts in this Guide
Installation Instructions Congratulations! You now own genuine RunCool® Heat-EscapeTM OuterCoolerTM Hood Louvers. Read instructions thoroughly and “Limited Warranty and Limitation of Liability”, at end.
Welcome to this RunCool® Hood Louvers installation session! Most Car Guys we know would make good surgeons, as they frequently “operate” on their vehicles. (And, considering the occasional busted knuckle or two, this can also include some pain and blood loss!) Hence, these Installation Instructions have a stepby-step “surgical” approach (also with the hope that Obamacare will reimburse you for performing this ‘operation’!). Read these carefully and completely.
PHASE I: Gather your instruments
First of all, gather these:
• Electrical tape
• Masking tape (get 3M-- the best!)
• Duct tape
• Shop vac
• Thick gloves
• An electric saber saw with a metalcutting blade is good for cutting out the hood panels—and safer than using a cutting disc, because it generates fewer sparks. Just don’t cut through the underlying hood frame!
• Even better, use an angle grinder tool. If you don’t have one of these, this is the handiest electric tool anyone can have in his shop! Harbor Freight Tools (800-423-2567) sells these starting at only $11.95 (#03150-IRYH) and $19.95 (#31309-IRYH). Northern (800-533- 5545) also has them in the $20-$25 price range, and theirs comes with the cutting disc (this set is item #143378- B259). Lowe’s has one by SKIL, for around $29. Popular sizes are 4”- and 4 ½” diameter. Be sure to have a thin, 1/16” or thinner, metal-cutting disc for this tool (1/4” is too thick). DeWalt (available at Lowe’s) makes one only .045” thick—excellent (#A60T-BF). An air tool cut-off wheel with a cutting disc works quite well. Also have a grinding disc or a file for smoothing off the cut edges.
• Pop rivet gun ($6.95 at Harbor Freight, #7356-OVGA). If you have compressed air and want to really speed up the process (!!!), an air-powered rivet gun can quickly justify itself—#93458-9YFA for $34.99 from Harbor Freight.
• Goggles (eye protection).
• 6 or 7 wet/damp clean (not oily – fire hazard!) bath towels (they shouldn’t get stains -- just don’t tell your wife).
• Fire extinguisher – be sure it is full!
• Flat black spray paint.
• An assortment of hole-saw drill bits for metal; 1”- to 2”- dia. good for Step #V-5; this and/or other sizes good for Step #V-6. (Cheap ones @ $3.99 for a set of 8 sizes — #38425-1DEH at Harbor Freight.) The best ones are at Lowes.
PHASE II: Prepare for Surgery
1. We ship some (not all) of our Natural Aluminum Hood Louvers with a white or clear plastic film overlay. If yours have this, remove it now. (For easy removal, heat film with a hair dryer.)
2. Affix black plastic electrical tape along the underside of the perimeter of the Louver panels. This will form a slight cushion between the Louvers and the surface of your vehicle to prevent scratching. Put it inboard about 1/16” so it doesn’t show around the outer edges when the Louvers are installed.
3. Open your hood. Examine the insulation pad under the hood. Usually this is held in place with round, push-in plastic clips. Remove the clips and this pad. You can replace this later and cut out holes where the Hood Louvers are (leave a margin wide enough around the openings so rainwater will not get it wet) if you like, but most people leave it off. This is because it is either: a) oily and grimy and a fire hazard, or b) getting ready to be. Do NOT cut the panels in the hood without first removing this pad — fire hazard!!
PHASE III: Determine the location
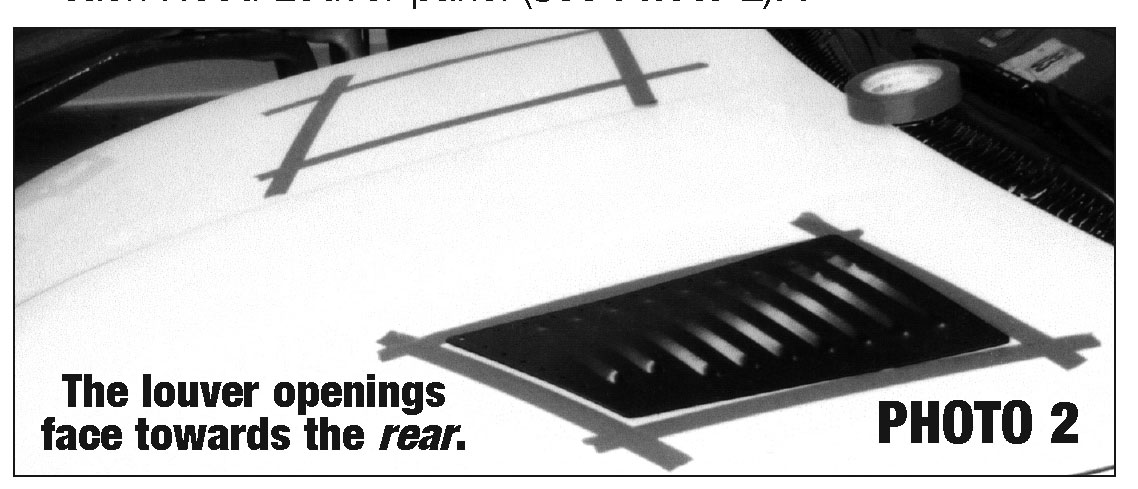
There are factors to consider when determining where to locate your Hood Louvers. NOTE: THE LOUVERED OPENINGS FACE TOWARD THE REAR OF THE VEHICLE. 1. Enhancing Factors . . .
a. You want to select a location where they look good on the hood.
b. If you have a turbo, try to locate them above it, to aid the evacuation of the heat.
c. Most of the heat is in the center mass of the engine compartment, so this location will be the most effective.
d. Experience shows no problems with rainwater flowing onto the engine block, valve covers, battery, manifolds, etc. — people frequently wash their engines, some using 1200 p.s.i. pressure washers!
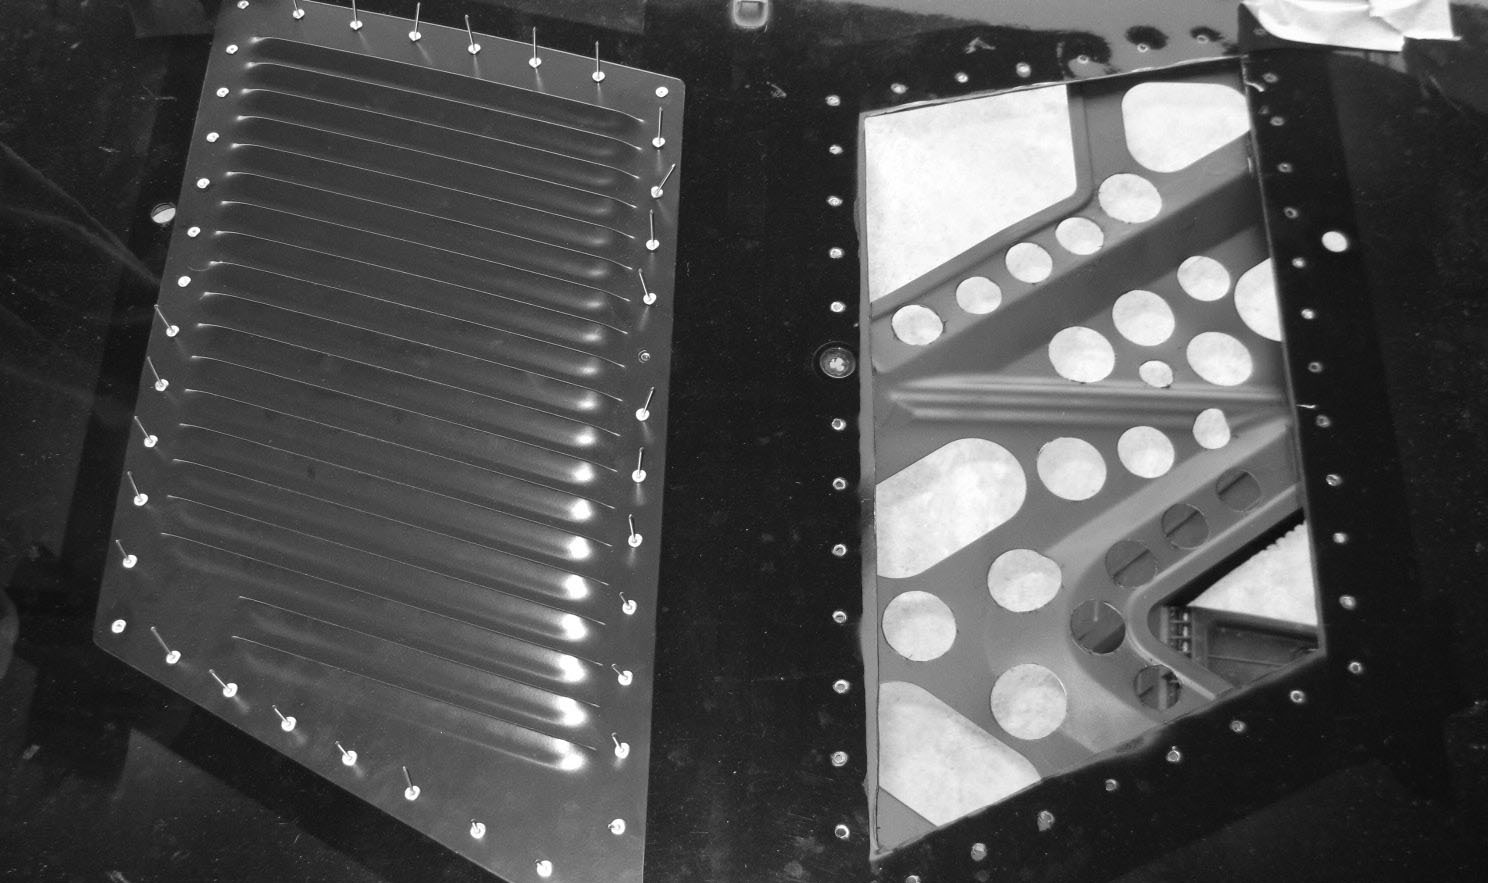
2. Factors to Take into Consideration . . . a. With your hood open, look at the interior hood support frame. IT IS COMPLETELY SATISFACTORY TO HAVE SOME OF THE HOOD FRAME PASSING UNDER THE HOOD LOUVERS. If so, you can “hole out” or “Swiss cheese” the hood frame below the Hood Louvers while still maintaining full strength (see Photo 1). Note, in Photo 1, the UNUSUALLY large brace under this hood (most are much smaller!). But, NO PROBLEM! The owner, (Detective Michael Livera of Odessa, Texas, P.D.) just holed it out with various size hole-saw drill bits (the large elongated slots were already there). On wide hood frames you can use a 2”-or 3”-hole saw drill bit. On smaller frames, use ½”-or 1”-hole saw drill bit. Drill in the center ridge/panel of the frame; leave the frame sides intact, to retain strength. Some vehicles (e.g., certain late Fords) have flat, unraised central panels that have no real support function and which can be cut through and removed.
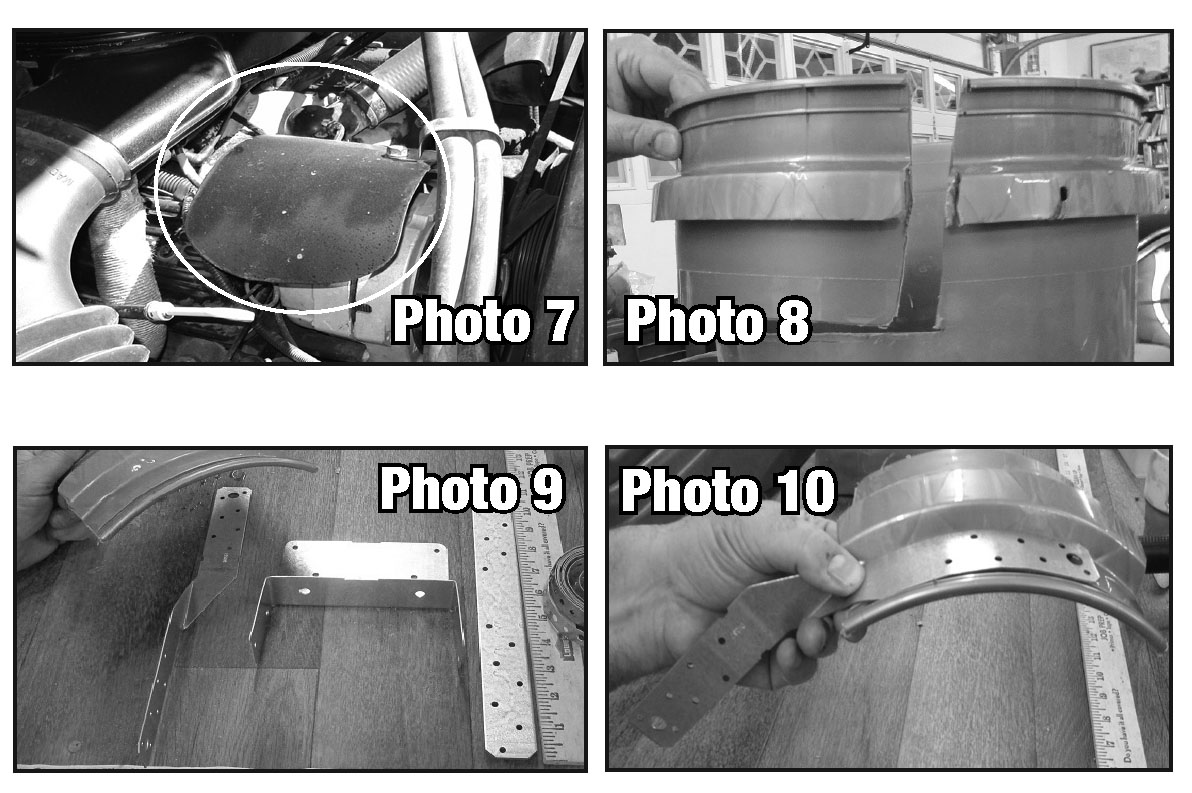
b. As part of this location process, you do not want rainwater to flow directly onto the distributor (most vehicles built in the last 15-to-20 years don’t have one) or the alternator (which is, typically, so far forward this is not a problem). An option which prevents rainwater from flowing onto the distributor or alternator, if that is a problem, is only partially cutting an opening in the hood (or not at all) under that one panel, opening up just the other side. Also, see the “Notes on Making a Rainwater Diverter” at the end of these instructions (see Photo 7).
c. If windshield washer squirters are in the way, these can usually be relocated—even remounted onto the Hood Louvers.
d. On Jeeps with a windshield hold-down and two rubber ‘bumpers’, often you can actually locate the Hood Louvers such that the bumpers are just outboard of the hood louvers, and the hold-down bracket can be mounted on and through the rivet holes of the inboard borders of the Hood Louvers.
e. An open-style air cleaner (as on carburetored engines), with an exposed filter element, is also a consideration (but if this is a V8, usually no problem as the louvers are usually outboard of this). Here are two suggestions for this situation: i. Mount the Hood Louvers farther outboard. ii. Buy a smaller-diameter air cleaner unit. Yours is probably 14” diameter. Proform/Mr. Gasket makes these in smaller: 6 ½”, 9”, and 10”; available at JEGS (800-345-4545) and Summit Racing (800-230-3030).
PHASE IV: Designate your cut lines
Note: They will ‘mold’ to fit the contour of most hoods as you pop rivet them down.
1. Run a piece of masking tape down the center of the hood.
2. Locate the Hood Louvers precisely where you want them, indexing off the hood center-line.
3. Apply masking tape or electrical tape onto the hood, around the perimeter of each, making an ex
4. Remove the Hood Louvers from the hood.
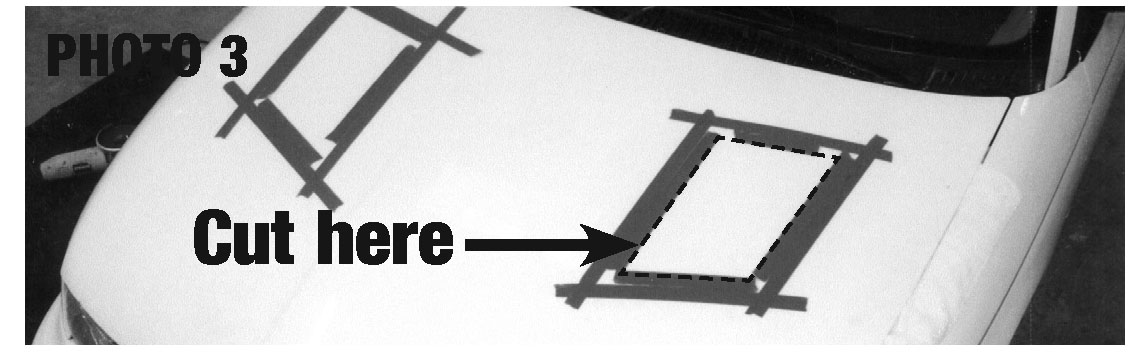
5. Next, run an inner row of masking or electrical tape such that the inner edge of it is 1” inboard from the inner edge of the first row of tape you just put on the hood. The inboard edge of this second, inner row of tape is your cutting line (see Photo 3).
6. Good Suggestion (but not shown in the photos, here): Protect the paint on your hood from scratches from the metal dust generated by cutting and drilling. To do so, tape newspapers or tape towels over the exposed areas (but NOT where the panels will be cut out). Remember Fire Safety; keep an extinguisher handy. PHASE V: Let the Surgery begin! Now you are ready to cut panels out of the hood so heat will rise through the hood louvers. (Don’t be nervous; you’ll be really glad you did it!)
1. Due to flying sparks from grinding, exercise extreme safety. Be sure nothing is in the immediate or surrounding area that a spark can ignite, including petroleum products, products made with petroleum (such as plastic), dry leaves—even steel wool! Outdoors is usually safest. A saber saw with a metal-cutting blade generates fewer sparks than a disk grinder, but do not cut through the hood frame (instead see Section 6 of PHASE V, and Photo1 where you hole out/”Swiss cheese” this frame with hole saw drill bits).
2. IMPORTANT! Completely cover your windshield with wet/ damp towels. Flying sparks from cutting and grinding will severely pit glass!!
3. IMPORTANT! Completely cover your engine and engine bay with clean/damp towels. Sparks from cutting and grinding can be a fire hazard. This will also make clean-up easier!
4. Further, because grinding produces sparks, be sure to: • Grind when your engine is cold (gasoline can evaporate—explosive—when hot). • Open your hood all the way for at least five minutes, to let any trapped gasoline fumes escape, before cutting. • Be sure your fire extinguisher is fully charged and nearby and ready!! • Cut with your hood at least partially opened to prevent accumulation of gasoline fumes. • Wear goggles (Note: Sparks can pit the lenses of eye glasses!) to protect your eyes when cutting. • Throughout the cutting/grinding process, be on constant fire alert—including regularly opening your hood and checking there.
5. Optional Off-Road Racing Tip: Radiased corners are stronger than squared-off corners. Before you cut out the panels, if you have a hole saw drill bit in a diameter between ½” and 2” (1” is best), drill holes in the four corners of each area of the hood you are going to cut out. Drill four holes tangent to, and inboard of, the four lines to be cut. Then cut the lines into the drilled holes to leave radiased corners.
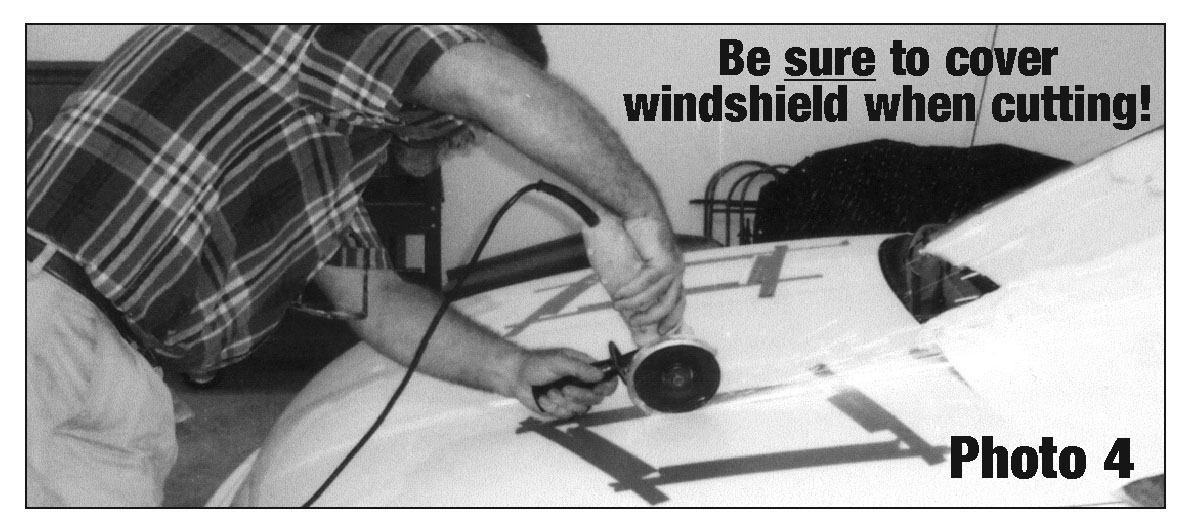
6. Using your saber saw or angle grinder, cut out a panel along the inner side of the inner row of the masking tape outline (see Photo 4). If using an angle grinder, be sure to use a thin cutting disc, rather than a thick grinding disc. Several shallow passes are better than one deep pass. Open the hood regularly to check the towels under the hood to be sure a spark hasn’t ignited them or anything else there or in the surrounding area. Don’t cut through the underlying hood frame. Instead, come back after you have cut out and removed the panels and “Swiss cheese” the frame there by holing it out with hole saw drill bits, from above (see Photo 1).
7. Wearing thick gloves (sharp edges), remove the cut-out panels from the hood. Note: Usually, the sheet metal of the hood is affixed to the hood frame with a thick, anti-vibration adhesive. Use a screwdriver or chisel to pry the cut-out panels off the hood frame.
8. Use your angle grinder or a file to smooth out the raw edges of the hood around the cut-out area. Again, practice fire safety!
PHASE VI: Drill the holes
1. Peel off the inner row of tape on the hood, leaving the outer row of tape in place.
2. Place the Louver panels back on the hood, using the outer row of tape as an outline for the position. Tape the louver panels in place, with a short piece of duct tape in the middle of each side of each Hood Louver. Leave most of the mounting holes around the perimeter of the louver panel exposed, so you can see where to drill the holes!
3. Drill the mounting holes, being sure to use a 9/64” drill bit (provided with the kit). This is the proper size for the 1/8”- dia. rivets provided. This is a slightly smaller-size hole than on the Louver panels, to give you a little bit of leeway in mounting the panels. Your drill bit should pass through the hood and continue about 3/8” beyond the underside of the hood’s surface (to give enough room behind it for the pop rivet to affix). Don’t drill through anything below that distance. If you hit a hood support, within that depth, drill through it. Drill the four corner holes first. Then take some nails or machine screws (approx. 1/8”-dia.), and temporarily drop them into the holes, to serve as locator pins, as you drill the remaining holes.
4. Now, remove the locator pins and the Hood Louvers. Open the hood and de-burr any rough edges of the cut openings. This is a good point to clean off the hood. Use a shop vac or compressed-air nozzle to avoid scratching the paint.
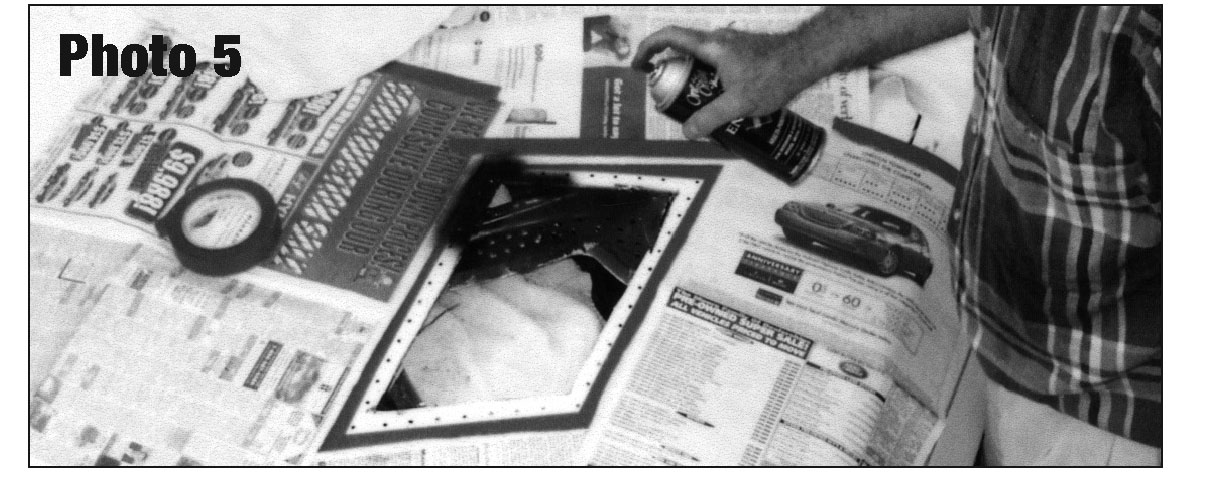
5. To prevent rusting, paint the raw, cut edge of the hood. A quick way is to move the existing masking-tape border in ¼”, then mask off the rest of the hood with newspaper. Next Paint the inner area of holes and the cut edge (see Photo 5). It will not show because it will be covered by the Hood Louvers. Also spray paint (with flat black) any of the underhood support frame that might show through the Louver openings from the top. This is to prevent it from being conspicuous when seen through the Louvers
6. If you want to reinstall the under-hood pad, do it now. Then cut the pad openings about 1½” outboard of the holes in the hood (to avoid getting soggy with rainwater).
(To continue the surgery analogy, this is where the S.A. [Surgical Assistant] ‘closes’ the patient with surgical staples.)
Note: If for some reason you’d rather use sheet metal screws get Phillips-head for best appearance — be sure they are Stainless Steel. Lowe’s has “Weather-Max” brand, by Hillman, part no. 127049. Get two packs. After installing grind off/blunt the tips — for safety
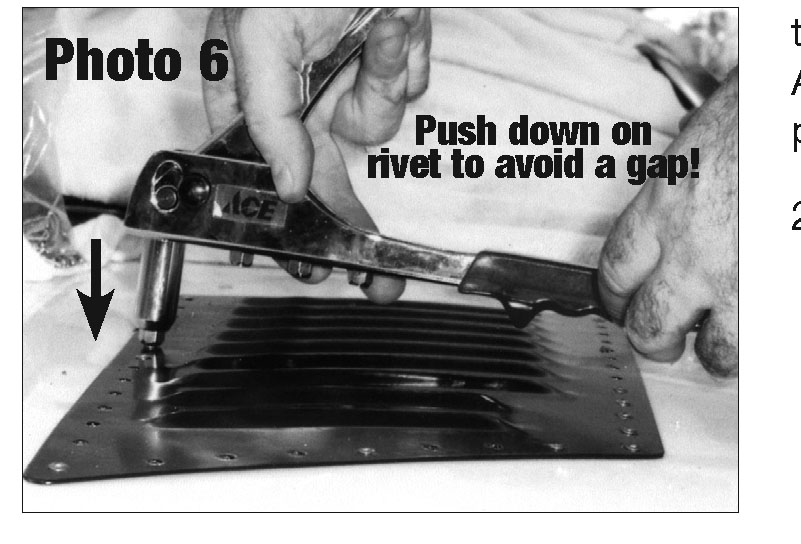
1. Before “popping” the rivets in place, be sure to wear eye protection. Be sure the hood louver panel is pressed down firmly against the hood (see Photo 6). A gap between the hood louver panel and the hood will not allow the pop rivet to mount correctly. Pop the rivets in place, from the outside in.
Do the four corners, first. Then do the center of each side. Two full squeezes of the pop rivet gun are typically needed for each pop rivet. If you encounter a thick section, such as a hood-frame brace, here are some suggestions. Try one of the pop rivets provided. Or, you can pop a pop rivet in a piece of scrap sheet metal. Grind off the back of the pop rivet so you can extract it, with the head of the pop rivet intact. Glue this pop rivet head in place in that hole in the hood louver panel, so it will match the other pop rivets. J-B Weld, a strong, two-part epoxy, is excellent for this. Another option is to get some longer pop rivets.
2. If any pop rivets didn’t turn out to your satisfaction (e.g., you had a gap), you can remove them. Open the hood and grind off the underside of the offending pop rivet. Then take a hammer and a 1/16”- dia. punch (or a nail) and knock out the rivet from the underside.
3. Remove the towels from across your engine and across your windshield. Careful: These will have metal dust and sharp flakes in them, so don’t spill them into the engine compartment or onto the vehicle! Use a shop vac to completely clean these areas.
PHASE VIII: The Surgery was a success!
1. Drive and enjoy your vehicle with your new RunCool® Hood Louvers
2. Consider additional sets of RunCool Hood Louvers for your other vehicles! Thank you! Run cool!
If you wish to paint your RunCool Hood Louvers. . .
If you like, you can paint these Hood Louvers to match your vehicle. When painting the bare aluminum, scuff sand it well (240 grit or finer is good) to promote paint adhesion. Eastwood makes “Self-Etch Primer”, which etches and primes the material. We heat tested 5 different brands; this worked the best. Available in Flat Gray or Flat Black at (866) 483-2259. If you paint the Louver panels before you install them, the fasteners will be more distinctive, for an enhanced, high-performance look.
Most Will Need This, But For Your Information: Notes on Making a Rainwater Diverter
Experience shows no problems with rainwater flowing onto the engine block, valve covers, battery, manifolds, etc. – after all many people frequently wash their engine! The only need to divert rainwater is if it flows directly onto the distributor, alternator or open air cleaner.
1. You can make a “Shield” over the component, using the cut-out panel from the hood. Curve it and bolt it on, typically using an existing bolt that is also holding something else (see Photo 7).
2. Easier yet for your “Shield”, cut an upper section out of a 5-gallon plastic pail ($2.99 at Lowe’s) (see Photo 8).
3. “Joist Hanger” brackets can be found at Lowe’s (near the “Lumber” section) They are quite varied and adaptable (see Photo 9).
4. Bend a “Hanger” to fit. Bolt, or rivet it to the “Shield” (see Photo 10). 5. Bolt “Shield” to engine; allow at least a 1” air gap below the “Shield” for good air/heat flow.