FREE 1 to 3-Day Delivery on Orders $149+ Details

How to Install Delta All Aluminum LED E-Hood Bar on your Wrangler
INSTALLATION INSTRUCTION for TJ &JK Models
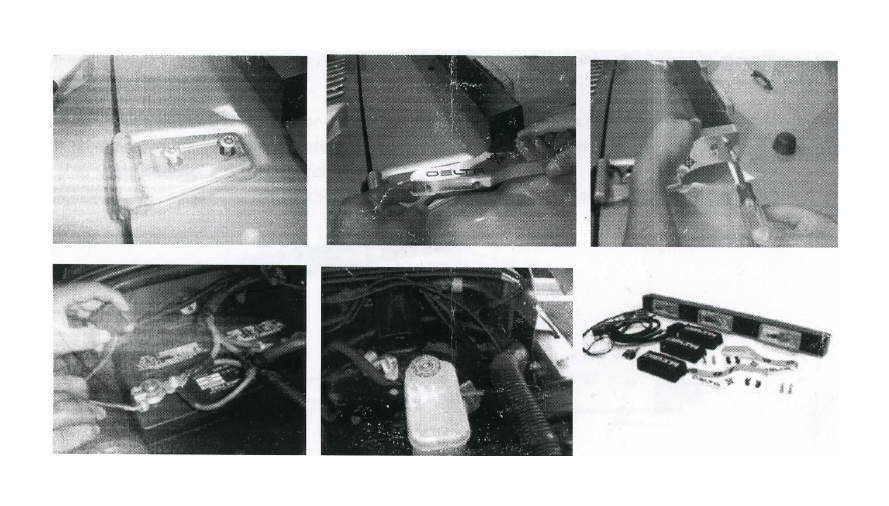
1.For JK - Remove (2) hood hinge bolts holding the hood on the driver side first and replace it with the driver's side aluminum arm using factory bolts. Remove (2) hood hinge bolts on the passenger side.
For TJ - Remove (1) hood hinge bolt (most forward) on the hood on the driver side first and replace it with the driver side aluminum arm (see photo) using the 1" bolt (provided). This bolt will connect the billet aluminum arm with the hinge through the most forward bolt hole in the arm. Apply a double stick tape next to the other bolt hole to provide an added support and hold. The unused back bolt hole on both arms can be plugged with the plastic plug (provided).
2. Attach black cross-bar to driver's side aluminum arm using (2) small hex bolts, (provided)
3. Attach black cross-bar to passenger's side aluminum arm using (2) small hex bolts (provided), while holding the arm route the wire lead through the channel under the aluminum arm and secure to the hood using (2) factory bolts.
4. Lift the hood up and route the wire lead around the hinge and into the engine compartment. (See photo).
5 Install the relay in a close proximity to the battery. (See photo)
6 Install the switch on the dash-board (left to the steering column) by snapping the side panel of the dash-board and dulling hole in the dash-board. For best result use our Billet Aluminum Switch Plate I #05-2001-3X.
7. Connect blue wire to the switch prong with lamp icon.
8. Connect the short red wire from the prong with icon on the switch to any "hot wire" using snap-lock (provided).
9. Connect the black wire leading from the switch to any grounded metal surface under the dash-board.
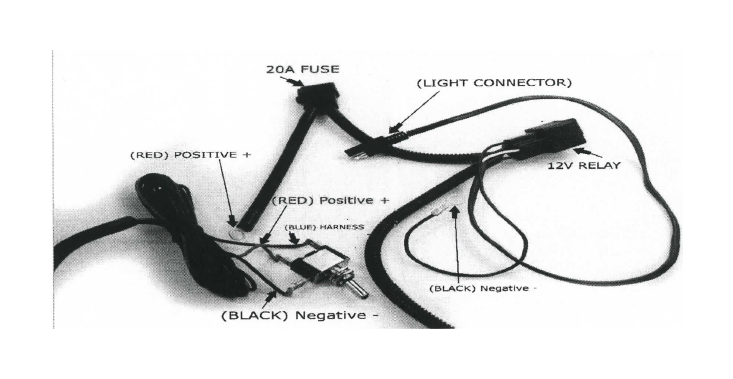
10. Remove the fuse from the harness (for safety) and connect the red leading from the relay to the positive post on the battery and ground the black wire with the ring connector leading from the relay to any clean (unpainted) ground near the relay. You may use the same screw which is holding the relay.
11. Connect the waterproof pigtail connector on the light bar with a matching connector on the harness. Now insert the fuse back into the fuse holder and test the lights.
Switch installation:
To install a switch, first you must find the best location where the switch will be installed, we recommend near the center dashboard area for easy access. After locating the best accessible area, you will need to drill a %" hole to place the switch.
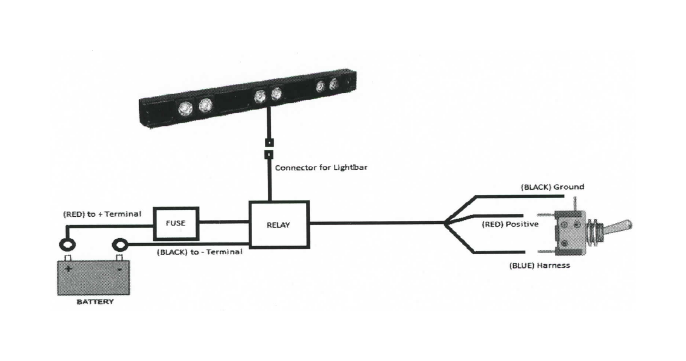
Wiring: Connect 3 wires from harness to switch as follows:
1. (Red wire) connects to icon. 2. (Black) Wire connects to ^ icon. 3. (Blue Wire) connects to =D icon
Then lock the switch in place where the YA" was drilled. The switch installation is now complete.
Installing Power source: After installing the switch inside of the vehicle, there will be (3) other cables that will need to be connected to a power source:
1. Positive (Red) cable circular end connects to the positive post on battery.
2. Negative - (Black) cable circular end connects to the negative - post on battery.
3. Light Connector cable connects to light bar.
Turn on vehicle and flip switch to the ON position. Installation is now complete