FREE 1 to 3-Day Delivery on Orders $149+ Details

How to Install Crown Automotive Parking & Side Marker Light Kit (07-13 Wrangler JK) on your Jeep Wrangler

Shop Parts in this Guide
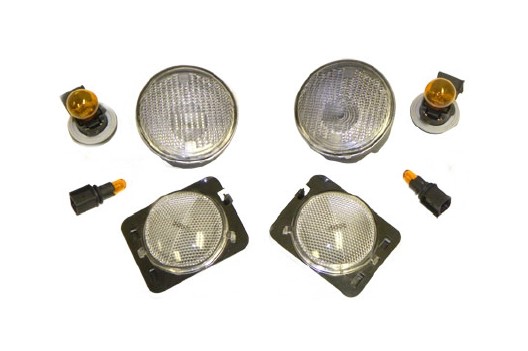
Parts List
1 – Clear Left Parking Lamp
1 – Clear Right Parking Lamp
1 – Clear Left Turn Signal Lamp
1 – Clear Right Turn Signal Lamp
2 – Amber Parking Bulbs (3157NA)
2 – Amber Turn Signal Bulbs (194NA)
Parking Lamps
1. Disconnect the connectors from the parking lamps (below headlamp) by moving red safety clip away from lamp, pressing on clip and pulling connector.
2. Remove the left parking lamp by pushing the center of the 2 tabs on the rear of the lamp outward. Remove the lamp by pulling it through the grille.
3. Ensure that the new parking lamp has an amber bulb installed prior to installation. Install the replacement lamps by aligning the tabs in the lamp with the slots in the grille and pressing on the lamp, so the tabs snap into the grille. Plug the connector into the lamp, ensuring that the red safety clip is engaged.
4. Repeat Steps 2 & 3 on the right parking lamp.
Turn Signal Lamps
5. Disconnect the bulb housings from the turn signal lamps (on each fender flare) by rotating the bulb housings and pulling.
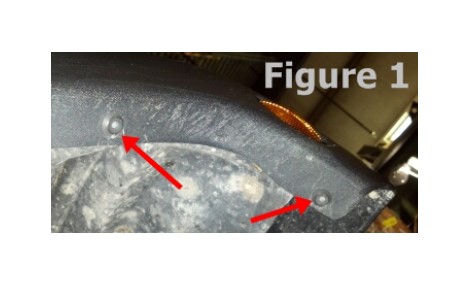
6. Remove the 2 plastic rivets at the front of the left fender flare (see Figure 1). This can be accomplished by pressing the small pin in the center of the rivet out of the rivet. A small allen wrench or screwdriver works well to accomplish this. If not damaged these can be re-used, otherwise replacements can be purchased. (Replaces Part # 6506007AA)
7. Release the left turn signal lamp from the inner fender by pushing the clip at the top of the lamp downwards. Separate the fender flare from the inner fender and push the top of the lamp out and then down. This should release the clips on the lamp from the inner fender.
8. Remove the bulb housing from the replacement housing. Install the housing into the inner fender by first ensuring that the clips at the bottom of the lamp are engaged into the inner fender. Then the top clip can be snapped into the inner fender.
9. Remove the original bulb housing from the connector and replace with the supplied bulb housing. Ensure that the included amber bulb is used.
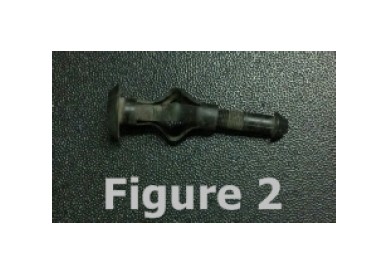
10. Install the plastic rivets that were saved earlier by first assembling the pins into the rivets about 1/8” (see Figure 2). Insert the rivets into the hole in the fender flare and inner fender and push the pins as far as possible into the rivets.
11. Repeat steps 5 through 9 on the right turn signal lamp.
Please Note: DOT Regulations specify that front parking and turn signal lamps emit amber light. Do not use clear bulbs with these clear lamps.