Installation Time
(approx) 3 Hours
Difficulty Level:
Light to Moderate mechanical skill required.
FREE 2 or 3-Day Delivery on 10,000+ Items. Details
$129.99 (kit)
FREE ShippingSaved - View your saved items
We're sorry. We couldn't save this product at this time.
or use
Hi, guys. So, today, we're checking out the 1-3/4-Inch Spacer and Leveling Kit, fitting all 2007 to 2018 JK Wranglers. So, one of the easiest and most affordable ways to get some added height on your Wrangler, some better functionality is to add a spacer lift, and this option is going to do a really good job at that. Now, this kit will come with four 1-3/4-inch spacers that will go on top of your coil springs. Now, these are going to add that extra height to your Wrangler, which will open up room in the wheel well for larger wheels and tires. It'll help you out when you're off-road, creating some better room for more articulation, and this is just, overall, going to create a more defined stance out of your rig if that's what you're looking for. Now, this is really going to be for you if you're looking to keep it on a budget and you don't necessarily want a big lift kit, and you're looking for really just a simple and no-fuss solution getting some added height on your Jeep. Now, when it comes to tire size and what you can fit with this spacer kit, this will accept up to a 33-inch tire. That's going to fit in the wheel well very nicely. You're going to have some room for better articulation and room to work with while you're off-road, and it's just, overall, going to look very nice sitting inside that wheel well, in comparison to another tire size. Now, speaking of that, a 35-inch tire, I would definitely not recommend. You may be able to bolt it on. It may look pretty good mounted inside the wheel well because it is a bigger tire, but you're not going to have a lot of room for articulation. You may experience some rubbing and some contact if you do take your Jeep off-road with a 35-inch tire, so I would highly recommend sticking with the 33 if you're looking for a lift kit and looking to upgrade your tires at the same time.Now, as far as pricing is concerned, like I mentioned before, this is going to be incredibly affordable, coming in at roughly $120. Now, overall, as you can see, this is a very simple lift kit. This is going to come with the spacers and bump stop. Spacers for the rear, just to make sure that you're not making any contact with your fender. So, it is going to be pretty simple in comparison to some other choices. Now, some other options on the page, as far as spacer lifts are concerned, may come with the spacers. They may come with a couple of extra components if they are a little bit more expensive. Usually, the more components in the kit means that it's going to raise the price a bit. So, you may see options that are going to either be for this size that will come with shock extensions or sway bar end links and so on. So, overall, if you're not necessarily looking to spend a lot of money, if you're looking to get a functional kit that's going to add some extra height to your Jeep, this is going to be a great choice to take a look into.Now, as far as install is concerned, I'm going to call this a two out of three wrenches on the difficulty meter. This isn't as involved as many other lift kits, so I wouldn't necessarily call it a three. You can get this done in your driveway with some very basic hand tools in about three hours. So, speaking of that install, let's jump into that now. The tools that I used for my install were a pneumatic and an electric impact wrench, a dead blow, an 18-millimeter open-ended wrench, an extension, a ratchet, a 21, 18, 17, 16, and 10-millimeter socket, and an 18-millimeter swivel socket.So, the first couple of steps of this install include getting the Jeep up in the air, whether you're on a jack and jack stands or if you are on a lift like I am with a couple of pole jacks. You want to make sure that you're supporting the axle because we will have to lower it down. You also want to make sure that the front wheels and tires are off, and if you are on the jack and jack stands, I would recommend chocking the rear wheels. But our first step is going to be to take off our sway bar end links, or at least to just disconnect them from the axle.So, we can take off the bottom bolt for our sway bar end link. We don't necessarily have to take off the top considering that we just need to disconnect this from the axle so we can lower it down. So, I'm going to take an 18-millimeter swivel socket on the passenger side, and then I'm going to take an 18-millimeter wrench and we can take that off. Then we can do the same thing on the other side. Next, we can disconnect our front track bar using a 21-millimeter socket. There's going to be a flag nut on the back. That is going to shift the axle a little bit, but it's going to allow us to drop our axle.Next, we can remove our lower shock bolt using an 18-millimeter socket and wrench. Now, in order to get this out, you may have to adjust the height of the axle in order to loosen that bolt up. And the other thing that we want to make sure to do while we're over on this side is disconnect our brake line bracket. We have one up at the top on the frame and one down on the spring perch. I'm going to use a 10-millimeter socket for both of those, but I'm also going to use my impact wrench for this top one. Wanna make sure to save these. So, what we can do at this point is kind of just wiggle our shock out at the bottom there, and then just pull out our brake line bracket. This is just going to give it enough slack so when we drop our axle we're not damaging this brake line because we definitely don't want to do that. If this does get damaged in the process, you will need to replace them. So, once we are finished with the brake line and the shock over on this side, we can do the same thing on the other side, and then we can start lowering our axle.At this point, what we can do is start lowering down our axle so we can take out our springs. So, I'm just going to lower my pole jacks here. And we just want to make sure that it's even, keeping an eye on our brake lines, even though they are disconnected at the bracket. You also want to keep an eye on the breather hose on the differential. I usually just like to pop that off. There's no clip or anything. It's just a tube that you can just pull back, and then we can just lower this down. And you'll see the spring start to separate at the top. Can usually just do this one by one, but once you have enough room, you can wiggle the spring out on either side, or you can even kind of rotate the spring, move the sway bar if you need to, and even pull down on the axle if you need to.So, last but not least, once we have the springs out, we're just going to take out this isolator as well, and we can do the same thing on the other side. So, now that everything is taken apart, what we can do is add our spacer. Now, this might be a little bit difficult to get around the spring perch at first. Once that is over that lip, we can take our factory isolator, pop that into place, and then we can repeat that on the other side and then put in our springs. And we can take our factory spring and pop that back into place. Now, when the spring is in, you want to make sure that that pigtail is sitting all the way up against that notch in the spring perch, then we can do the same thing on the other side. So, after our springs are in, what we can do is start to raise our axle back up. And again, we want to do this evenly on both sides. So, what we want to try to do is line up our bottom shock mounting location because after we get our brake line in, that's going to be our next step, but making sure that that's aligned. It's going to put us in a good position. So, what we want to do at this point is reconnect our brake line. So, we're going to take our factory hardware and reconnect this bottom bracket on our spring perch and the top bracket on our frame. I'm going to actually move our shock out of the way. We can tighten that up with our 10-millimeter socket that we used to remove it. We can secure our top brake line bracket using the same factory hardware and securing that down with our 10-millimeter socket.Next, we can secure our shock back into place using our factory hardware, and then we can secure that down with our 18-millimeter wrench and socket. Then we can repeat that process for the shock and the brake line on the other side. Next, we can reattach our sway bar end links using our factory hardware. We can tighten that up with the 18-millimeter socket and wrench that we used to remove them, and then we can repeat that on the other side.So, now that we're wrapped up in the front, the last thing that we have to do up there is reconnect our front track bar. And we have to do that with the tires on and the Jeep on its own weight, so we'll save that for last. So, now we can get started in the rear. Now, our first step is going to be to take off our bottom shock bolts. I'm going to use an 18-millimeter socket and wrench to disconnect this bottom shock bolt. I also have the axle supported just like in the front, but we can go ahead and take that out. And this is going to give us access to that lower sway bar bolt. You might need a small pry bar just to get it out of the mount here. Now, we can take out the bottom sway bar bolt using an 18-millimeter socket and wrench. Next, we can take out the bolt on our brake line bracket up on the frame here. I'm going to use the same 10-millimeter socket that we used up front. And again, this is just going to make sure that our brake line is not damaged while we're lowering our axle. Then we can just repeat that on the other side. Next, we can disconnect our rear track bar using a 21-millimeter socket. So, once the track bar is disconnected, we can start to lower down our axle. So, real quick, I'm just going to disconnect this breather hose. You just have to pull back on it. It's just going to be a barbed pin there. And then what we can do now is just lower down our axle. Once the axle is low enough, we can just pop out our spring and the isolator is going to come out with it.So, what we can do is take our isolator as well as our spacer, grab our spring, and pop that back into place. You want to make sure that this is sitting where it was when it was taken out. There should be a little indent kind of like the pigtail that we had to deal with up front, and then we can pop this into place. You may have to tinker with the height of the axle in order to get it in. Then we can repeat that on the other side. Then once they're in place, what we can do is start to raise our axle back up, making sure that that spacer is centered. Now, we can just repeat that process in reverse. We can line up our sway bar, secure that back down with the factory hardware. Tighten that up with an 18-millimeter socket and wrench. We can do the same thing for our shock. Again, you might have to mess with the height of the axle in order to line this up. Then we can take our factory bolt, pop that on through, tighten that up with an 18-millimeter socket and 18-millimeter wrench. And we can reattach our brake line, factory hardware, tightening that up with the 10-millimeter socket, and then we can repeat that on the other side.Next, what we can do is attach our sway bar drop bracket in the back here. We're going to need to disconnect these two bolts that are holding in this sway bar mount. We're going to put a block in between it just to make sure that it drops down far enough to give our sway bars a little bit of room to work with. So, I'm going to use a 16-millimeter socket to remove both of those bolts on this sway bar mount. So, after the sway bar bolts on this side are taken off, we can take off the other side as well, then we can pop in our spacer. Next, we can take our spacer, pop that on top of our factory mount there. We can take our supplied sleeve here, and that's going to go through with our provided bolt and flat washer. Then we can line this up with our mount and start to thread it into place. So, after those are threaded in, what we can do is tighten them up with a 17-millimeter socket, then we can repeat that on the other side.So, now that we're all wrapped up in the rear, again, our last thing to do is reconnect our track bar. However, since our axle is shifted up in the air, we will need to put the tires back on and do it on ground, just like we will with the front. So, now we can put the tires on, then we can reconnect our track bars. So, our last step once the Jeep is on the ground is to reconnect our track bar. So, it may be helpful to have somebody in the driver seat turning the steering wheel back and forth in order to line this up. Once you have the bolt in and the flag nut installed on the back, we can tighten it up with the 21-millimeter socket. I also recommend a extension just to clear the drag link here. Now that the Jeep is back on its own weight, we can reconnect our track bars. For the rear, you're going to want to have somebody wiggle the back end of the Jeep. They can just be on the passenger side, and just push the Jeep back and forth. This is just going to allow the axle to line up. Then once that bolt is through, we can take the flag nut and secure it to the other side, and then tighten that up with the 21-millimeter socket.So, that is going to wrap it up for my review and install. Make sure you like and subscribe for more videos and products just like this, and always keep it right here at extremeterrain.com.
Subscribe to our YouTube Channel
Features, Description, Reviews, Q&A, Specs & Installation
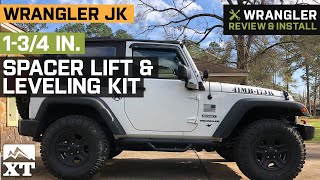
Improved Offroad Performance. When leaving the blacktop behind, even an inch can mean the difference between clearing an obstacle and getting hung up. The 1.75 Inch Spacer Lift and Level Kit gives you more than an inch of lift. One inch of lift in the suspension means enough clearance to add larger tires. That's another add-on for ground clearance.
Rugged Construction. Solid metal and rubber parts give this lift and level kit the strength to stand up to virtually anything the trails throws at your Jeep. The added lift gives you just enough extra clearance to tackle trails that would be impossible in the stock setup. This add-on kit does not require struts or shocks since it installs on the existing hardware and works with your factory suspension.
Straightforward Installation. Installing the 1.75 Inch Lift and Level Kit requires no cutting, drilling or welding. You will need to disassemble some parts to gain access for the installation, but the included instructions walk you through the entire process.
One-Year Warranty. You get a 12-month or 12,000-mile warranty, whichever comes first, against defects in materials or workmanship.
Application. The 1.75 Inch Spacer Lift and Level Kit installs on all Jeep Wrangler JK models manufactured between 2007-2018.
Fitment:
CA Residents: WARNING: Cancer and Reproductive Harm - www.P65Warnings.ca.gov
Installation Info
Installation Time
(approx) 3 Hours
Difficulty Level:
Light to Moderate mechanical skill required.
What's in the Box
10 More Questions