 FREE 1 to 3-Day Delivery on Orders $149+ Details

How to Install Carr XRS Adjustable LED Light Bar Brackets (87-95 Wrangler YJ) on your Jeep Wrangler
Installation Time
1 hours
Tools Required
- Wrench for T40 Torx and 3/16” Allen wrench
- Loctite
- 5/32” Allen wrench
- 7/16” wrench/socket
- ½” wrench/socket
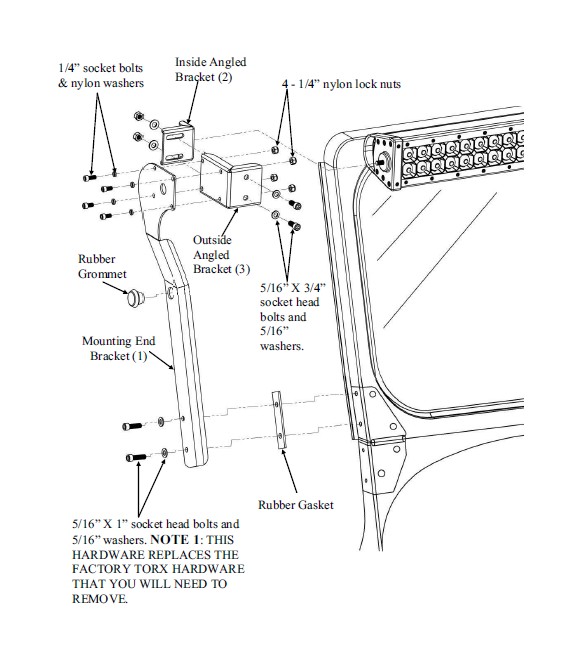
MATERIALS FURNISHED: Two Mounting End Brackets (1), two Inside Angled Brackets (2), Outside Angled Brackets (3) and one Hardware Pack.
WARNINGS!
> Do not over tighten the nuts and bolts or damage to the castings and or stripping of the threads could result.
> FOR SAFE AND PROPER USAGE OF THIS PRODUCT, THE MOUNTING INSTRUCTIONS MUST BE FOLLOWED CAREFULLY AND COMPLETELY.
> The manufacturer and distributor of this product are in no way responsible for the consumer’s failure to adhere to the warnings and directions of these instructions in the event of damage to the consumer’s vehicle, other properties and or personal injury.
1. Read these instructions through first to save yourself time when installing this product. (NOTE: Two people are required for this installation. See steps 7-10)
2. Take the black Rubber Grommet and twist it in the hole like you are screwing a bolt into a threaded hole until the smaller end comes all the way through. A little WD 40 on the grommet will help make this easier.
3. Take both of the Inside Angled Brackets (2) and mount it to each end of your LED light bar with the hardware that came with your LED light bar. Do not tighten all the way. Leave each bracket so it is able to move.
4. Take both of the Outside Angled Brackets (3) and fasten them to each Mounting End Bracket (1) with the ¼” hardware provided. Securely tighten these four bolts.
5. Remove the factory Torx bolts with a T40 Torx wrench or a 3/16” Allen Wrench on the hinges where you will be installing this light bar assembly. These bolts will be replaced with our 5/16” X 1” socket head cap screws. Do this on both sides of the vehicle. Refer to NOTE 1 on the drawing on the other side of this sheet.
6. Attached both Mounting End Brackets (1) to each side of the vehicle using the 5/16” hardware provided with the Rubber Gasket. Refer to NOTE 1 on the drawing on the other side of this sheet. Securely tighten these bolts to the vehicle.
7. Now you will need two people for the next 3 steps.
8. Each person grab an end of the LED light bar with our Angled Brackets (2) installed and place the entire assembly inside both of the Outside Angled Brackets (3).
9. Take the four 5/16” X ¾” bolts with the washers and nylon lock nuts and attached the LED light bar assembly to both of the Mounting End Brackets (1) assemblies.
10. Once you have centered the LED light bar assembly, securely tighten these bolts.
11. Now tighten the hardware that attaches to our Inside Angled Brackets (2) and your LED light.
12. Go back and retighten all hardware.
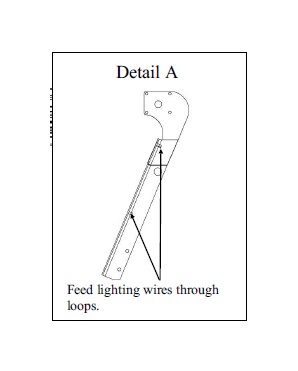
13. Refer to Detail A for feeding your wires from your light bar to your vehicle.
14. Now your light bar is ready to go.
15. IMPORTANT: By not following these mounting instructions completely and carefully, product failure could occur.

