 FREE 1 to 3-Day Delivery on Orders $149+ Details

How to Install a Body Armor Rear Bumper w/ Adjustable Pin on your Jeep Wrangler
** Inspect bumper and swing arm prior to installation. Contact us at 951-808-0750 if missing parts
** Due to the weight of the bumper it is recommended at least two people for installation
Removing Factory Bumper:
NOTE
If not installing Body Armor new elevated CHSML light then proceed with steps 1 and 2
If installing JK-5120 then you will need to proceed to step 3 (removal of OE tire mount)
1. Remove the plastic vented panel from the inside of the tailgate to access the center brake light plug and unplug it.
2. Remove the rubber grommet and wires from the outside of the tailgate and reinstall the plastic vented panel on the inside.
3. Remove the factory spare tire mount from the tailgate. Use the upper bolts to attach the JK-5120 CSHML light, otherwise reinstall all 4 bolts back into their original locations.
4. Remove the rubber bump stops from the tailgate. DO NOT discard. These will be reused
Installing JK-2395:
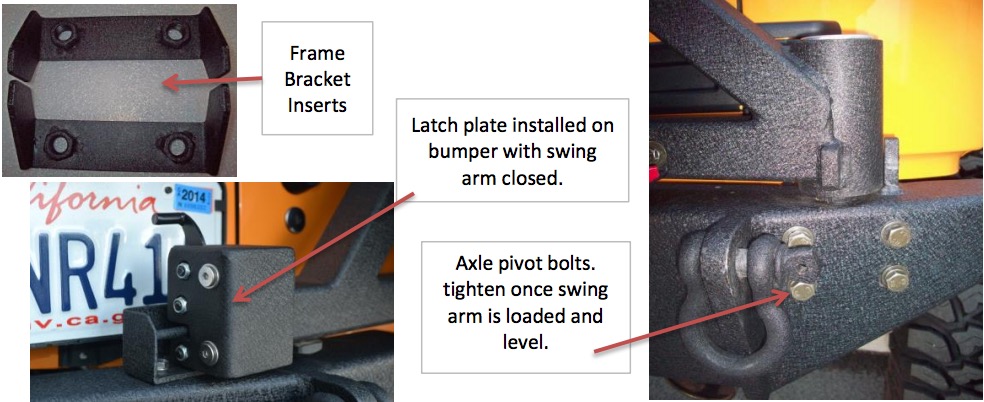
1. Insert frame brackets into the frame rails. They should be positioned with the legs down and the flat plate in the inside surface of the outside wall of the frame rail. Align the holes of the plate with the holes in the frame
2. Place the lower bumper section on the frame and loosely attach using the four 16MM
bolts with a lock washer and flat washer. Also reinsert the four 10MM from step 5. Leave all hardware lose until all bolts are installed, fully tighten all of the bolts once all are installed.
NOTE: The 16MM bolt with lock washer and flat washer will insert through the bumper bracket, through the frame and into the nut plate brackets.
3. Install the 4 8M bolts/lock washer/flat washers into the 4 mounting points on the pivot pin. Keep loose until the swing arm is installed. If not installing the swing arm at this time tighten the 4 8M bolts
4. Install the latch striker plate to the bumper (drive side under the license plate)
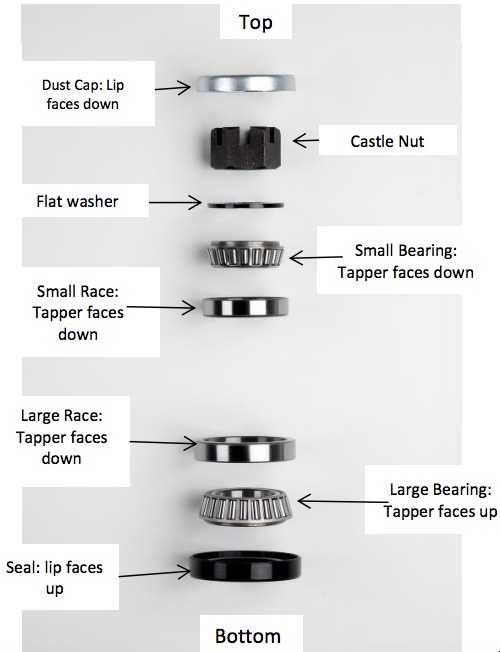
Pre-lube the bearings with a quality marine grade grease
1. Take the swing arm and turn it over so that the bottom of the bearing barrel is facing up. Insert the large race with the tapper facing up. You will need to force it in. Insert Large bearing with the tapper to match the tapper on the race.
2. Insert the seal, make sure that the lips of the seal are inside the bearing barrel. Gently tap in with a mallet the seal will be fully installed when it is flush with the bearing barrel.
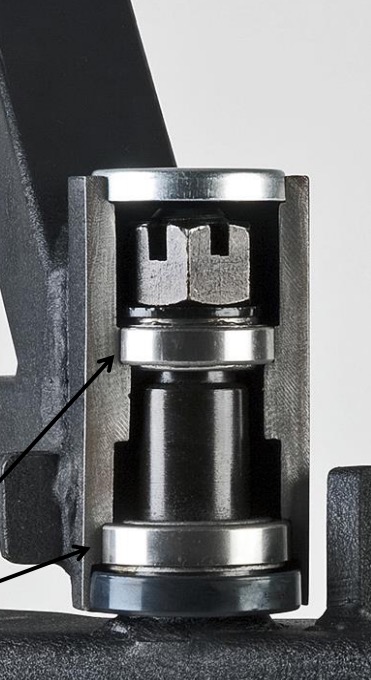
3.Turn swing arm over and insert the small race. Confirm that it is fully installed.(refer to cutaway image)
4. Slide the swing arm over the pivot axle making sure that it sets all the way down.
5. Now insert the small bearing over the axle followed with the large flat washer and castle nut.
6. Tighten the castle nut using a 36MM socket. Confirm that the arm swings freely and does not hit the landing pad
7. Once fitment is confirmed torque the castle nut to 100 ft. lb. A cotter pin is not required.
8. Install the dust cap with the "cupped" side facing down.
9. Install the latch to the swing arm latch box.
10. Now that the swing arm is installed it must be adjusted so that it latches correctly. It is easier to adjust/level the swing arm with the spare tire not installed. Use a lever device on the latch end to lift the arm to level it. Once the arm is level tighten the 4 bolts on the pass side of the bumper.
11. Re-install the OEM rubber tire stops on the tailgate.
12. Locate tire mount. There are 2 bolt patterns on the tire mount. The JK will use one on the left and two on the right. Measure 4.5" on center to confirm which holes to use, tighten the wheel studs at this time.
13. Attach the tire mount to the swing arm by using the 1/2" bolts, washers, lock washers and nut. Keep all hardware lose. The vertical tab of the mount plate fits on the driver side of the vertical tab on the swing arm.
14. Attach tire to the mount plate, tighten the wheel lugs. Now slide the tire and mount so that the tire is tight against the swing arm. Now tighten all of the mounting hardware on the tire mount.
NOTE: Recheck all bolts and latch after the first couple of hundred miles. It is advised to inspect the bumper and hardware periodically
** Body Armor provides a dual step paint process, a base E-coat with a textured power coat exterior paint. This is very durable and corrosion resistant process however rust can still occur. We warranty the finish for manufacturer defects for a period of 90 days from the date of purchase. Surface rust is not considered a manufacturer defect, rust from rock chips or trail scratches are also not considered a manufacturer defect. It is the responsibility of the owner to touch up any rock chips or scratches. Use of a flat black paint sprayed on a piece of foam can be used to touch up any scratches. Surface rust can be cleaned with spray lubricants such as WD-40.
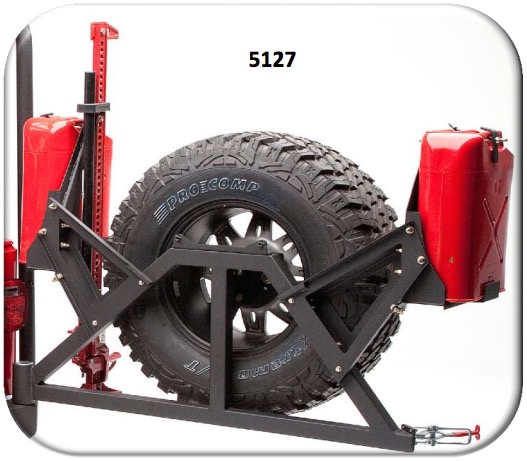
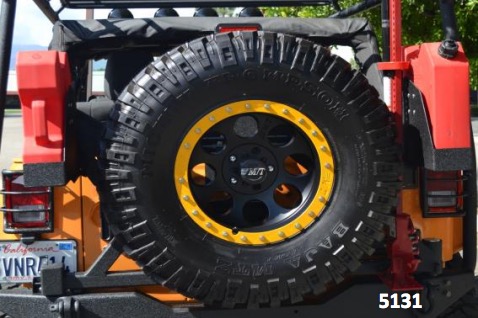
If you are looking for extra fuel capacity check out our gas can cradle system, PN 5127, PN 5131. And for the Hi-Lift Jack use PN 5128 bracket system. Both easily attach to the swing arm by using the pre-drilled holes

