
How to Install Black Horse Off Road 3 in. Round Side Steps - Black (07-17 Wrangler JK 2 Door) on your Jeep Wrangler
Shop Parts in this Guide

PROCEDURE:
1. REMOVE CONTENTS FROM BOX. VERIFY ALL PARTS ARE PRESENT. READ INSTRUCTIONS CAREFULLY. FACTORY INSTALLED OR AFTERMARKET "ROCK RAILS," SIDE STEPS OR RUNNING BOARDS MUST BE REMOVED.
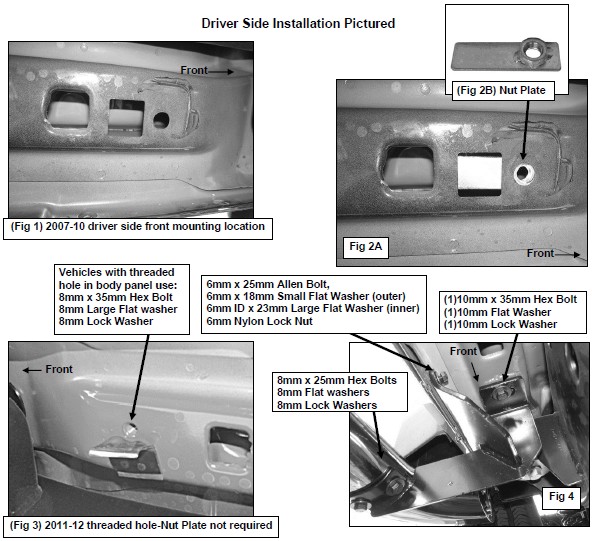
2. Start installation toward the front of the driver side of the vehicle. Determine if the vehicle is has an open floor panel or a threaded hole in the floor panel for the top tab on the Bracket, (Figures 1 & 3).
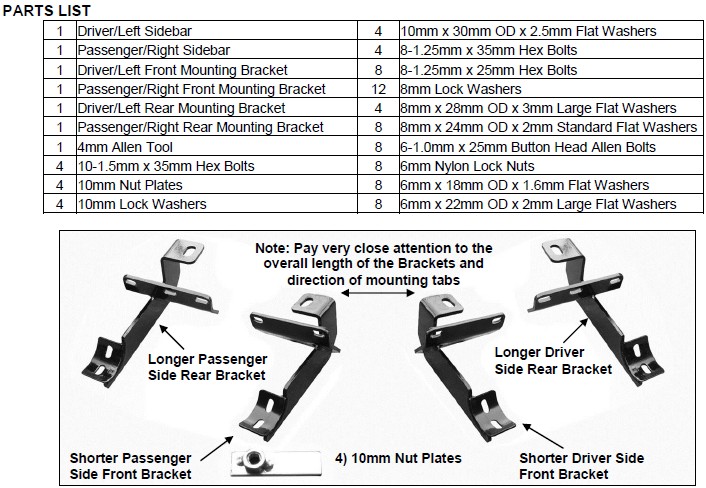
a. Vehicles open mounting location: Insert (1) 10mm Nut Plate into the large square opening in the floor panel. Line up the threaded nut with the small hole in line with the tab on the Bracket, (Figures 2A & 2B). Bolt the Bracket to the Nut Plate with (1) 10mm x 35mm Hex Bolt, (1) 10mm Lock Washer and (1) 10mm Flat Washer. Do not tighten hardware, (Figure 4).
b. Vehicles with factory threaded hole in floor panel: Bolt the tab on the Bracket to the threaded hole in the floor panel with (1) 8mm x 35mm Hex Bolt, (1) 8mm Lock Washer and (1) 8mm x 28mm OD Large Flat Washer, (Figures 3 & 4). Do not tighten hardware.
3. Line up the mounting plate on the Bracket with the (2) factory holes in the pinch weld. Bolt the Mounting Bracket to the back of the pinch weld using the included (2) 6mm x 25mm Button Head Allen Bolts, (2) 6mm x 18mm Small Flat Washers, (against pinch weld), (2) 6mm x 22mm OD Large Flat Washers, (inside against the bracket) and (2) 6mm Nylon Lock Nuts, (Figure 4). Leave loose at this time.
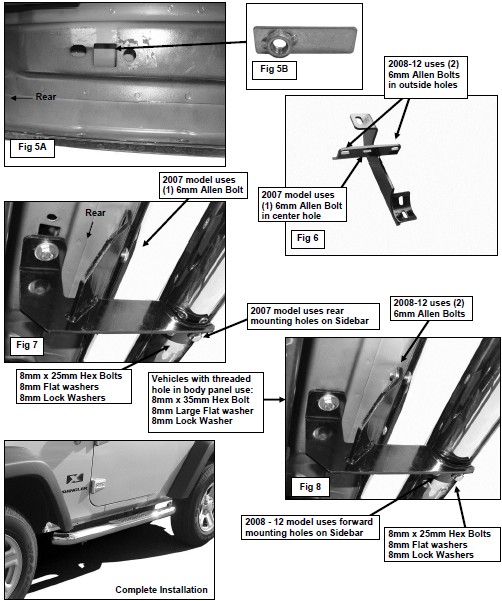
4. Repeat Steps 2 - 3 for driver side rear Mounting Bracket installation, (Figures 3, 5A & 5B). NOTE: Determine correct rear Bracket installation procedure for your model year:
a. 2007 - 8: Use only the center hole on the Bracket and (1) 6mm x 25mm Allen Bolt, (1) 6mm Small Flat Washer (outside) and (1) 6mm Large Flat Washer, (inside against bracket), and (1) 6mm Nylon Lock Nut to attach rear bracket to the back of the pinch weld, (Figures 6 & 7).
b. 2008 - 12: Requires (2) 6mm Allen Bolts, (2) 6mm Small Flat Washers (outside) and (2) 6mm Large Flat Washers, (inside against bracket), and (2) 6mm Nylon Lock Nuts to attach rear bracket to back of pinch weld, (Figures 6 & 8).
5. Carefully unwrap and position the driver Sidebar onto the Brackets. Attach the Sidebar to the Mounting Brackets using the included (4) 8mm x 25mm Hex Bolts, (4) 8mm Lock Washers and (4) 8mm Flat Washers (Figure 4). Do not tighten at this time. NOTE: The Sidebar has (2) sets of inserts to bolt the Sidebar to the rear Bracket.
a. 2007: Use the rear set of inserts closest to the rear tire, (Figure 7).
b. 2008 - 12: Use the forward set of inserts, (Figure 8).
6. Level and adjust the Side Bar and Brackets and tighten all hardware.
7. Repeat Steps 2 - 6 for Passenger Sidebar installation.
8. Do periodic inspections to the installation to make sure that all hardware is secure and tight.
To protect your investment, wax this product after installing. Regular waxing is recommended to add a protective layer over the finish. Do not use any type of polish or wax that may contain abrasives that could damage the finish. For stainless steel: Aluminum polish may be used to polish small scratches and scuffs on the finish. Mild soap may be used also to clean the Sidebar.
For gloss black finishes: Mild soap may be used to clean the Sidebar.


