FREE 1 to 3-Day Delivery on Orders $149+ Details

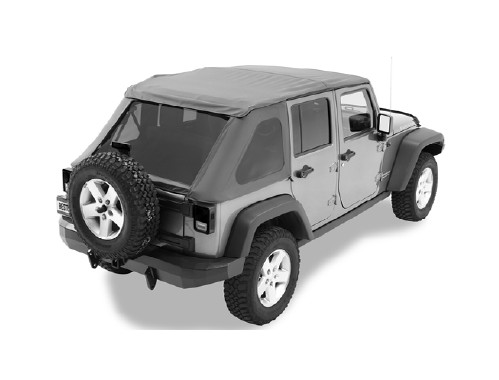
How to Install a Bestop Trektop NX on your 2007-2017 Jeep Wrangler JK

Shop Parts in this Guide
Installation Tips
Before you begin installing your new Trektop NX, please read all the instructions thoroughly, and watch the Bestop installation video. (See Support section on this page)
For a smooth fit:
For easier installation, the top should be installed at a temperature above 72º F. Below this temperature, the fabric may contract an inch or more, making it difficult to fit the vehicle.
It is normal for the fabric to contract and wrinkle when stored in the shipping carton. Within a few days after installation, the fabric will relax and the wrinkles will disappear.
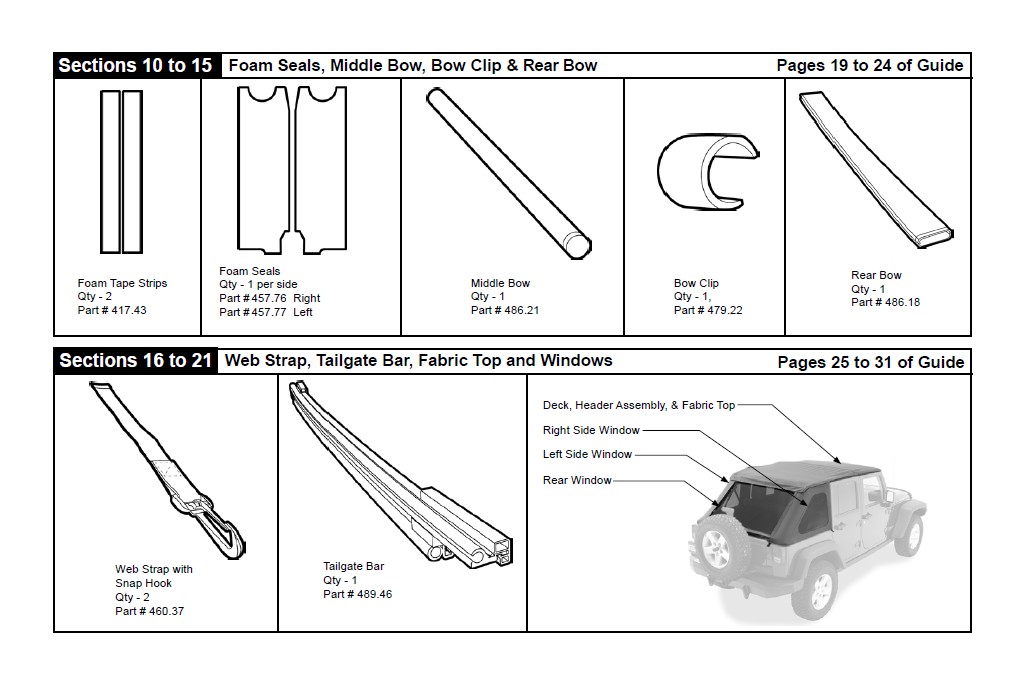
Parts List
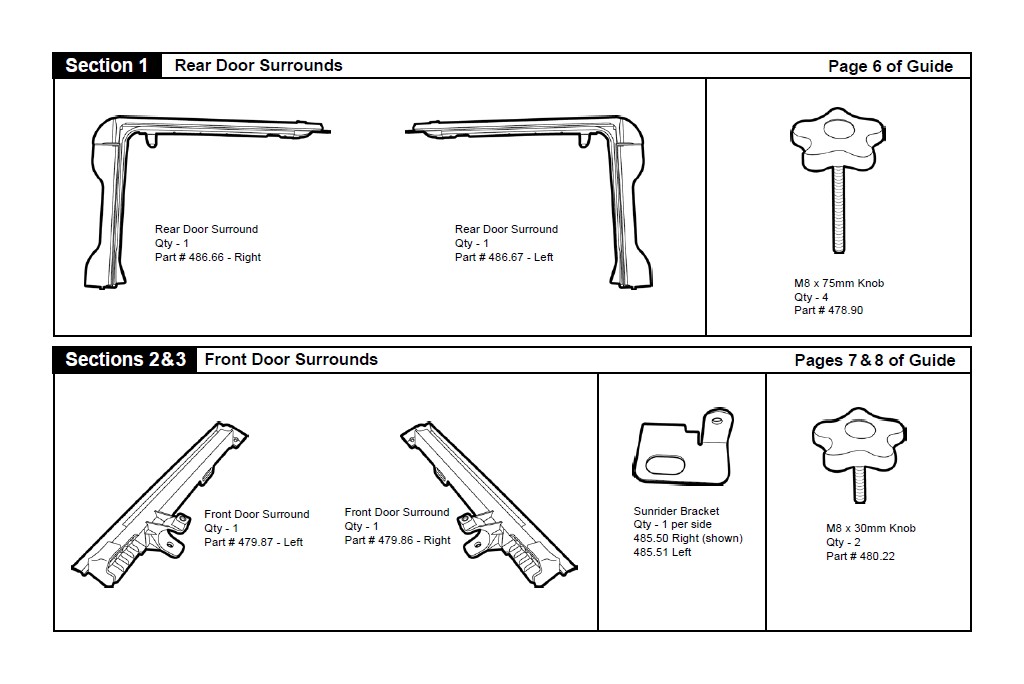
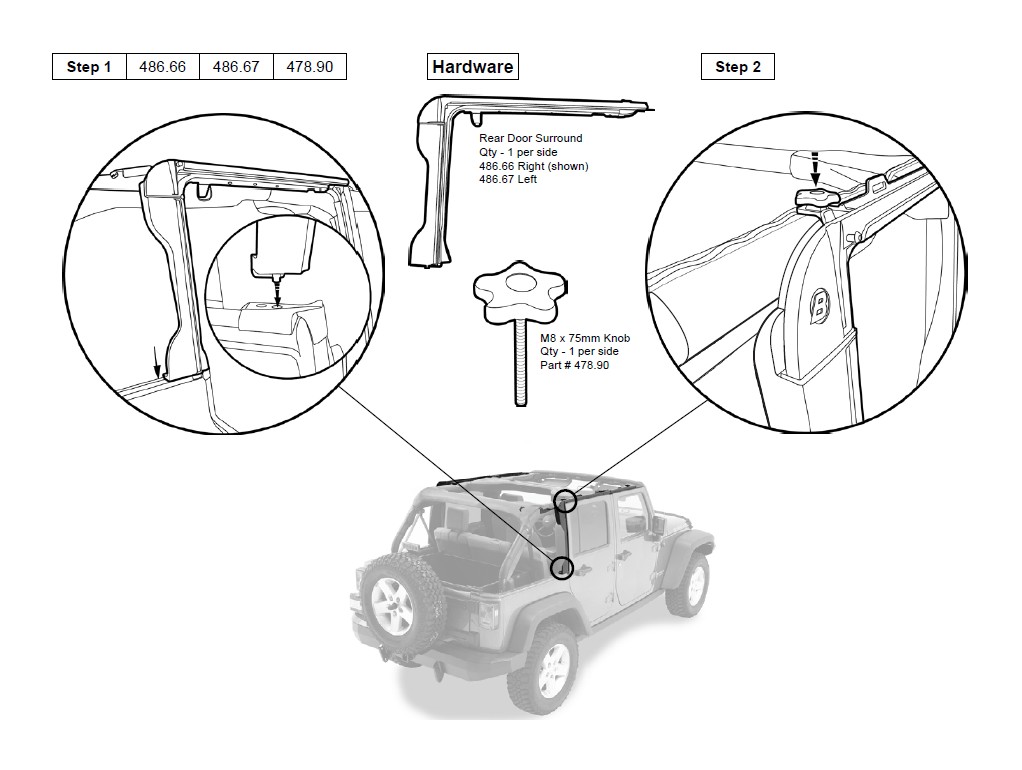
Section 1 Install Rear Door Surrounds
Step 1
Open the Rear Door. Insert the pin in the bottom of the Rear Door Surround into the hole in the belt rail behind the rear door opening. Press the channel along the top of the Rear Door Surround around the horizontal sport bar. Repeat on the other side of the vehicle.
Step 2
Insert an M8 x 75mm Knob into the rear position on the Door Surround. Repeat on the other side of the vehicle.
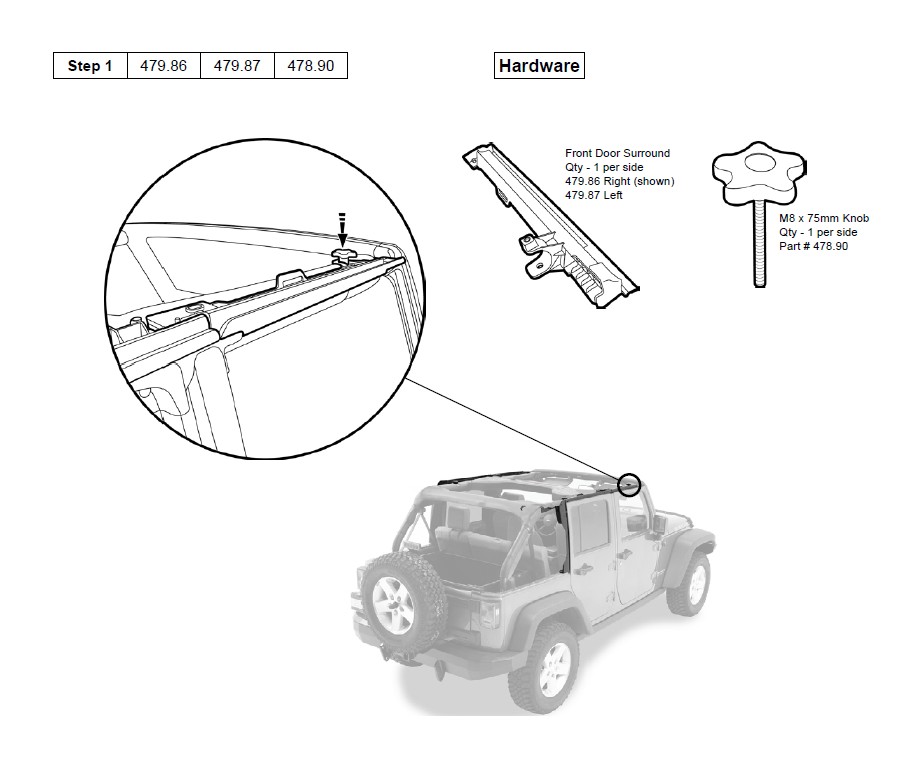
Section 2 Install Front Door Surrounds
Step 1
Open the Front Door. Position the Front Door Surround on the sport bar above the passenger side door and press it into place as with the rear.
Step 2
Insert an M8 x 75mm Knob into the front position on the Door Surround. Repeat on the other side of the vehicle.
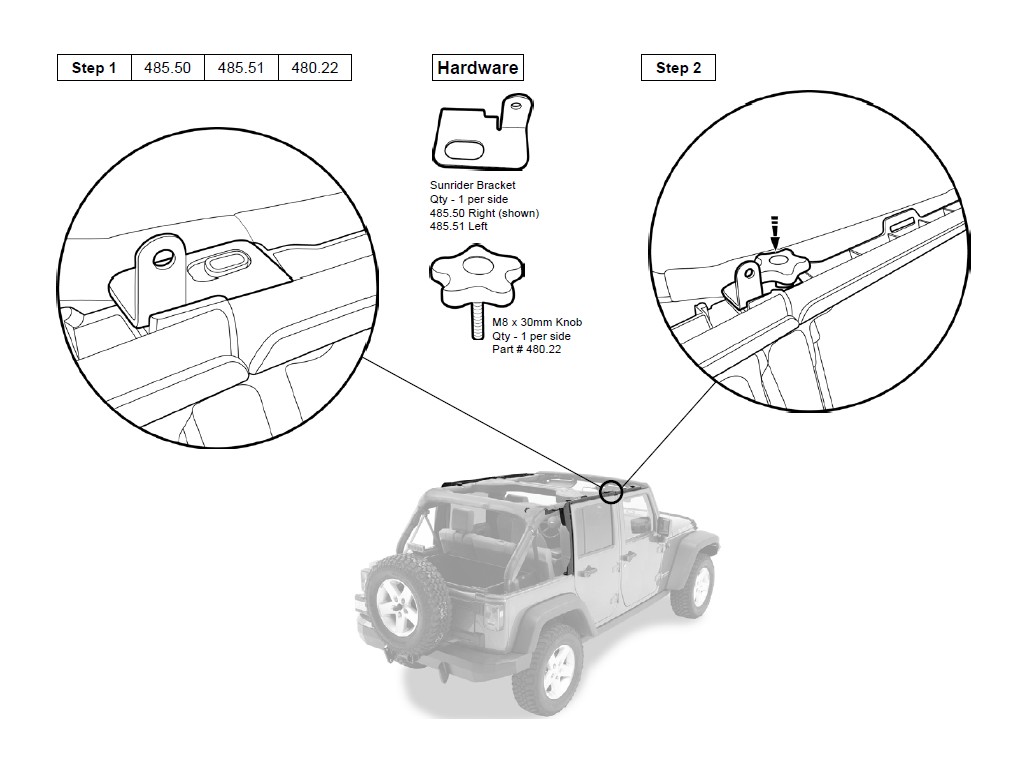
Section 3 Install Sunrider Bracket
Step 1
Place the Right Sunrider Bracket over the hole where the Front and Rear Door Surrounds join.
Step 2
Secure the Right Sunrider Bracket with the M8 x 30mm Knob. Repeat with the Left Sunrider Bracket.
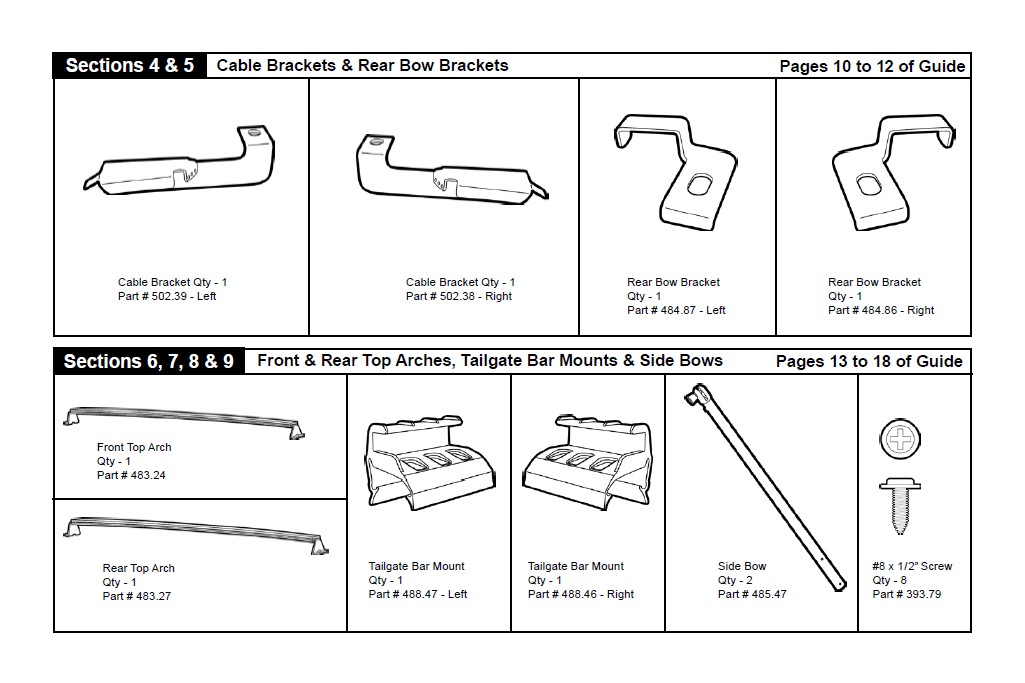
Section 4 Install Cable Brackets
Step 1
Unzip the upper rear and rear leg sport bar covers and locate the upper sport bar bolt. Use a 13mm socket and ratchet to remove the bolt and set it aside to be reused.
Step 2
Cut a horizontal slit the same width as the Cable Bracket in the sport bar cover 1/4" below the zipper and aligned with the bolt hole.
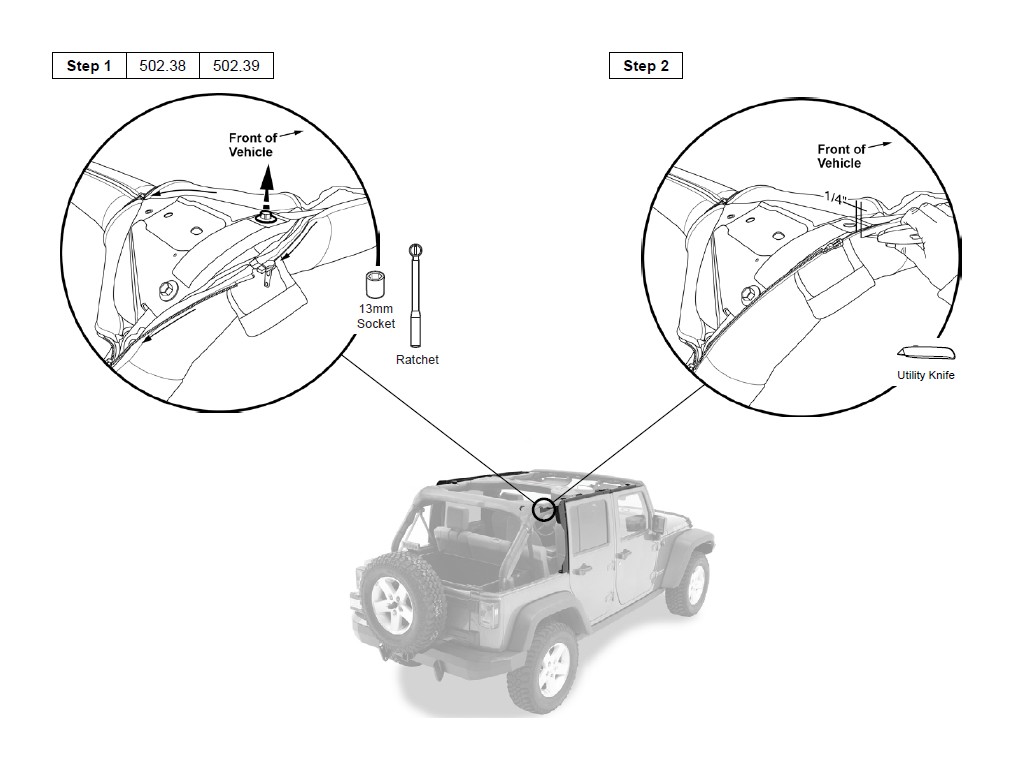
Step 3
Use the bolt that was removed to mount the Cable Bracket to the sport bar through the slit in the sport bar cover. Tighten the bolt. Repeat on both sides of the vehicle.
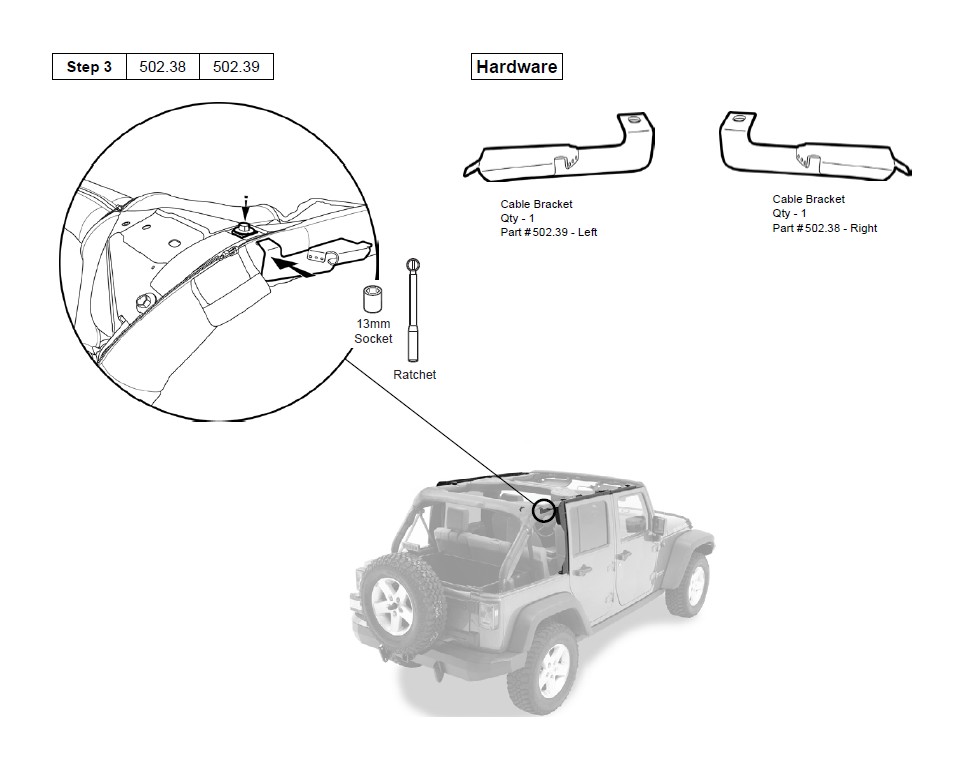
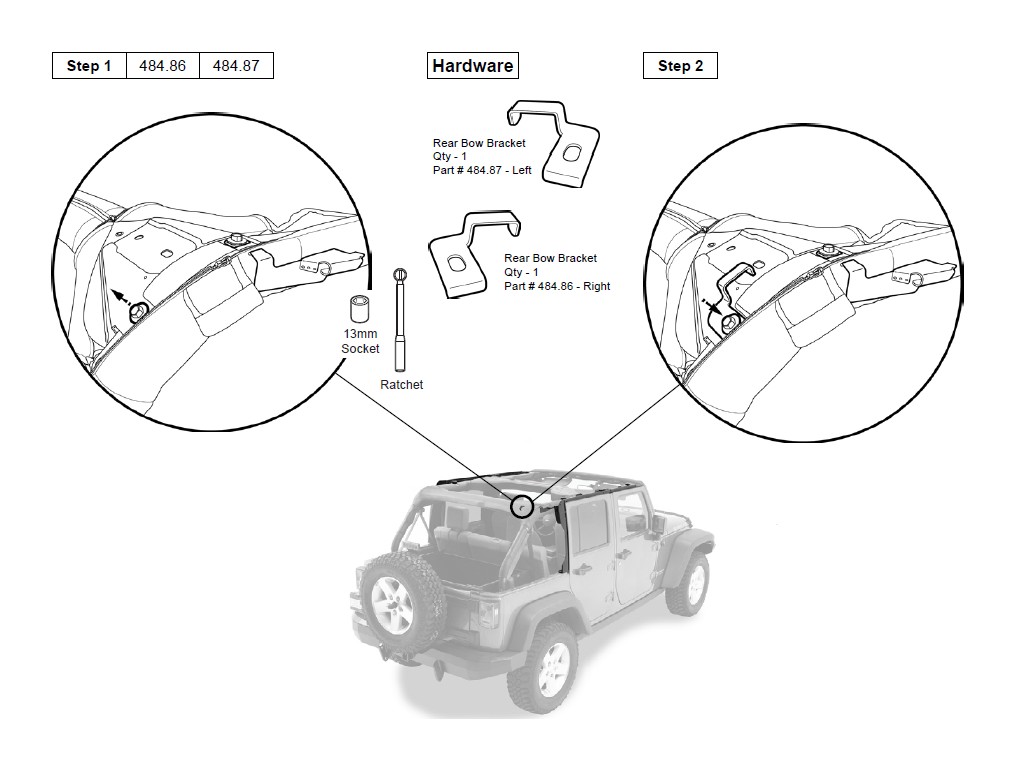
Section 5 Install Rear Bow Brackets
Step 1
Locate the rear sport bar bolt. Use a 13mm socket and ratchet to remove the bolt and set it aside to be reused.
Step 2
Loosely install the Rear Bow Bracket with the sport bar bolt. Mark where the bracket contacts the sport bar cover and remove the bracket.
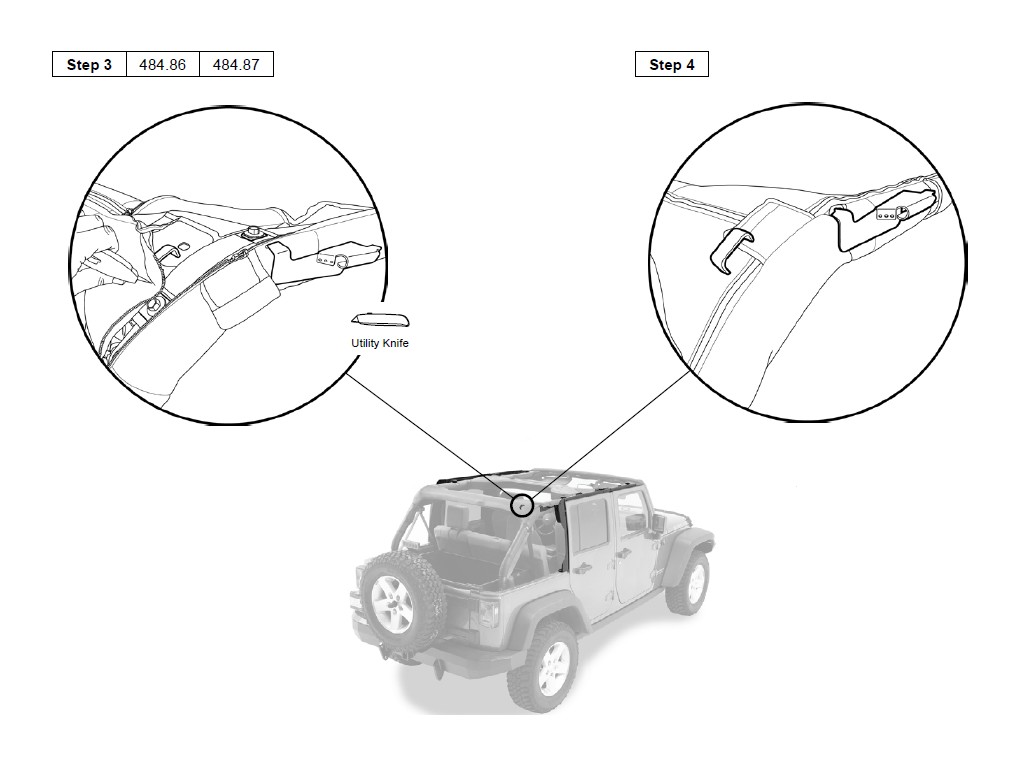
Step 3
Cut a horizontal slit the same width as the Rear Bow Bracket at this point. Reinstall the Rear Bow Bracket through the cover and tighten the bolt.
Step 4
Zip all sport bar covers. Repeat on both sides of the vehicle.
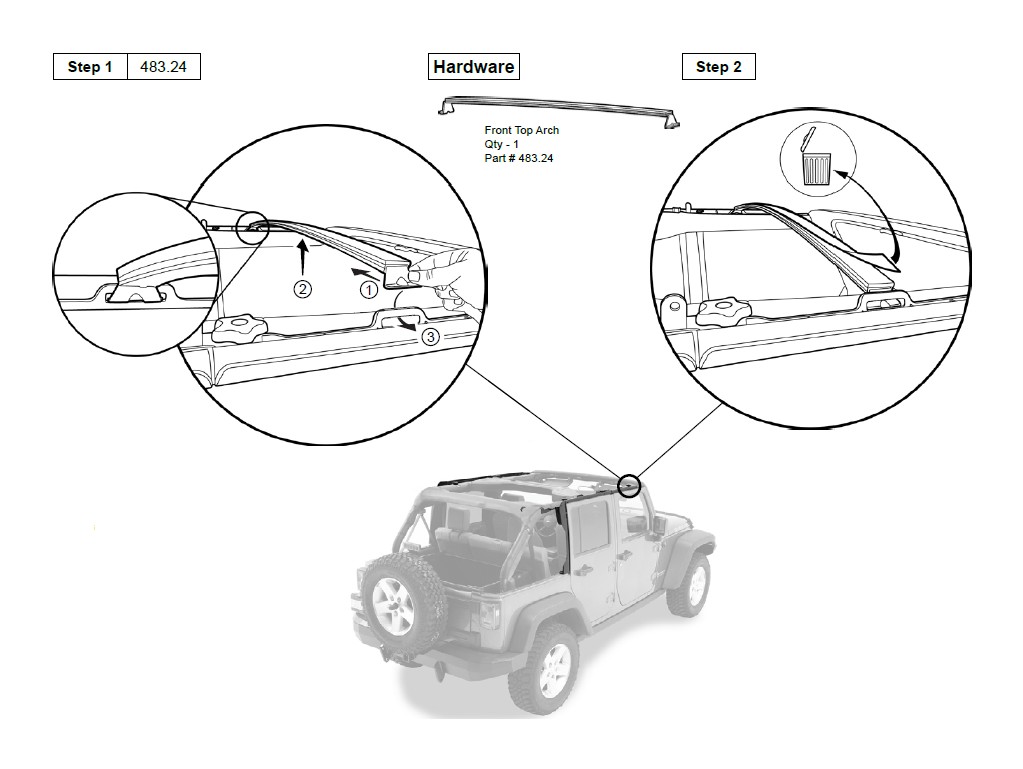
Section 6 Install Front Top Arch
Step 1
Insert one end of the Front Top Arch into the slot in the middle of the Front Door Surround on the opposite side of the vehicle from you.
1 Push the near end of the bow inward as you
2 push up in the middle of the bow from underneath to flex the bow and,
3 insert it into the slot on top of the Front Door Surround on your side of the vehicle.
Step 2
Remove and dispose of paper film.
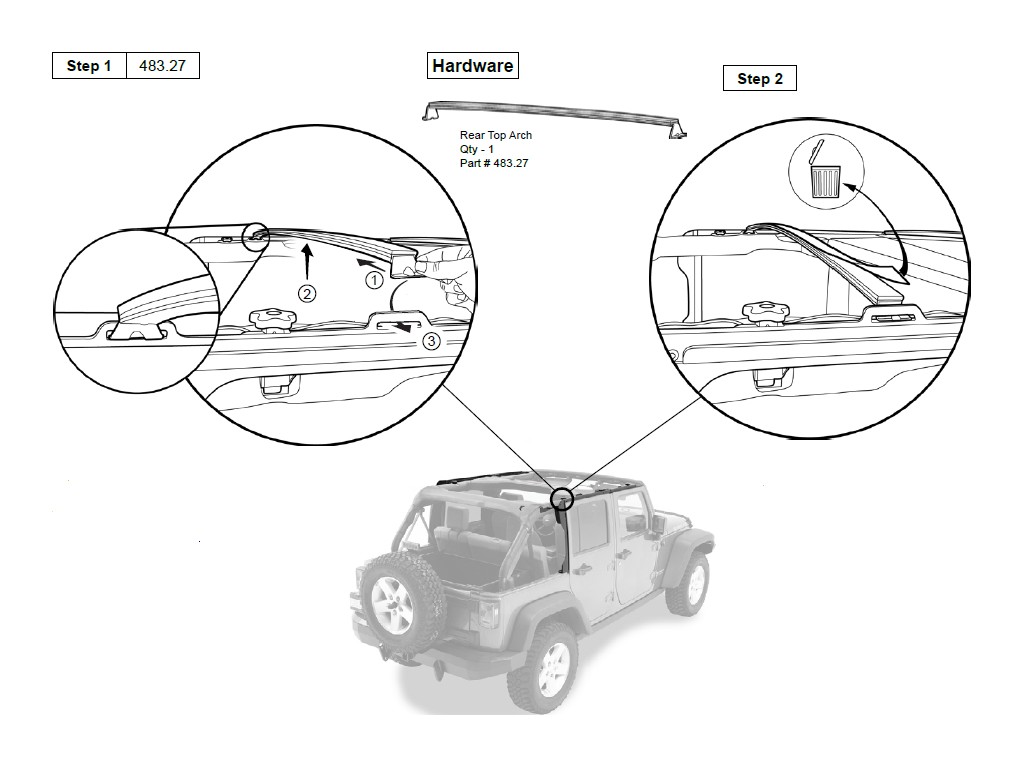
Section 7 Install Rear Top Arch
Step 1
Insert one end of the Rear Top Arch into the slot in the middle of the Rear Door Surround on the opposite side of the vehicle from you.
1 Push the near end of the bow inward as you
2 push up in the middle of the bow from underneath to flex the bow and,
3 insert it into the slot on top of the Rear Door Surround on your side of the vehicle.
Step 2
Remove and dispose of paper film.
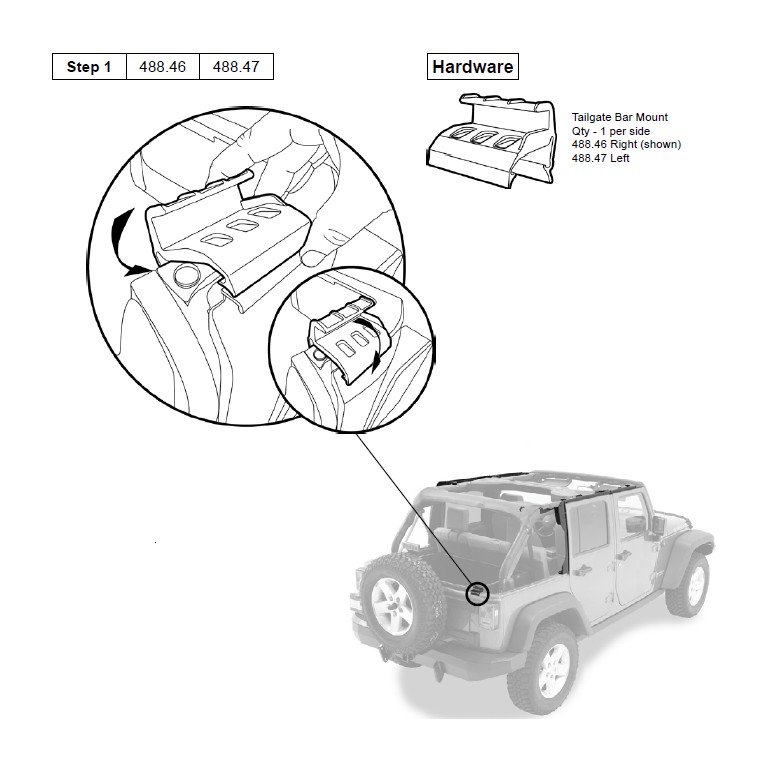
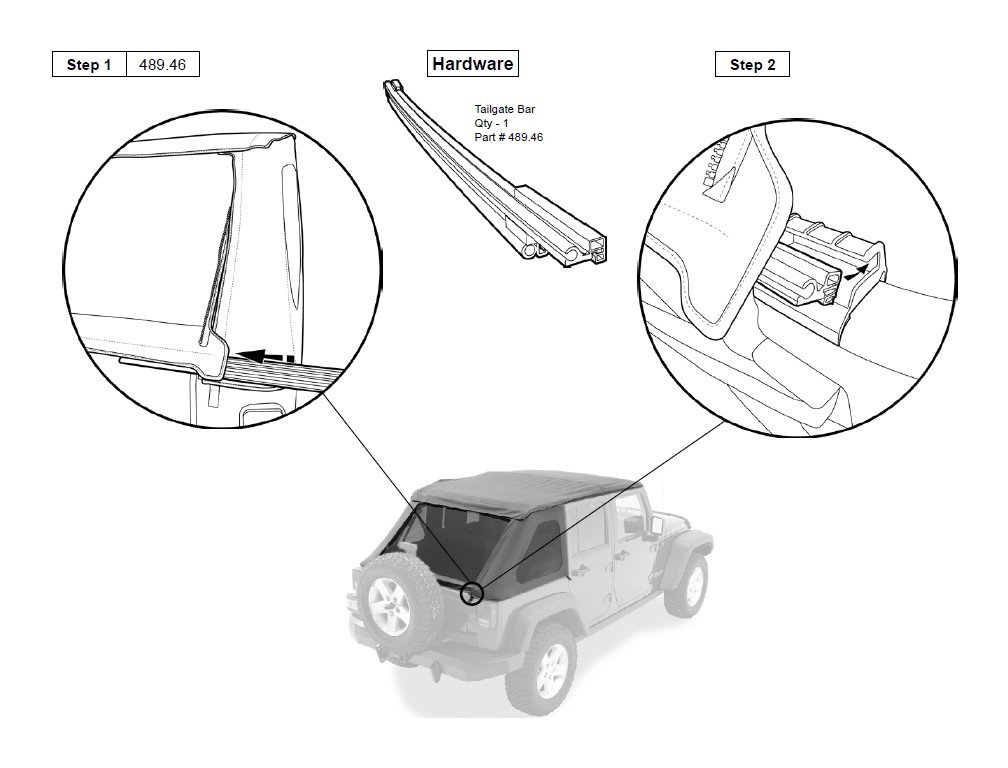
Section 8 Install Tailgate Bar Mounts
Step 1
Orient the Tailgate Bar Mounts on the vehicle. Hook the bottom of one mount under the ledge and roll the mount toward the outside of the vehicle until it clips into place under the belt rail. Repeat this with both Tailgate Bar Mounts.
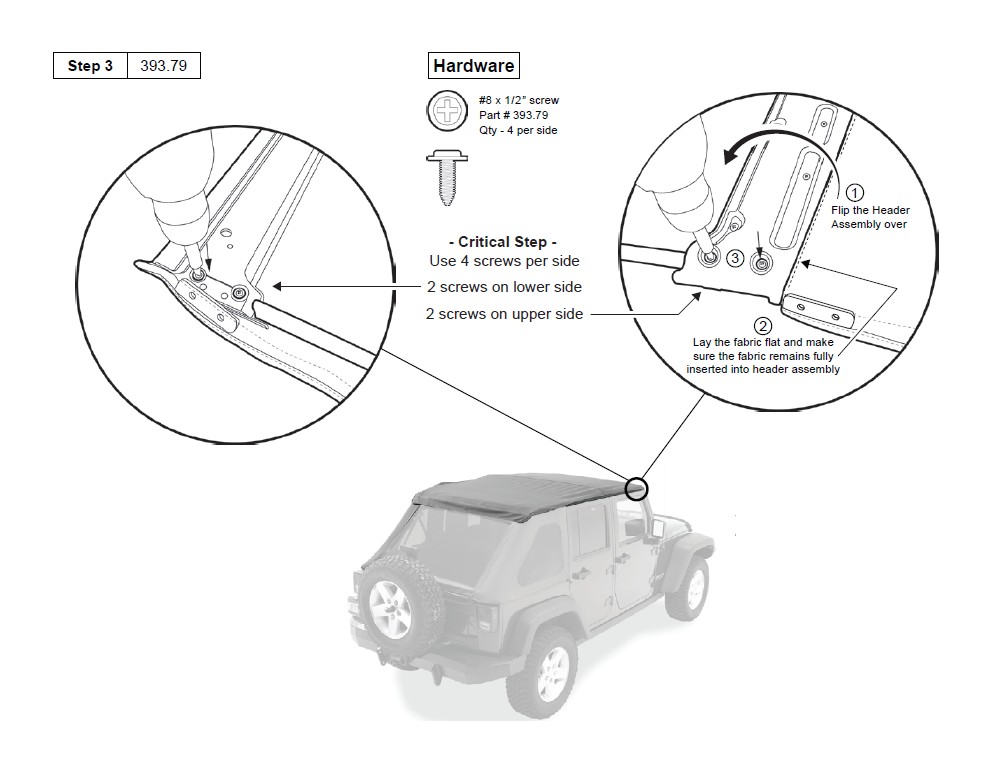
Section 9 CRITICAL STEP - Attach Side Bows to Header/Fabric Assembly
Step 1
Lay the deck, Header Assembly and fabric top upside down on a clean surface. Remove the screws on both left and right sides of the Header Assembly and set aside to be reused.
Step 2
Insert Side Bows into the Header Assembly on each side. Pivot quick release knobs to face toward the inside of the assembly, and align the holes in the Side Bow with the holes in the Header Assembly.
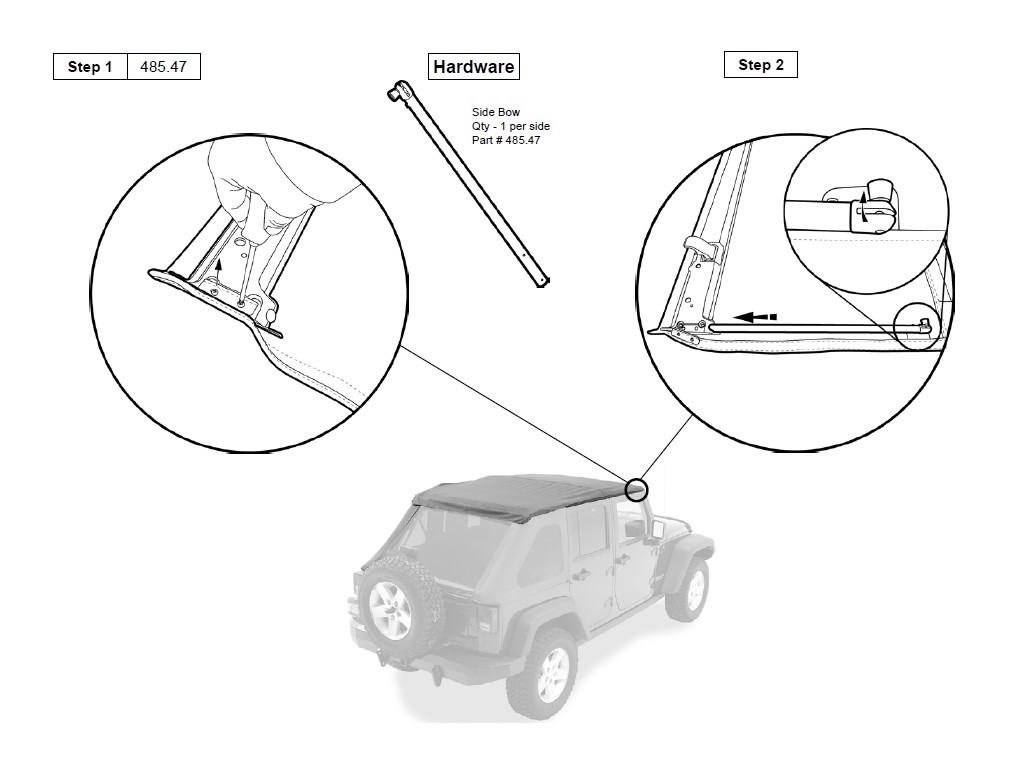
Step 3
Once the holes are aligned, use two (2) #8x1/2” screws to mount the Side Bow to the lower side of the Header Assembly. Repeat on both sides of the vehicle.
Step 4
1 Flip the Header Assembly over.
2 Be sure the fabric lays flat after you flip the header assembly over to expose the upper screw holes.
3 Insert two (2) #8x1/2” screws on the upper side of the header assembly. Repeat on both sides of the vehicle.
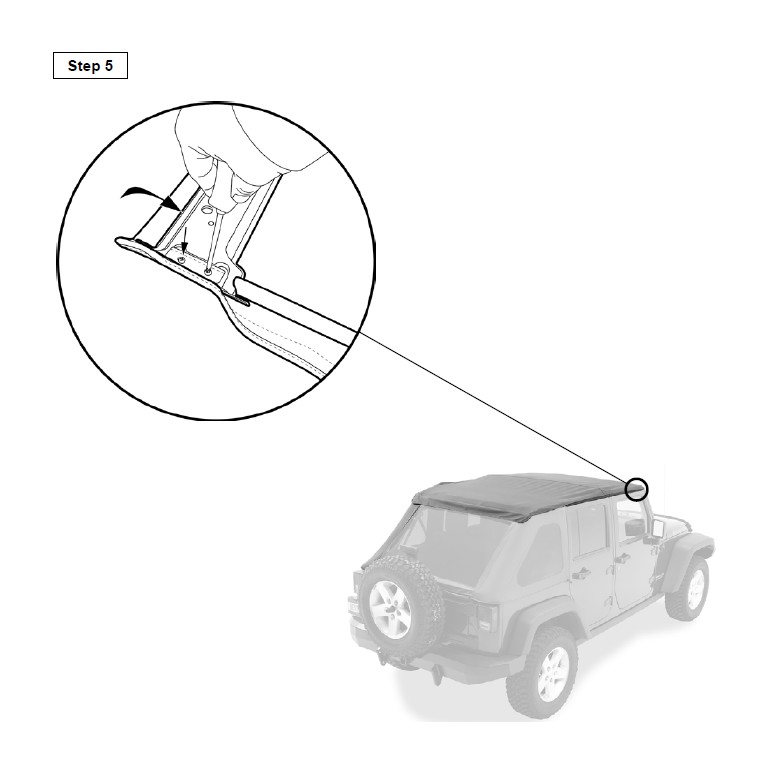
Step 5
Flip the Header Assembly back over and reinstall the screws removed in Step 1. Repeat on the both sides of the Header Assembly.
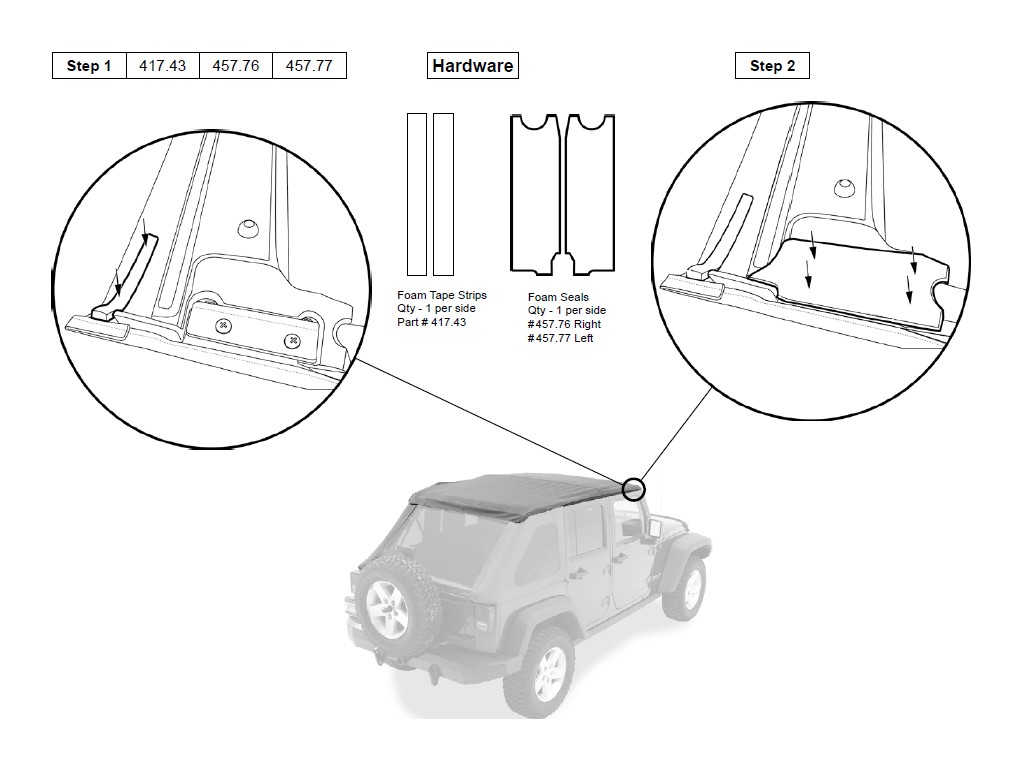
Section 10 Install Foam Tape Strips and Foam Seals
Step 1
Peel the backing off the Foam Tape Strips and install them on each side of the Header.
Step 2
Peel the backing off the Foam Seal and install it on the passenger side of the Header.
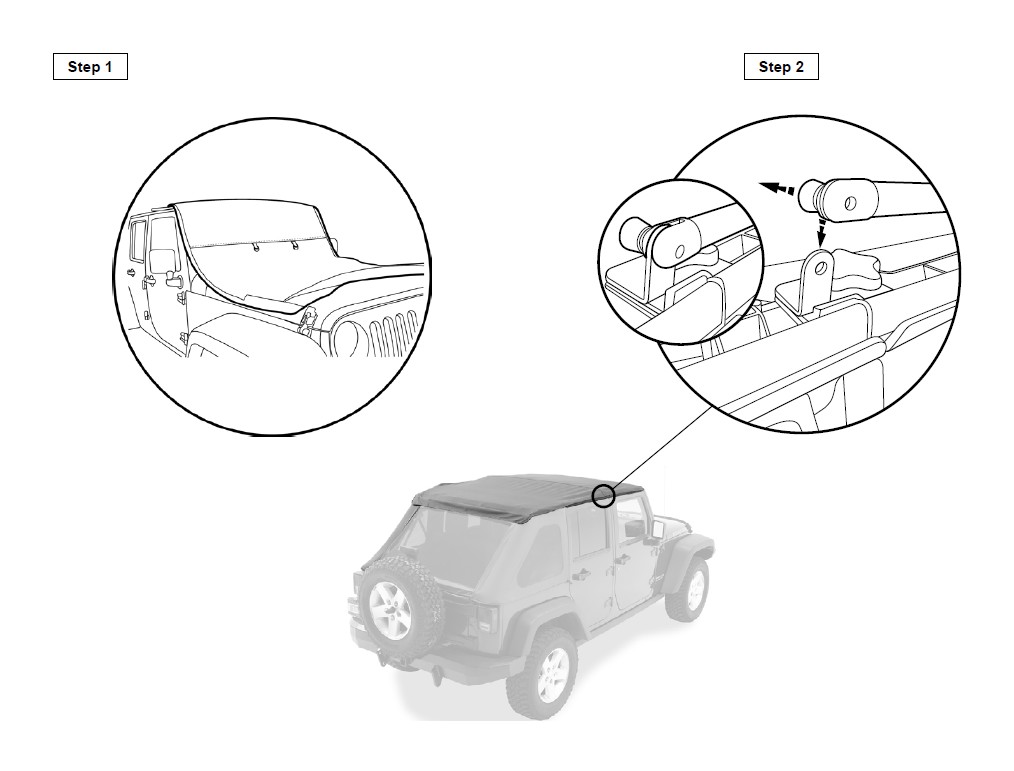
Section 11 Mount Header Assembly to Sunrider Bracket
Step 1
Fold the Top Fabric toward the front of the Header. Place the Header Assembly on vehicle, with the backing up and the Side Bows on top of the Door Surrounds.
Step 2
Pull back on the quick release knob on the Side Bow and slide the Side Bow over the Sunrider Bracket. Repeat on the other side of the vehicle.
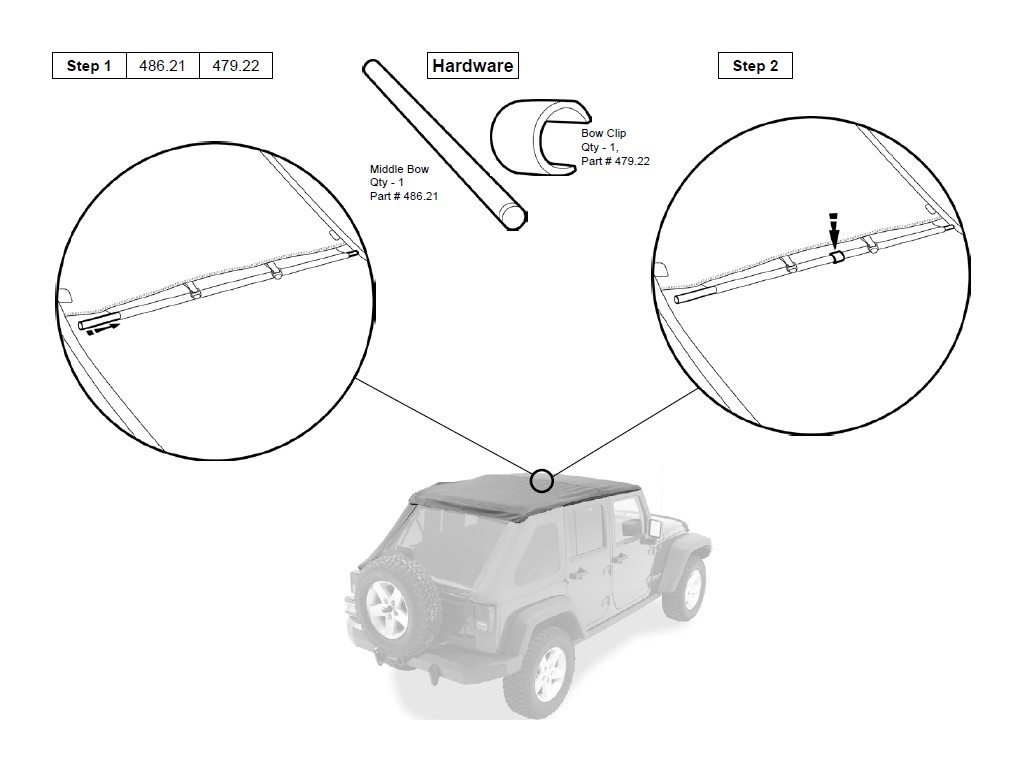
Section 12 Install Middle Bow and Bow Clip
Step 1
Slide the Middle Bow into the sleeve inside the Top.
Step 2
Hook the Bow Clip to the Middle Bow to secure the fabric sleeve.
Section 13 Position Middle Bow
Step 1
Drape the top fabric over the Top Arches and the sport bars.
Step 2
Make sure the Middle Bow is centered in the vehicle and sits in the slot in the Door Surround on each side. The Middle Bow should fit snug to the soundbar.
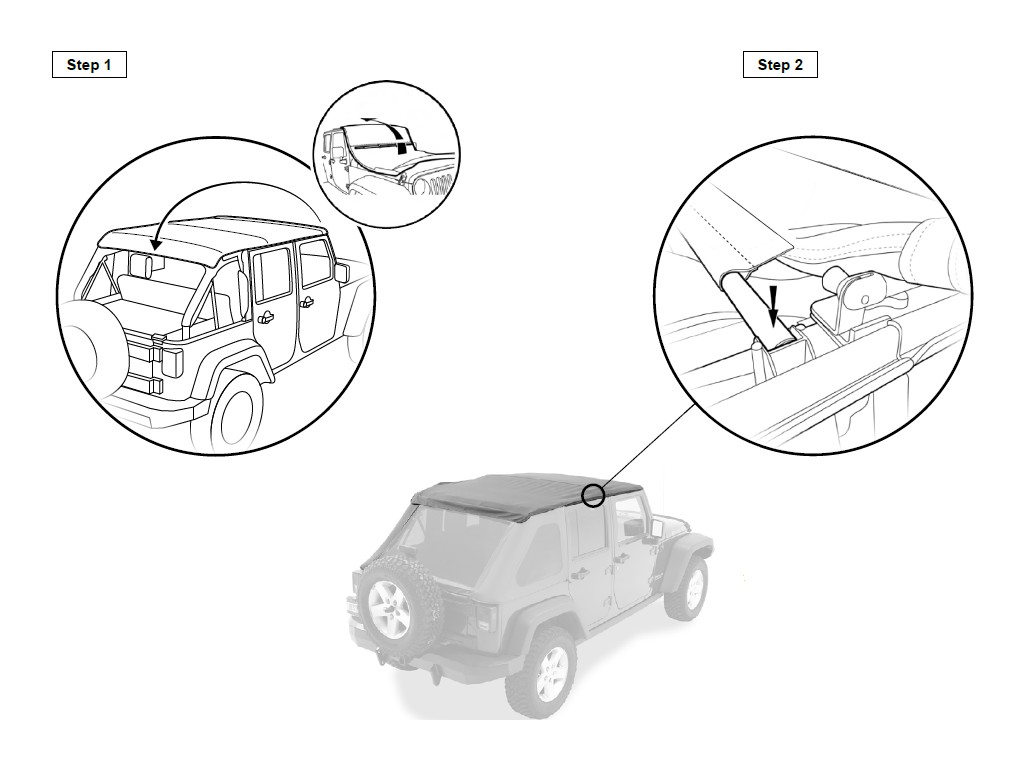
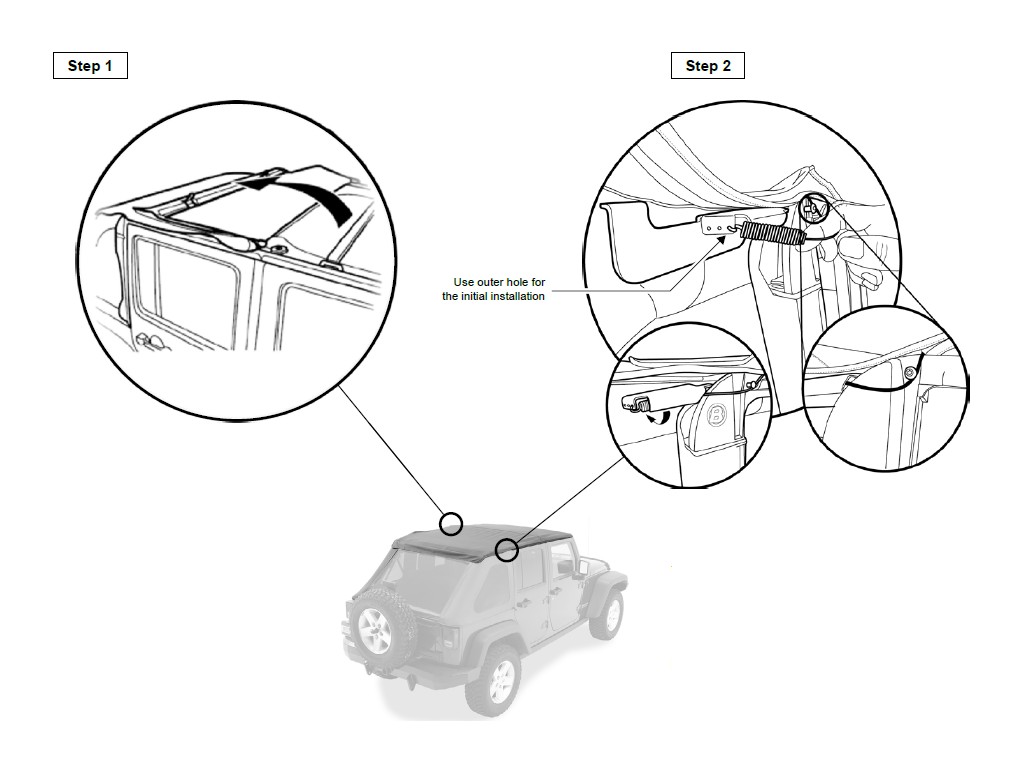
Section 14 Open Sunrider & Secure Cable Springs
Step 1
Open the Sunrider by lifting the Header Assembly away from the windshield and pivoting it toward the rear of the vehicle.
Step 2
Run the cable under the Door Surround screw and through the Cable Bracket. For the initial installation, hook the spring at the end of the cable to the outer hole in the Cable Bracket. In later installations, or for a tighter fit, increase spring tension by hooking the spring into one of the inner holes in the Cable Bracket. Repeat on both sides of the vehicle.
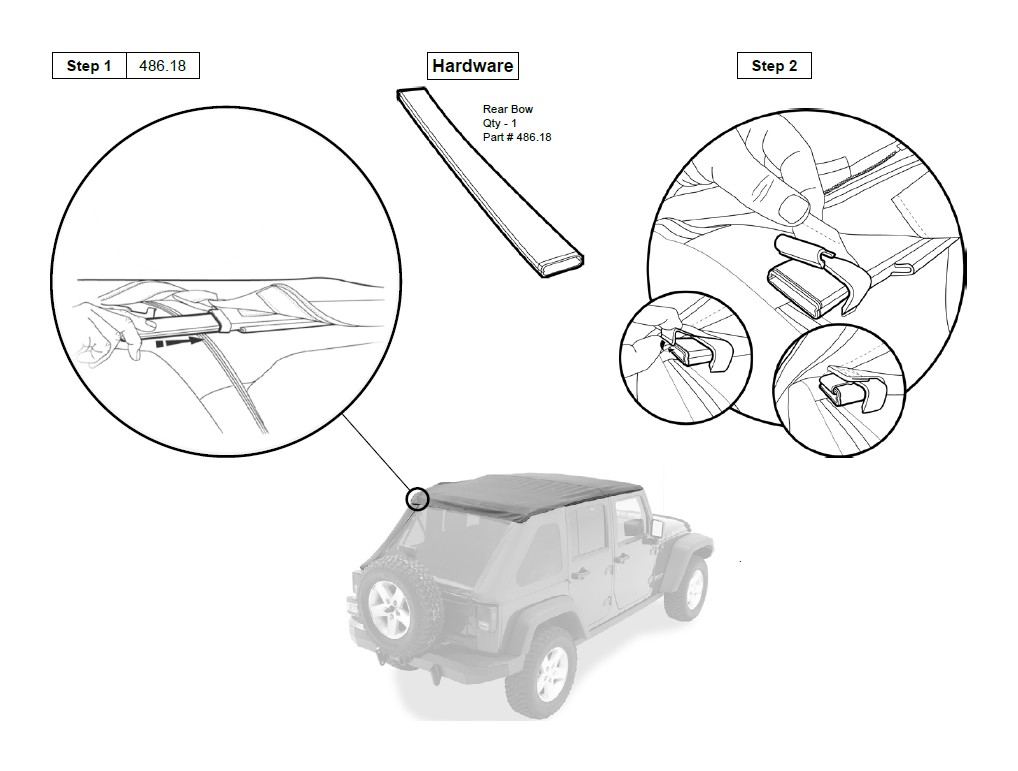
Section 15 Install Rear Bow
Step 1
Slide the Rear Bow into the pocket inside the rear of the top fabric first. Make sure it is centered between the brackets. Then push the Rear Bow through one bow bracket, and then push back the Rear Bow underneath the opposite rear bow bracket.
Step 2
Secure the J-Hooks on the rear bow flaps to the ends of the Rear Bow. Repeat on both sides of the vehicle.
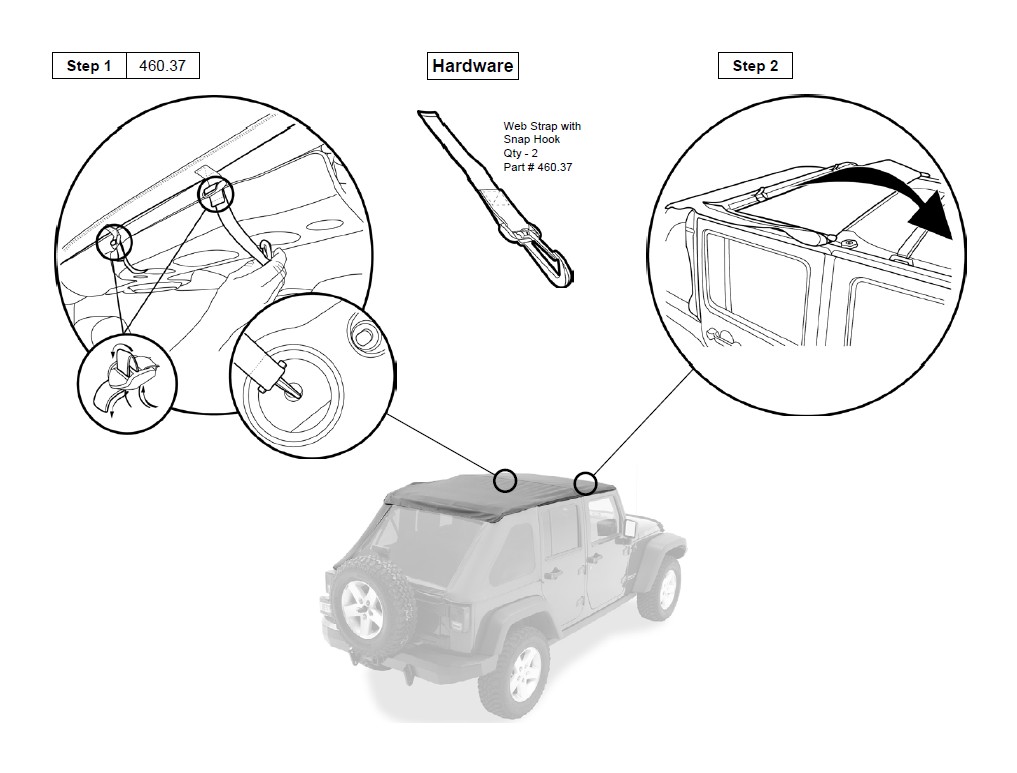
Section 16 Secure Middle Bow & Close Sunrider
Step 1
Working from inside the vehicle, thread a web strap with snap hook through each buckle at the Middle Bow location. Hook straps under and into the openings in the bottom of the soundbar. Pull the ends of each strap to tighten securely. Make sure that the Middle Bow is secure in the slots in the Door Surrounds on each side of the vehicle before pulling center straps tight.
Step 2
Close the Sunrider.
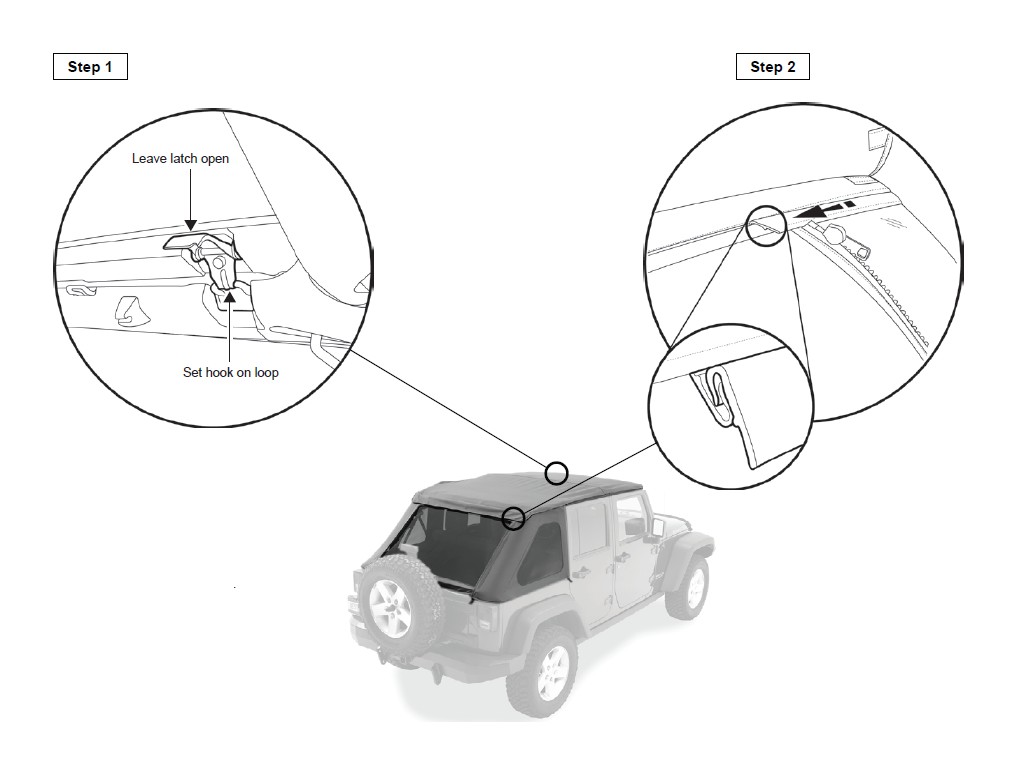
Section 17 Set Header Assembly Latches & Install Rear Window
Step 1
Hook the latches on the Header into the loops on the windshield frame. Do not close the latches at this time - they must remain open. Repeat on both sides of the vehicle.
Step 2
Align the J-Slide along the top edge of the Rear Window with the J-Slide sewn into the rear of the top. Pull down snugly on the rear window until it snaps into J-slide. Slide them together until the rear window is centered in the opening. Leave rear window hanging for now.
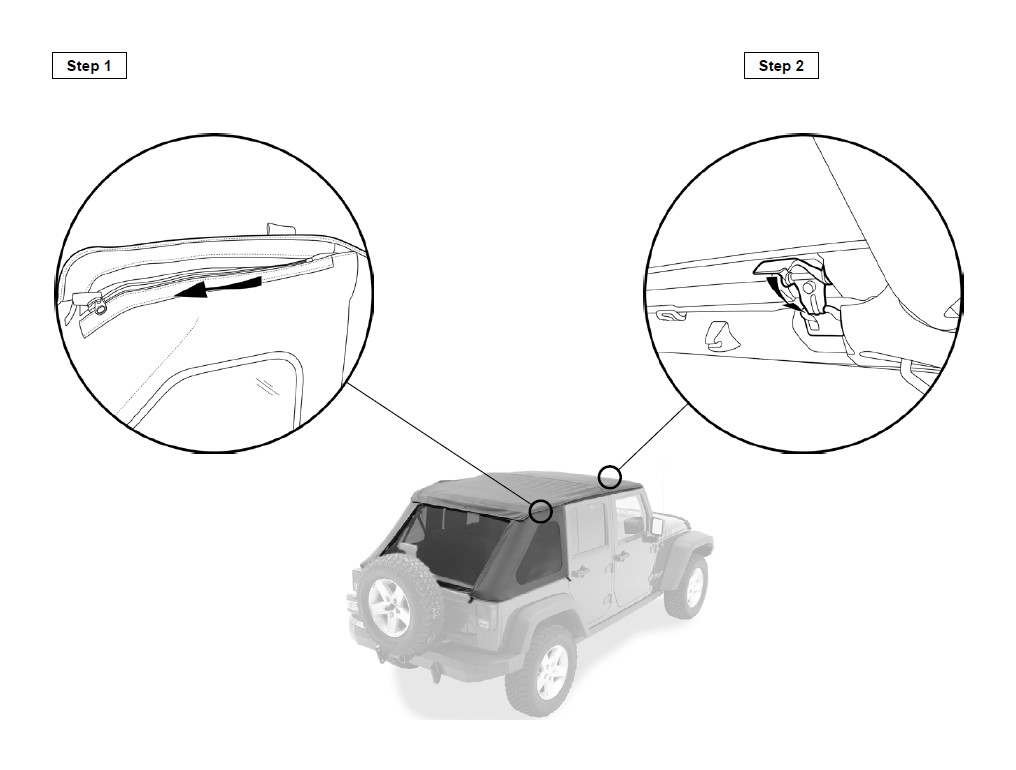
Section 18 Install Side Windows
Step 1
Start the zipper along the top of the Side Window with the zipper in the Top. Only close the zipper 1-2”.
Step 2
Engage the Rear Window zipper with the Side Window zipper. Only close the zipper 1- 2” Repeat steps 1 and 2 on the opposite side of the vehicle.
Step 3
With rear doors open, slip the plastic strip on the front of a Side Window into the channel in the Door Surround. Repeat with both Side Windows.
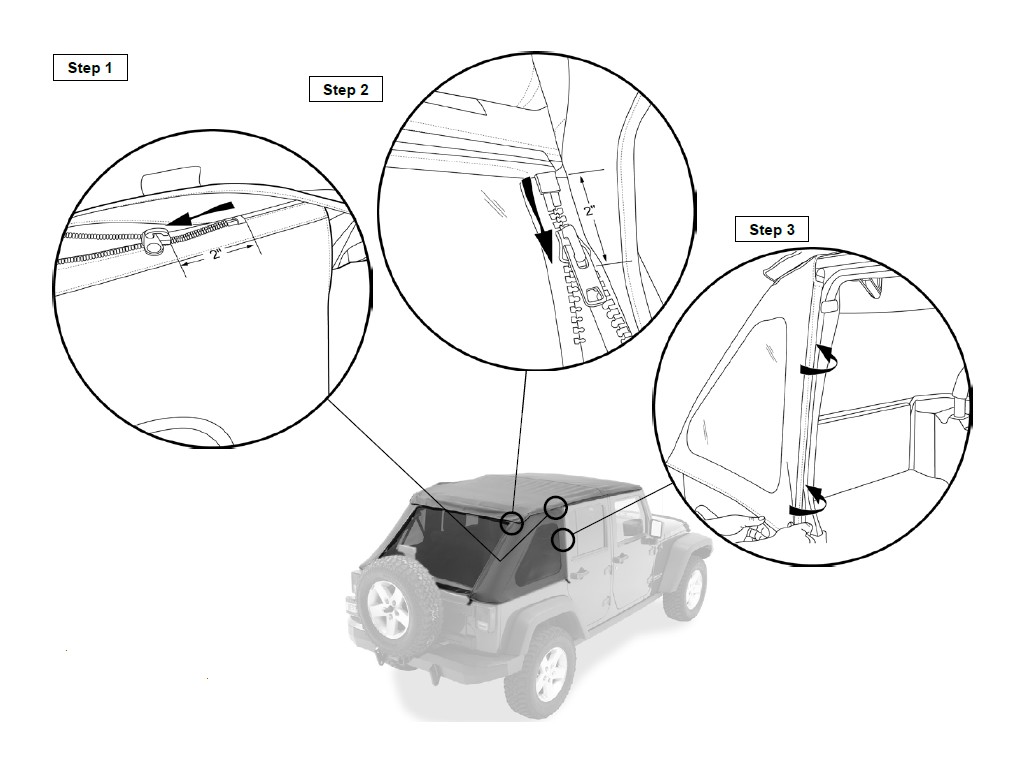
Step 4
Slip the plastic strip along the bottom of each Side Window into the channel in the belt rail on each side of the vehicle. Repeat on both sides of the vehicle.
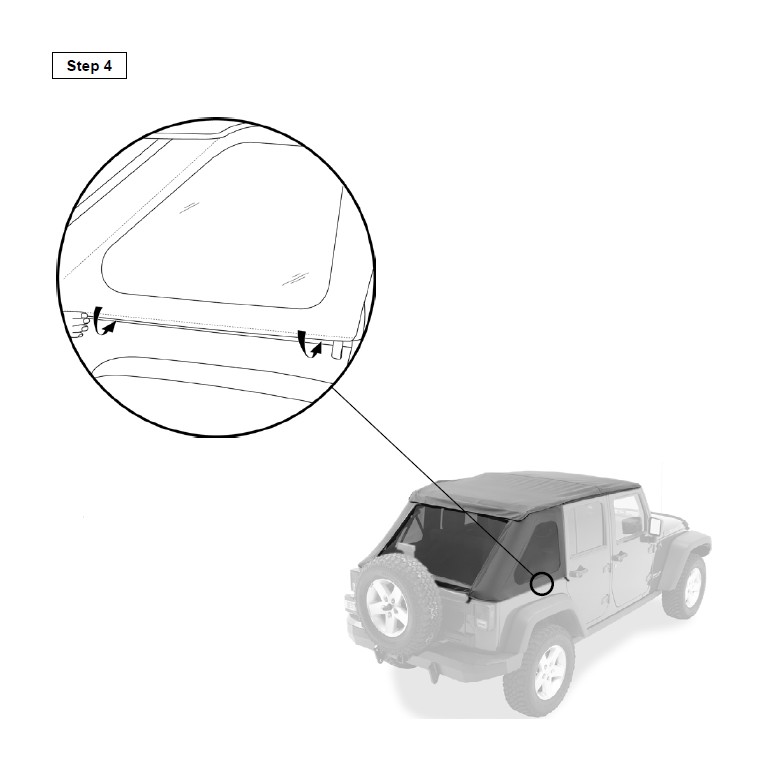
Section 19 Install and Secure Tailgate Bar
Step 1
Slide the channel in the Tailgate Bar onto the tubing along the bottom of the Rear Window on the inside.
Step 2
Slide the Tailgate Bar into the Tailgate Bar Mounts on each side of the tailgate opening.
Section 20 Secure Rear Window
Step 1
Close the zippers on both sides of the Rear Window. Top is designed to fit tight and zippers may be difficult to close on the initial installation.
Step 2
Wrap the Side Windows over the Rear Window and slip the plastic strips on each Side Window under the Tailgate Bar Mounts on each side of the tailgate.
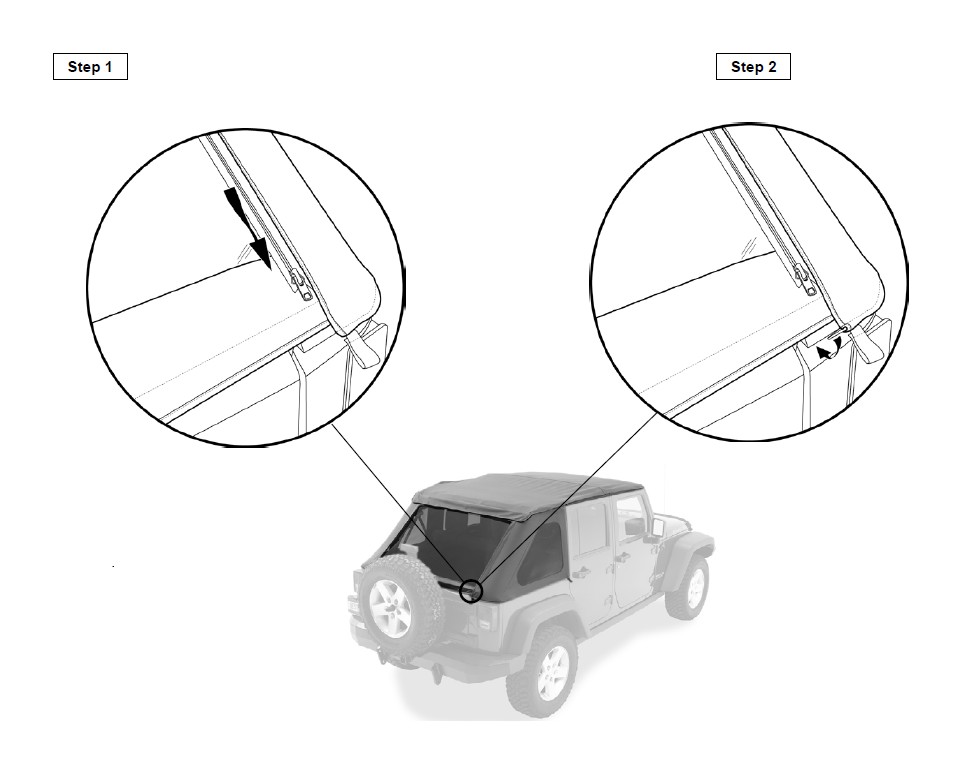
Section 21 Close Side Window Top Zippers & Secure Header Latches
Step 1
Close the zippers along the top edge of each Side Window.
Step 2
Make sure that the latches on the Header are hooked over the loops in the windshield frame, and close them securely.
Care and Maintenance of your Bestop Product
Fabric: The fabric should be washed often using soap, warm water and a soft bristle brush Rinse with clear water to remove all traces of soap. Bestop recommends using Bestop Cleaner (part no. 11201-00) and Bestop Protectant (part no. 11202-00) Bestop Cleaner and Bestop protectant are specially formulated to provide a total cleaning and protection system. Bestop Cleaner safely removes. Bestop Protectant protects against UV-fading, cracking and hardening, and repels dust, grease, dirt and mildew.
Windows: Keep windows clean to avoid scratching. DO NOT use a brush on the windows! Wash with a water-soaked cloth or sponge and a mild dishwashing detergent. Bestop recommends Bestop Vinyl Window Cleaner (part no. 11203-00), which safely cleans and protects vinyl windows and helps prevent UV damage. NEVER WIPE THE WINDOWS WHEN THEY ARE DRY. Be careful when cleaning snow or frost from the vinyl windows since they are easily scratched and may crack at low temperatures. DO NOT roll the sides or rear window in cold weather. The windows become stiff and
will crack. Cracks caused by misuse in cold temperatures are not covered under warranty.
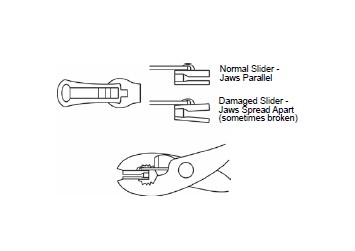
Zippers: Keeping zippers cleaned and lubricated with Bestop’s Zipper Cleaner (part no. 11206-00) will help prevent damage and keep the zippers in smooth working condition. If a zipper opens behind the slider, the slider may have been spread apart. This problem can usually be repaired by using an ordinary pair of pliers to bring the sides back into parallel. Return slider to the end of the zipper in the normal Open position.
Repeat this procedure until the zipper operates correctly.
Water: Seeping through at the seams may be stopped by applying 3-M Scotchgard® on the inside of the seams. Rips in the fabric may be repaired with Bondex® iron on patches. Iron the patches to the Inside of the top, carefully following the Bondex® instructions.
Snaps: Keep snaps cleaned and lubricated with silicone to help prevent snaps from sticking to the studs. If a snap does become stuck to a stud, use a screwdriver and GENTLY pry apart to prevent permanent damage to the snap or the top fabric.