

How to Install Bestop Trektop NX Glide - Black Diamond (07-17 Wrangler JK 4 Door) on your Jeep Wrangler
Installation Time
2 hours
Tools Required
- Drill Driver & #2 Phillips Bit
- #2 Phillips Screwdriver
- T30 Torx Driver
- Vise-Grips
- Adjustable Wrench
- Safety Glasses
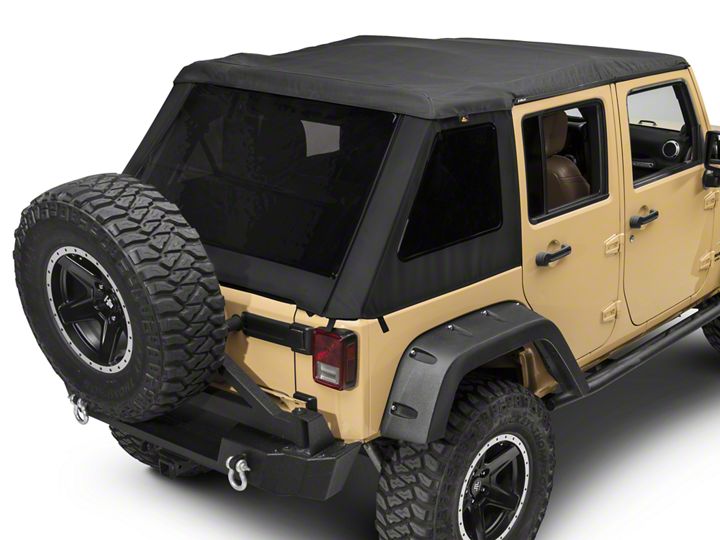
Shop Parts in this Guide
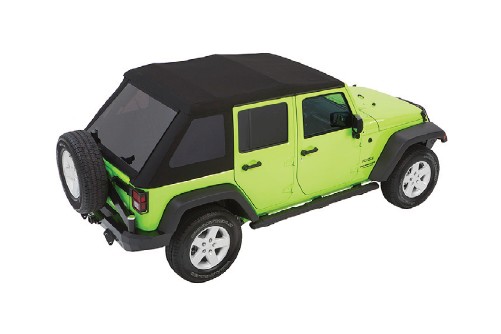
Installation Tips
Before you begin installing your new Trek Top Glide, please read all the instructions thoroughly.
WARNING: Do not rely in any way on the components of this product to protect against injury or death in the event of an accident. Never operate the vehicle in excess of manufacturer’s specifications.
Read and follow, precisely, all installation instructions provided when installing this product. Failure to do so may result in a poor fit and could place occupants of the vehicle in a potentially dangerous situation.
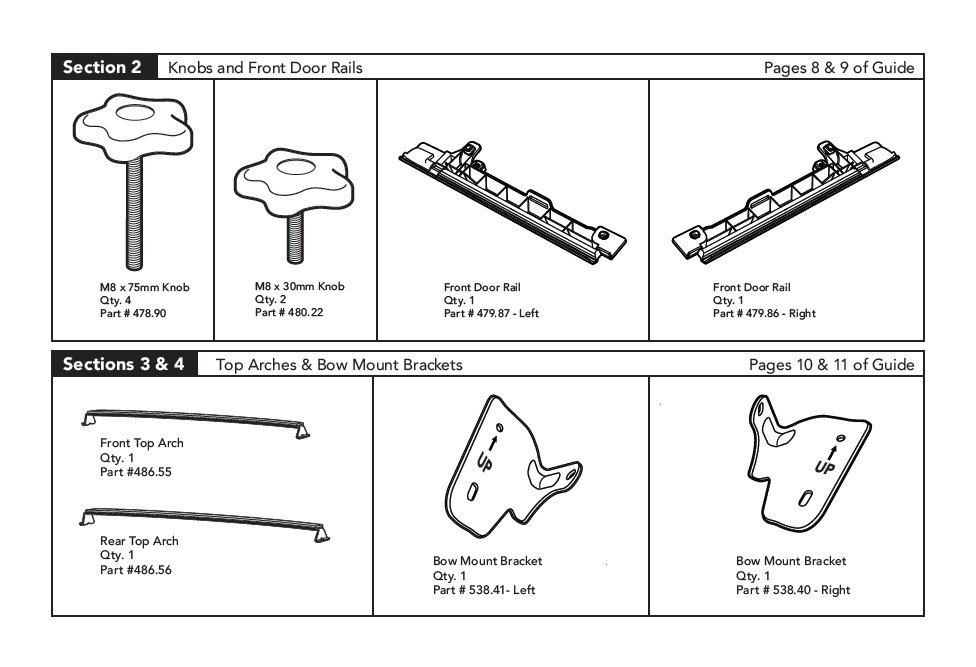
Parts List
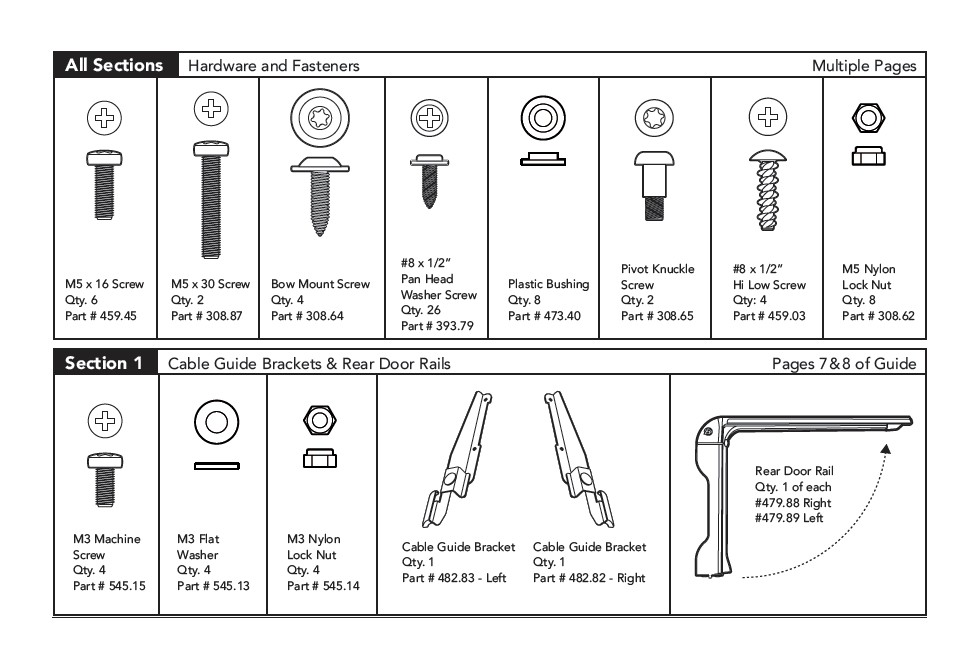
Section 1 Install Cable Guide Brackets in Rear Door Rails
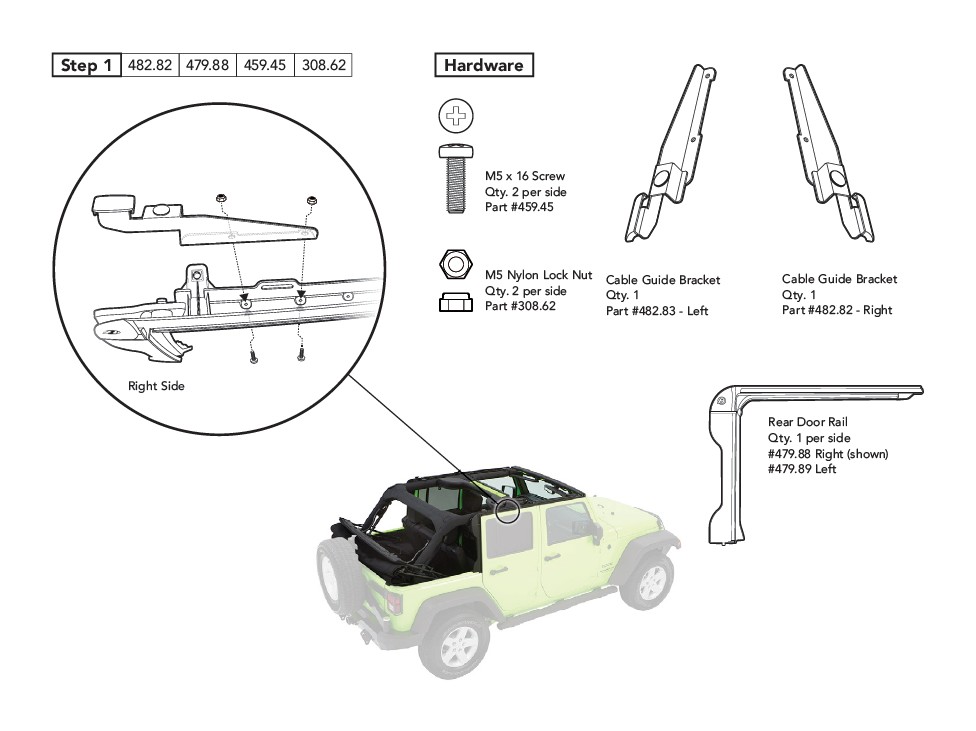
Step 1: Attach the Right Cable Guide Bracket
#482.82 to the Right Rear Door Rail
#479.88 using two (2) M5 x16 screws
#459.45 and two M5 Nylon Lock nuts
#308.62.
Repeat for left side.
Section 1 Install Rear Door Rails
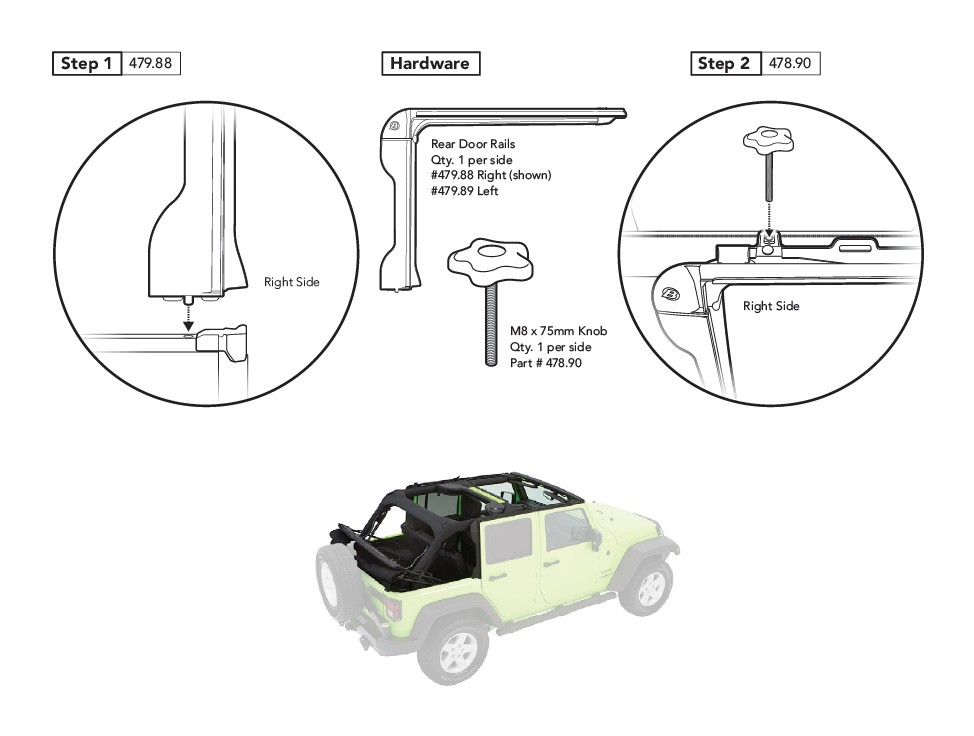
Step 1: Locate the Right Rear Door Rail #479.88.
Attach the Right Rear Door Rail assembly to the Jeep belt rail behind the right rear door, inserting the alignment pin on the bottom of the Door Rail Assembly into the hole in the top of the belt rail.
Repeat for left side Rear Door Rail #479.89.
Step 2: Secure Left and Right Rear Door Rails to the Jeep Sport Bar using (1) Long M8 x75mm Knob #478.90 per side.
The knobs go through the tab at the rear of each Rear Door Rail, and screw into the threaded holes in the top of the sport bar.
Section 2 Install Front Door Rails
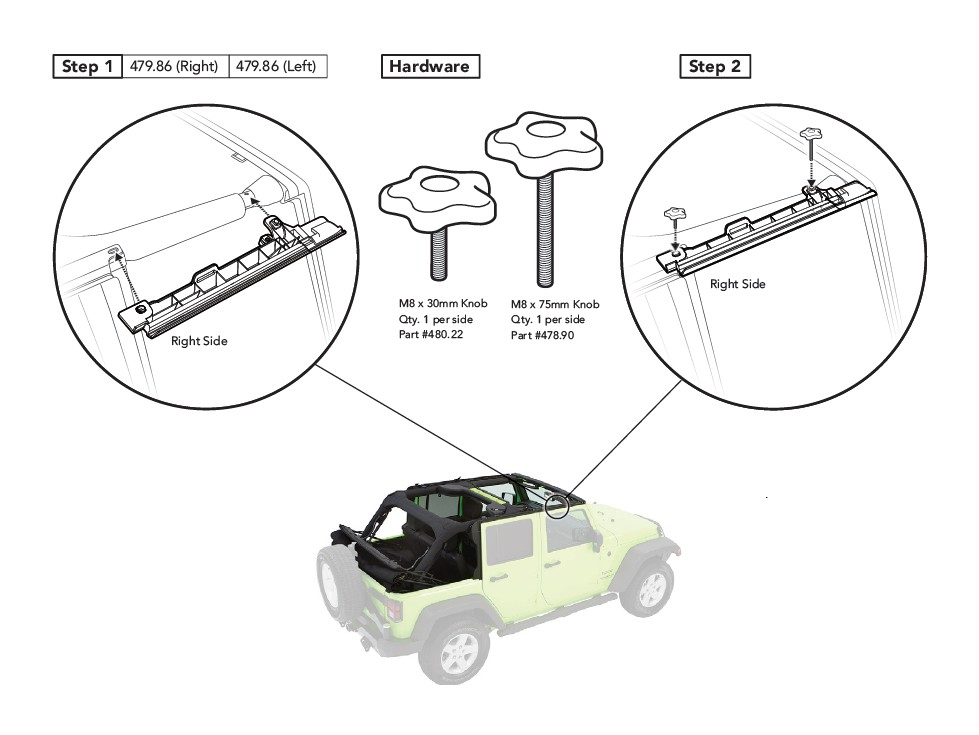
Step 1: Attach the Right Front Door Rail #479.87 to the Jeep sport bar, aligning the hole and slot in the tabs on the Front Door Rails with the threaded holes on the top of each sport bar, and with the slotted tab on each Rear Door Rail.
Repeat for the left side, using the Left Front Door Rail.
Step 2: Secure the Front Door Rails to the sport bar using (1) M 8x30mm Short Knob #480.22 at the rear, and (1) M8 x75mm Long Knob #478.90 at the front.
Secure the front of each Front Door Rail first, and leave both knobs slightly loose until after installing Top Arches, in Section 3.
Section 3 Install Top Arches
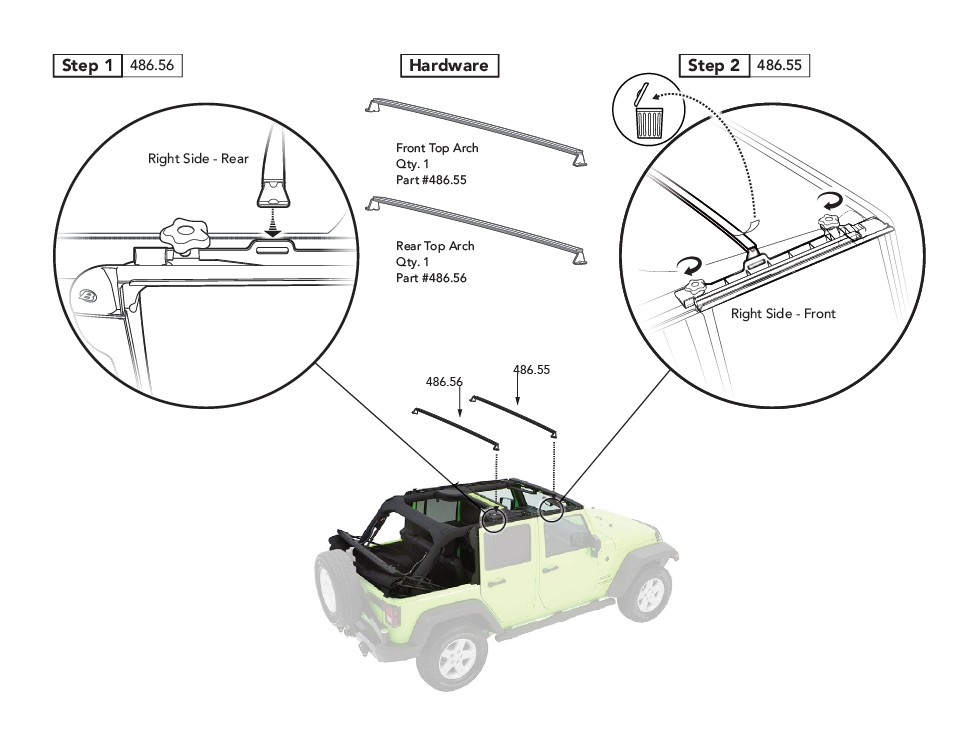
Step 1: Insert the Rear Top Arch 486.56 into the vertical slotted tab on the Rear Door Rail. Insert one end, and flex the bow to insert the other end into the tabbed slot on the opposite side of the Jeep.
Repeat for Front Top Arch 486.55, inserting one end into the vertical tabbed slot in the Front Door Rail, and flexing to insert the other end into the tabbed slot on the opposite side of the Jeep.
Step 2: Remove the protective peel-off strip on the top surface of each Top Arch.
Tighten all three knobs on the Front and Rear Door Rails, on both sides of the Jeep.
Section 4 Install Bow Mount Brackets
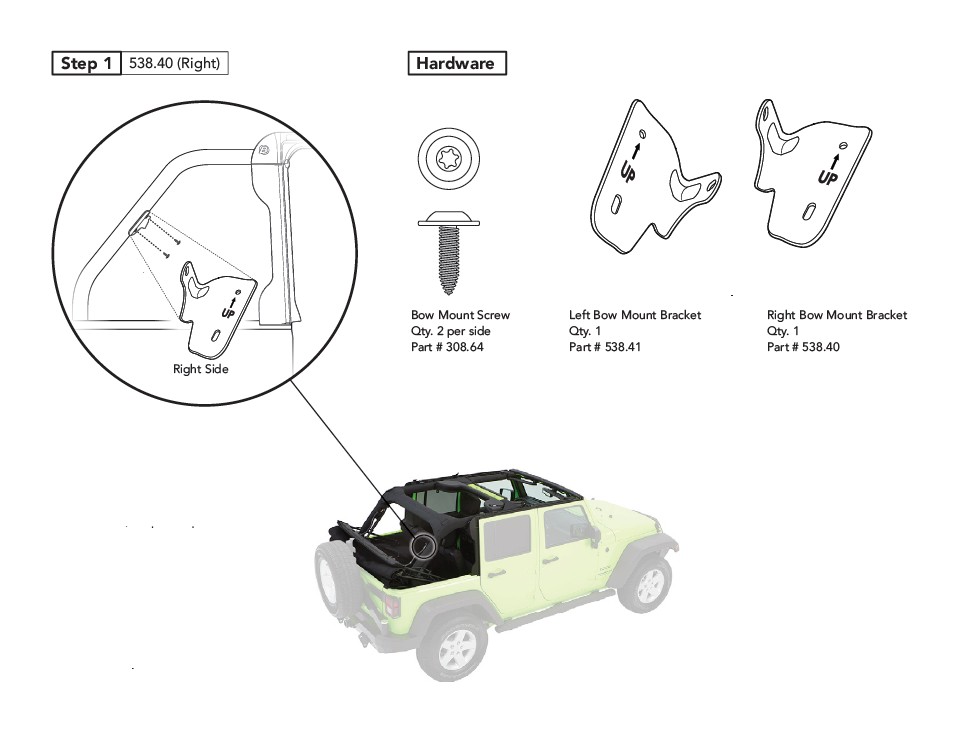
Step 1: Unzip the protective cover on the rear sport bar down-tubes and locate the two threaded holes on the underside of each sport bar down-tube.
Attach the Right Bow-Mount Bracket #538.40 to the right-side sport bar down-tube using two (2) Bow-Mount Screws #308.64.
Attach the Left Bow-Mount Bracket #538.41 to the left-side sport bar down-tube using two (2) Bow-Mount Screws #308.64.
Step 2: Replace the sport bar protective cover, making sure that the Bow Mount Brackets stick out through the openings in the cover.
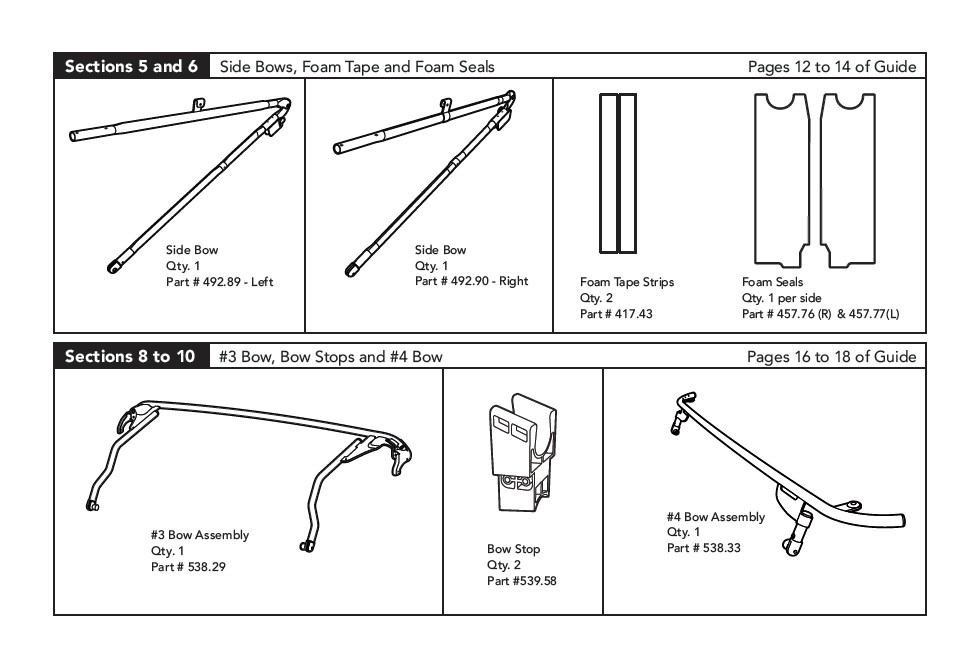
Section 5 Install Side Bows to Header/Fabric Assembly
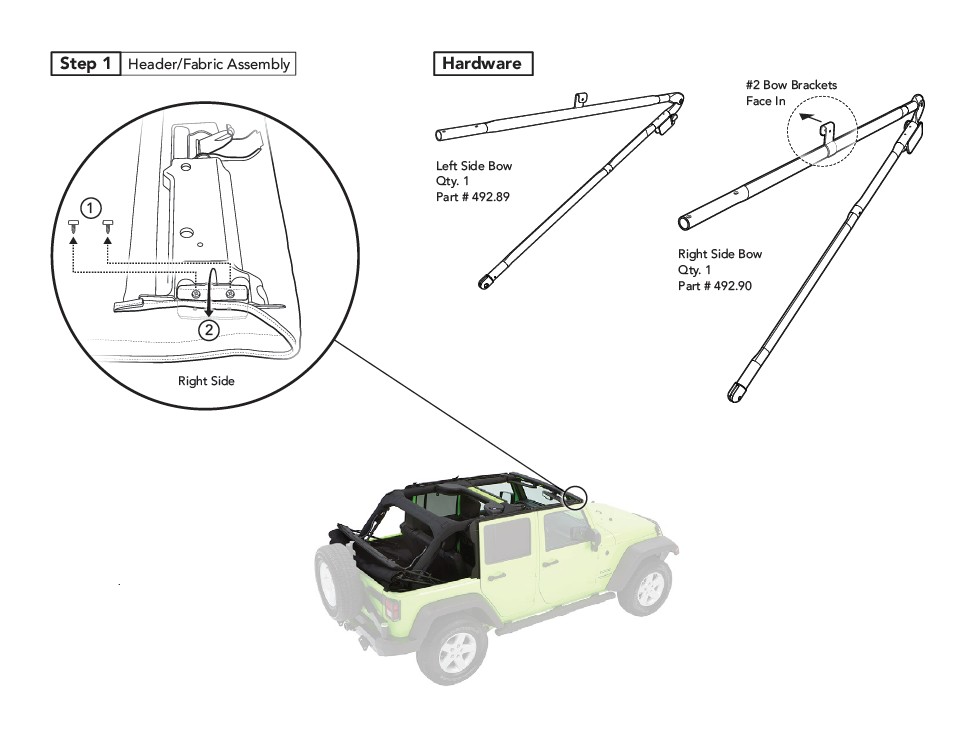
Step 1: Lay the Header/Fabric Assembly out with inside of fabric facing up. You may want to use the shipping box to keep the fabric off the ground.
Remove and set aside the two screws holding the protective flap down on the inside of the header. Fold the protective flap back to expose the screw holes used for attaching the Right Side Bow.
Repeat on left side of Header/Fabric Assembly.
Section 5 Install Side Bows to Header/Fabric Assembly (cont.)
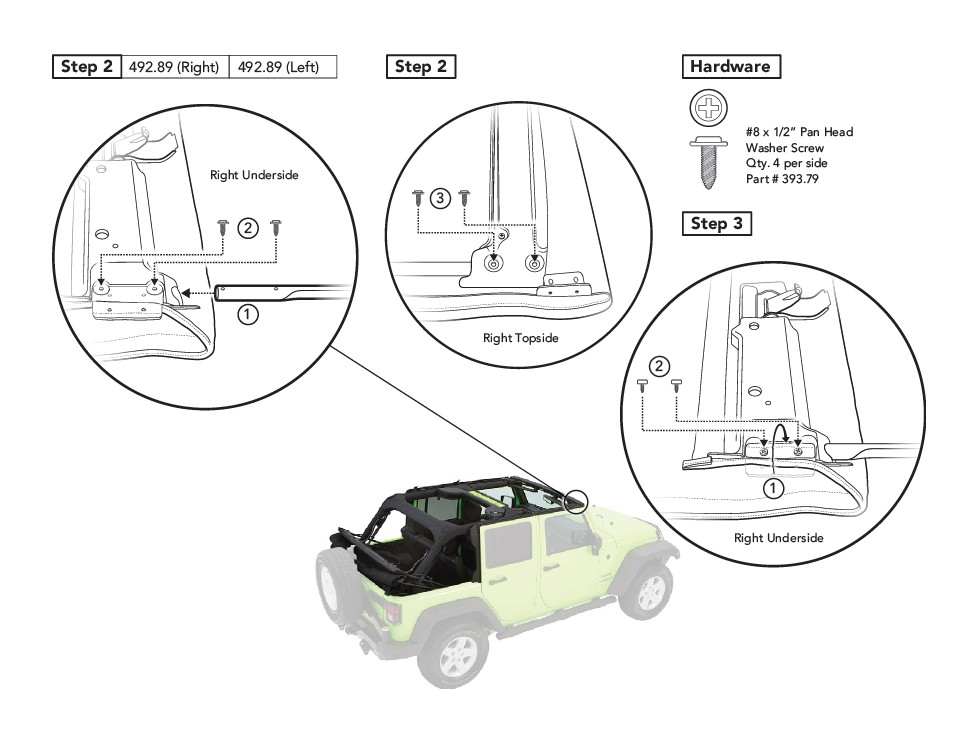
Step 1: Insert the end of the Right Side Bow #492.89 into the hole in the right side of the Header/ Fabric Assembly, aligning the two holes in the tubing with the two holes in the header. Make sure that the #2 Bow Bracket faces in.
Use a #2 Phillips screwdriver to secure the Right Side Bow in place with four (4) #8 x 1/2” Pan Head Washer Screws #393.79: two from the underside of the Header/Fabric assembly, and two from the topside.
Repeat on left side, using Left Side Bow #492.90.
Step 3: Replace the protective flaps on both sides, and re-insert the screws you set aside, two for each side.
Section 6 Attach Foam Seals and Foam Tape on Inside of Header
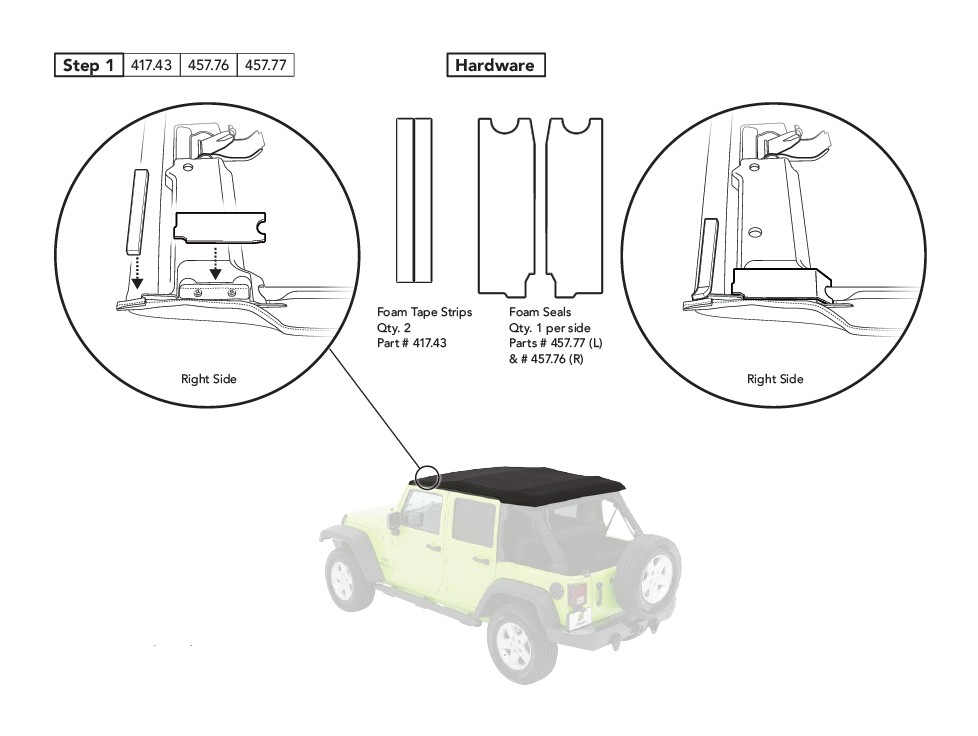
Step 1: With the front portion of the top folded back, locate the two Foam Seals #417.43 and the two Foam Tape strips #457.76 and #457.77.
Remove the protective liner from the back side of the Foam Seals and place the Foam Seals in the location shown in the diagram.
Remove the protective liners from the back side of the Foam Tape Strips and place the Foam Tape Strips in the location shown in the diagram.
Repeat on both sides of the vehicle.
Section 7 Drape Fabric over the top of the Jeep and Fold Front Portion of Top Back
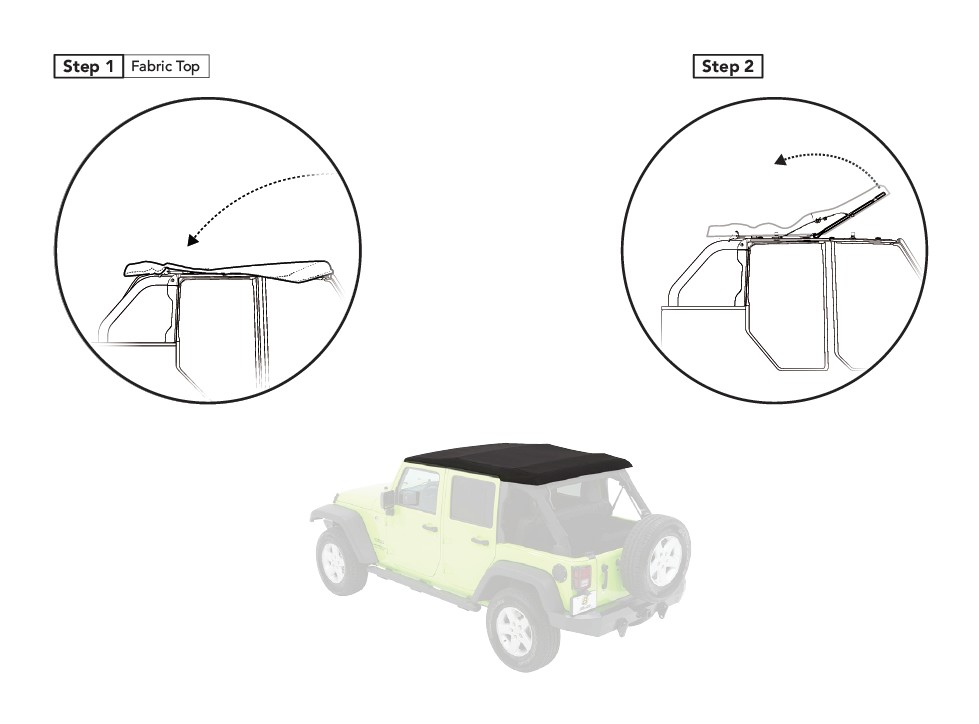
Step 1: Lift up the fabric and drape it back over the top of the Jeep, pulling it over the top of the #3 Bow and Stay Strap connecting to the #4 Bow.
Step 2: Fold the top back from the front pivot point, resting the front portion of the top on the rear portion.
Section 8 Attach #3 Bow to Bow Mount Brackets
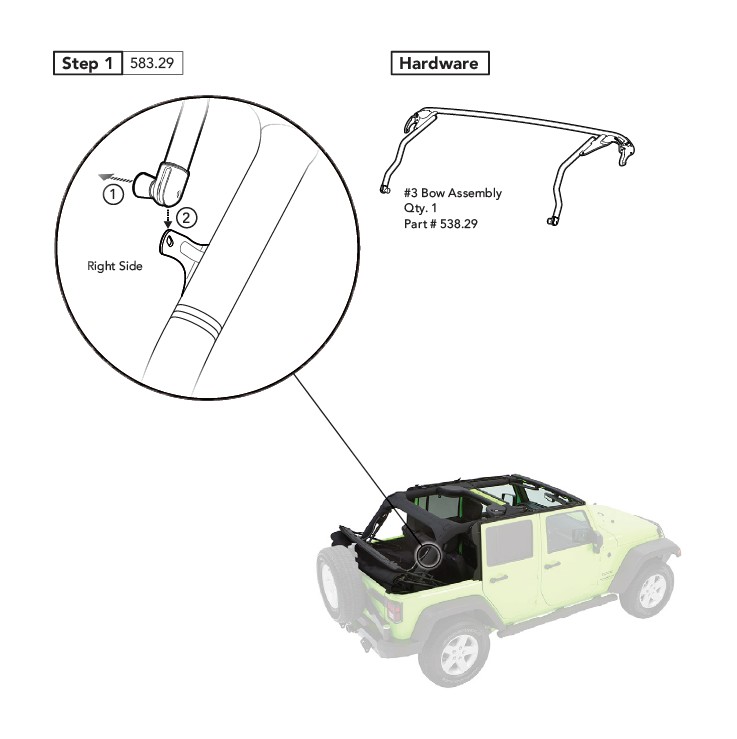
Step 1: Locate the #3 Bow Assembly #538.29.
Release the spring-loaded catch at the end of each bow leg by pulling out on the knob.
Slide the slotted end of the catch over the top portion of the Bow Mount Bracket #538.41, so that it snaps into place in the slotted hole in the Bow Mount Bracket.
Section 9 Attach Bow Stops to #3 Bow Assembly
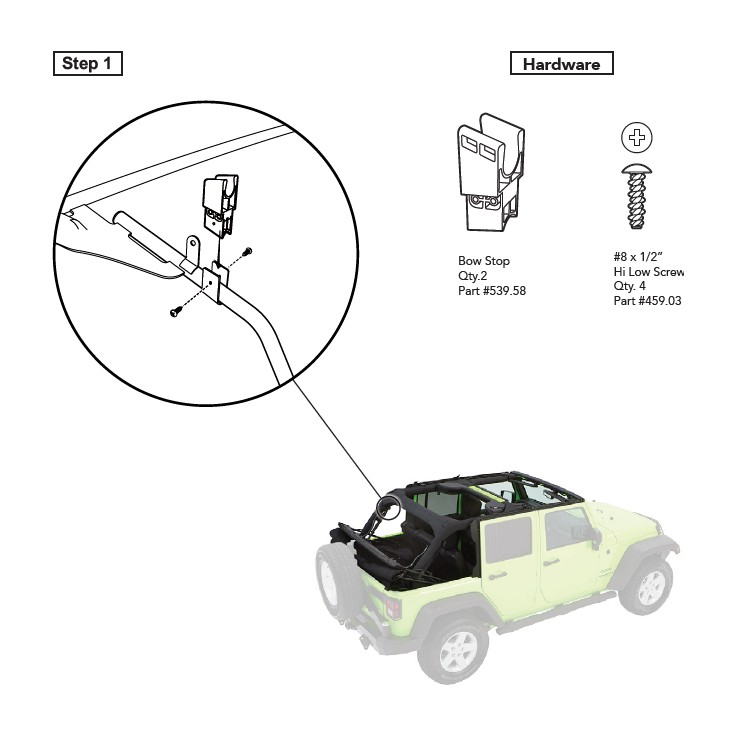
Step 1: Attach the Bow Stops #539.58 to the #3 Bow legs #538.29 with the narrow part of the Bow Stop inserted between the tabs on each #3 Bow leg. The holes for the screws in the tabs and in the Bow Stops must line up.
From each side of the Bow Stop, insert one (1) Hi Low screw #459.03 through the hole in the tab, and into the Bow Stop, and tighten.
Section 10 Attach #4 Bow Assembly to #3 Bow Assembly
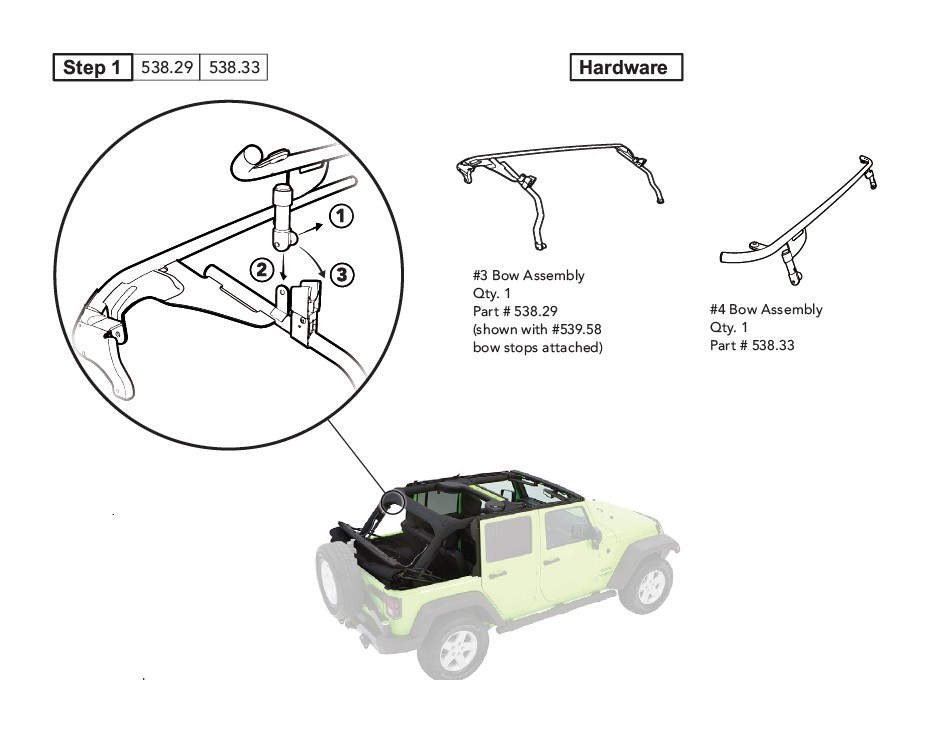
Step 1: Locate the #4 Bow Assembly #538.33.
1 Release the spring-loaded catch on each short leg of the #4 Bow by pulling out on the knob.
2 Slide the slotted end of the catch over the tab on the #3 Bow Leg #539.58, so that it snaps into place in the hole in the tab. Repeat on both sides of the #4 Bow.
3 After attaching the #4 Bow to the #3 Bow, pivot the #4 Bow down so that it snaps into place in the Bow Stops.
Section 11 Place Fabric/Header/Side Bow Assembly onto Jeep
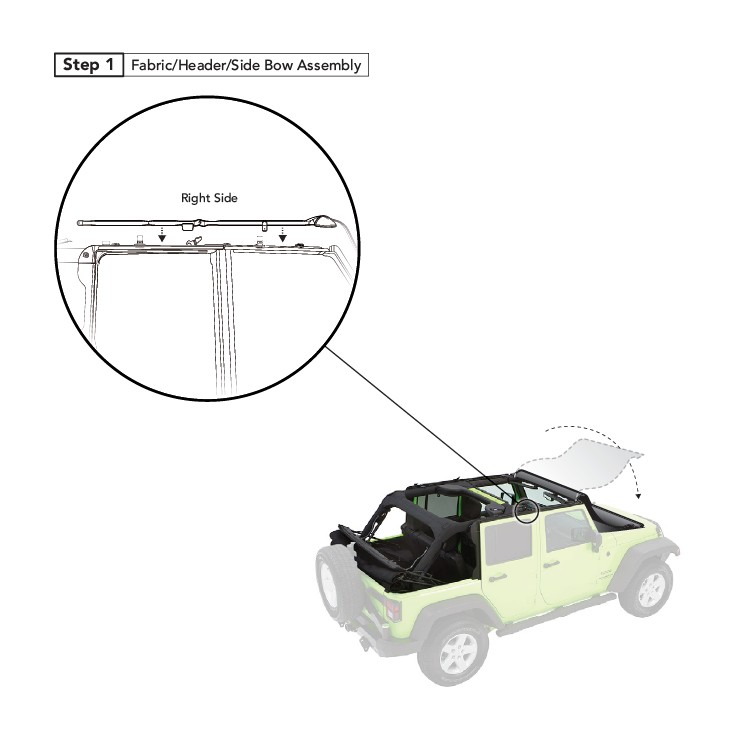
Step 1: Lift fabric and Header Assembly onto top of Jeep, with Header sitting on top of Jeep windshield, and fabric draped forward over Jeep hood.
You may want to protect the finish of the Jeep by putting a blanket across the Jeep hood.
Extend the Side Bows out straight and lay the Side Bows on top of the Door Rails.
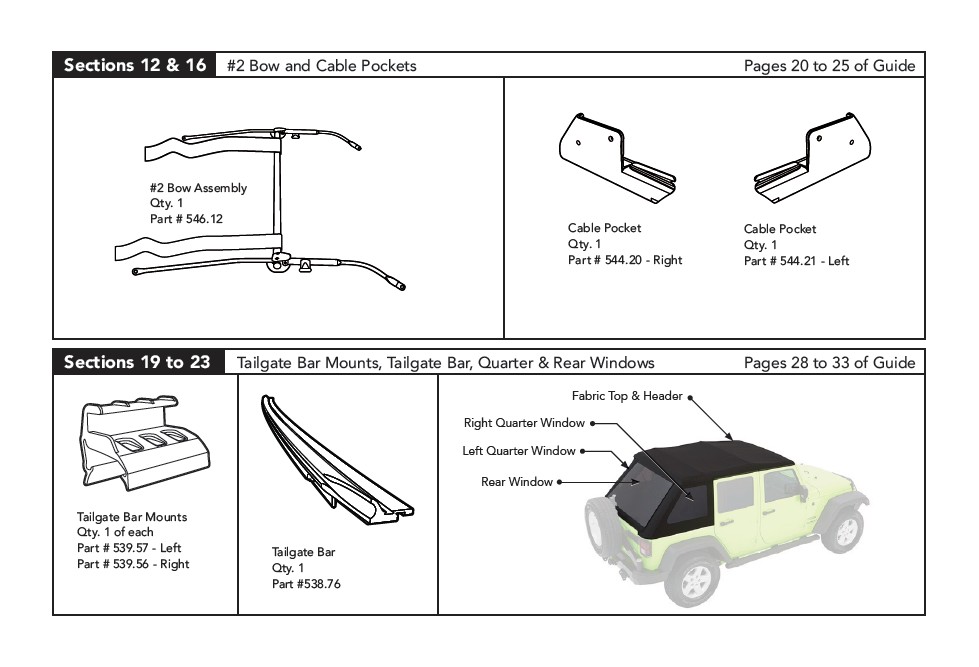
Section 12 Attach #2 Bow Assembly to Fabric/Header/Side Bow Assembly
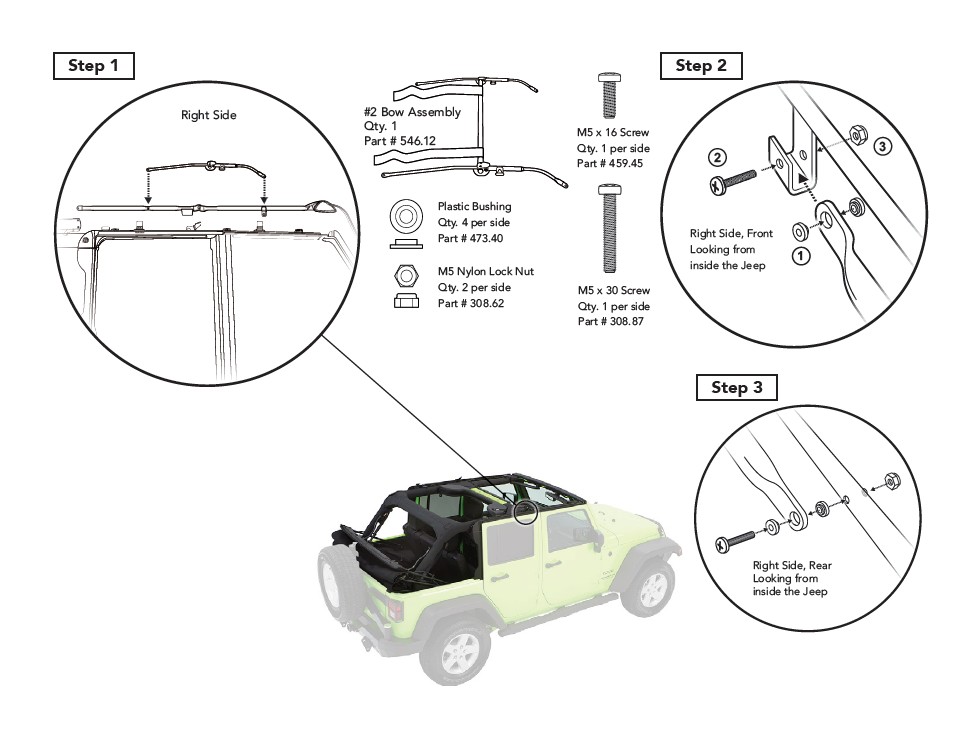
Step 1: Extend the legs of the #2 Bow #546.12 and orient the front legs with the J-bracket on the front inside of each Side Bow.
Step 2: one (1) M5 x 16 Machine Screw #459.45, two (2) Plastic Bushings #473.40, and one (1) M5 Nylon Lock Nut #308.62 per side.
Step 3: Attach the rear legs of the #2 Bow to the Side Bows using one (1) M5x30 Machine Screw #308.87, two (2) Plastic Bushings #473.40, and one (1) M5 Nylon Lock Nut #308.62 per side.
Section 13 Attach Fabric/Header/Side Bow Assembly to Door Rails
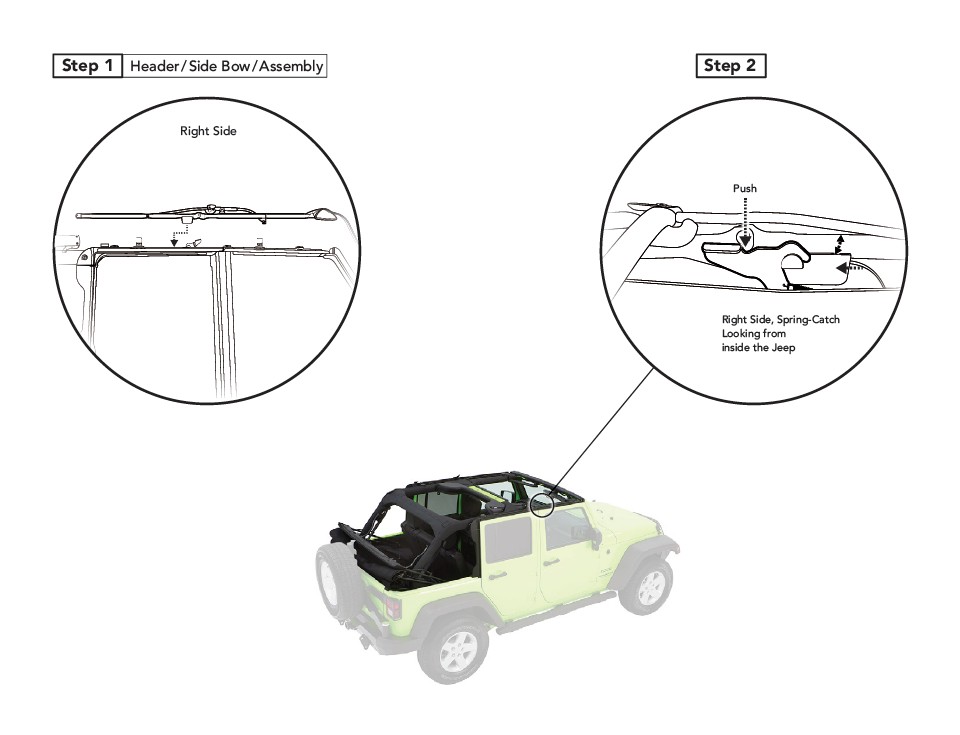
Step 1: Align the Header-Bow Assembly in the tracks in the top of the Door Rails.
The plastic track guide on the Side Bow Assembly must be located to the rear of the spring-catch, and in position to slide forward over the vertical plastic rib in the top of the Rear Door Rail.
Step 2: Slide the whole Header/Side Bow Assembly forward in the tracks in the top of the Door Rails, until the button on the inside of each plastic track guide on the Side Bows slips under the spring-catch and latches in place.
Section 14 Attach #3 Bow to Header/Side Bow Assembly
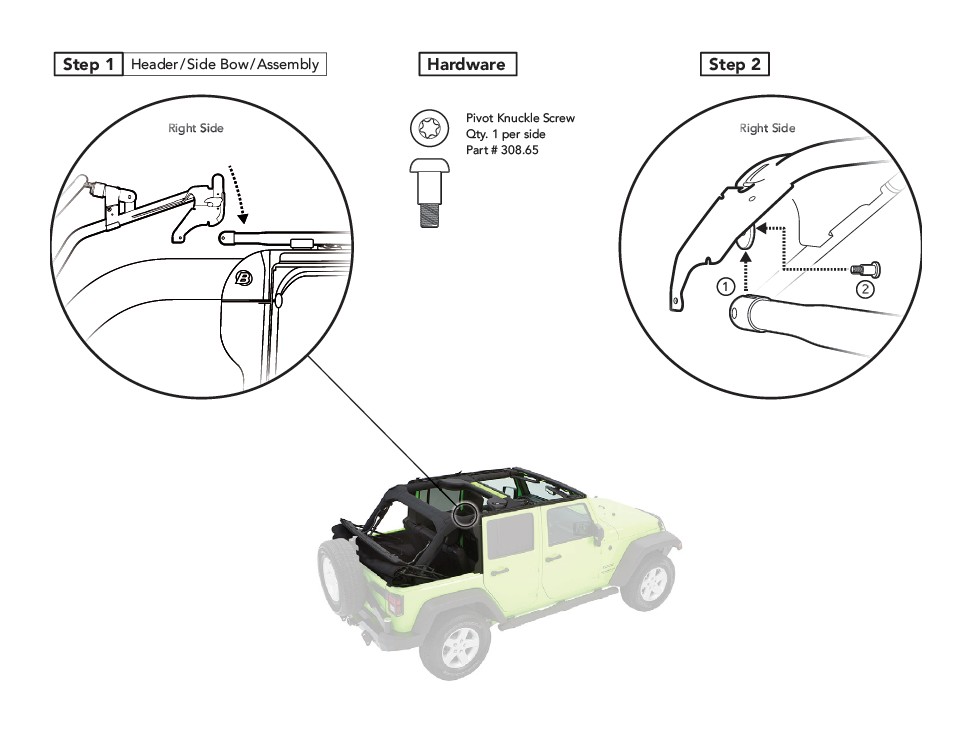
Step 1: With the Header/Side Bow Assembly latched into place, pivot the #3 Bow forward, and slide the slotted portion of each pivot knuckle over the flange on the bottom of the #3 Bow corner place, so that the holes in the flange and the hole in the pivot knuckle are aligned.
Step 2: Fasten the pivot knuckle on the end of each back leg of the Header/Side Bow Assembly to the flange on the underside of each #3 Bow corner plate, using one (1) Pivot Knuckle screw #308.65 per side.
Section 15 Attach Stay Strap to #3 and #4 Bows
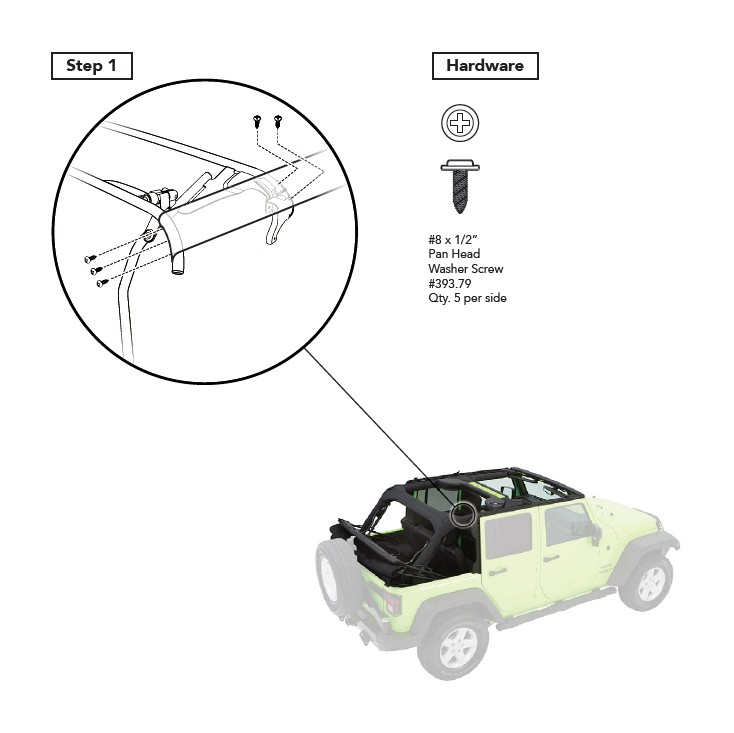
Step 1: With the #4 Bow disengaged from the Bow Stop, attach the loose end of the Stay Strap (attached to the #2 Bow at the opposite end) to the #4 Bow using three (3) Pan Head Washer Screws #393.79 per side, and to the #3 Bow using three (3) Pan Head Washer Screws #393.79 per side.
Repeat on both sides of the Jeep.
Section 16 Attach Cable Spring to #3 Bow Corner Plate
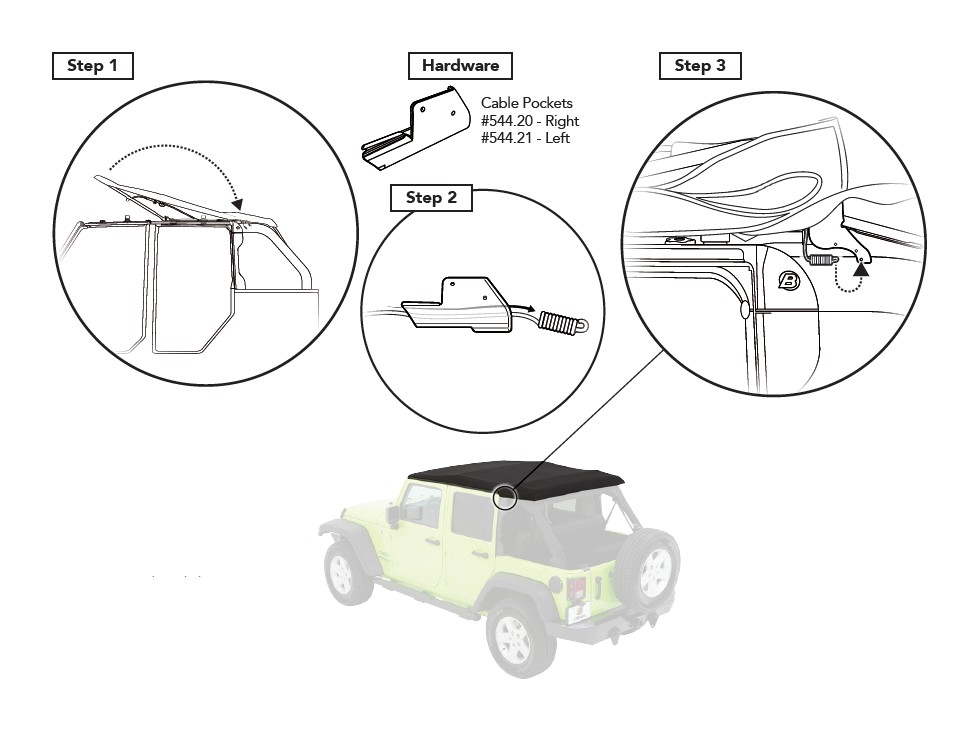
Step 1: Fold the front portion of the fabric top back, to provide some free play in the cable.
Step 2: Locate the Left Cable Pocket #544.21 and slip the spring end of the Cable Spring through the Cable Pocket as shown.
Slide the Cable Pocket back along the cable to get it out of the way.
Step 3: Attach the free end of the Cable Spring to the bottom hole in the #3 Bow corner plate, just behind the Rear Door Rail.
Repeat on both sides of the Jeep.
Section 16 Attach Cable Spring to #3 Bow Corner Plate (cont.)
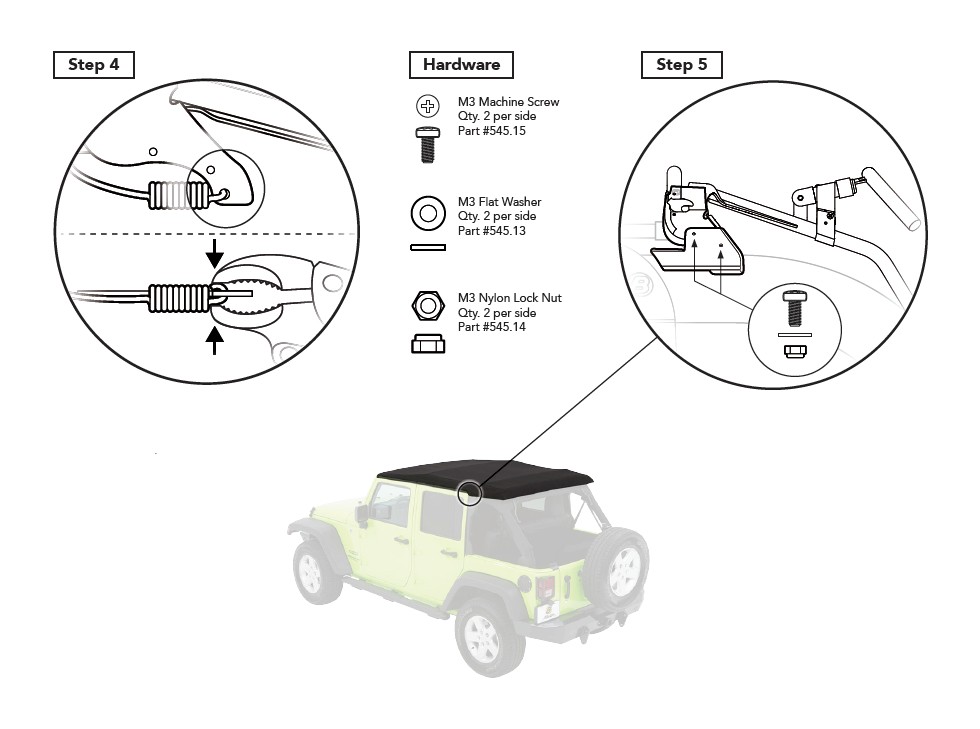
Step 4: Crimp the end of the spring where it passes through the hole in the corner plate, to prevent it from coming loose.
Repeat on both sides of the Jeep.
Step 5: Slide the Cable Pocket back so that it covers the Cable Spring and the #3 Bow corner plate, and so that the holes in the Cable Pocket line up with the holes in the #3 Bow corner plate.
Attach the Cable Pocket to the #3 Bow corner plate with two (2) M3 Machine Screws #545.15, two (2) M3 Flat Washers #545.13, and two (2) M3 Nylon Lock Nuts #545.14.
Repeat on both sides of the Jeep.
Section 17 Attach Bow Flaps to #3 Bow and #4 Bow
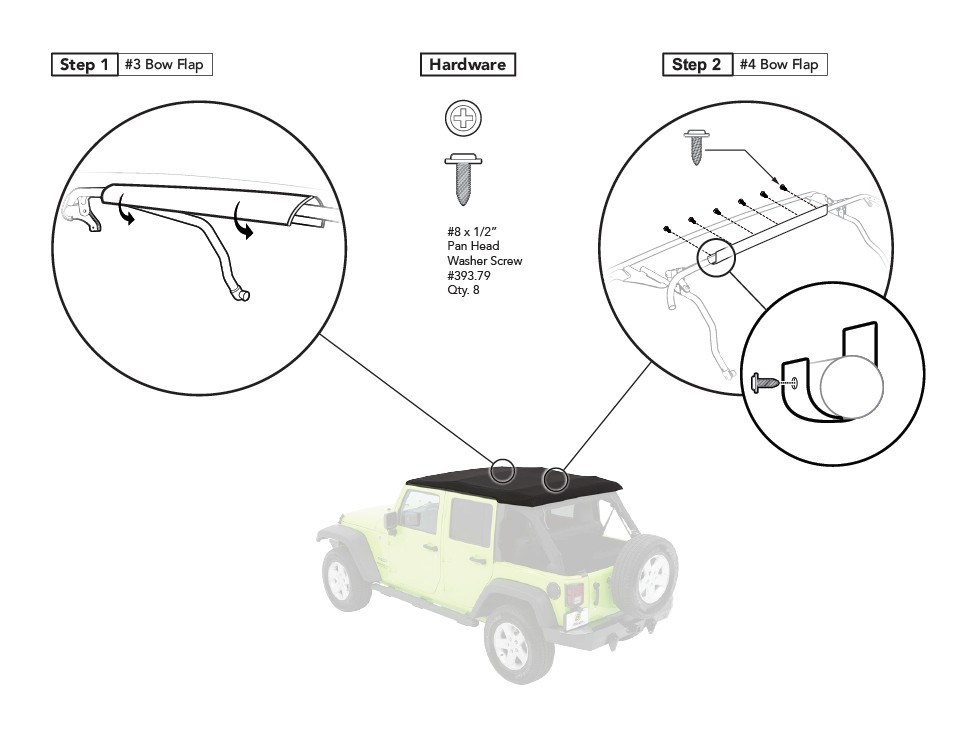
Step 1: From inside the Jeep, wrap the flaps located above the #3 Bow around the #3 Bow, and secure the hook & loop fabric together.
Step 2: From inside the Jeep, wrap the flaps located above the #4 Bow around the bottom of the #4 Bow, and secure to the front side of the #4 Bow using eight (8) #8 x 1/2” Pan Head Washer Screws #393.79.
Section 18 Attach Bow Flap to #2 Bow
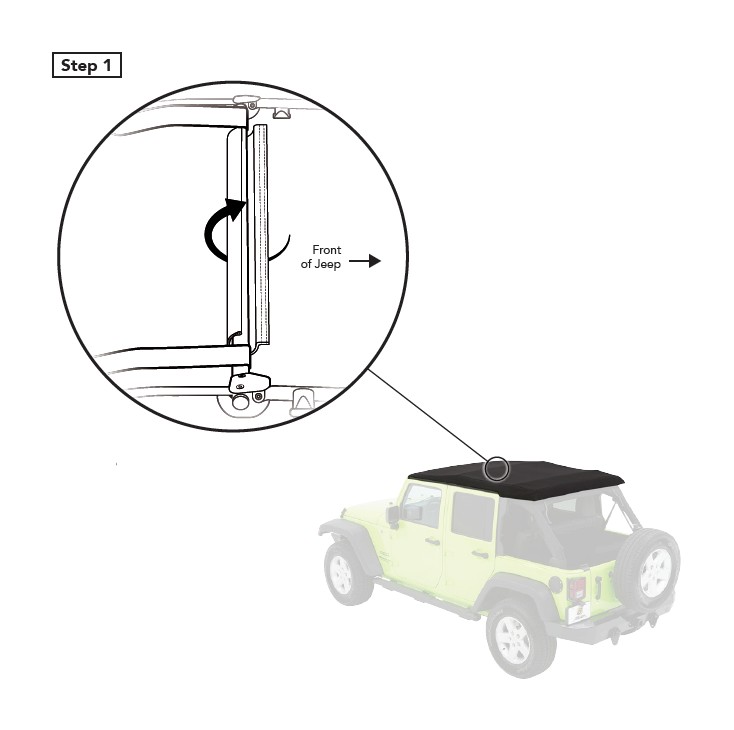
Step 1: From inside the Jeep, wrap the flaps located above the #2 Bow around the #2 Bow, and secure the hook & loop fabric together.
Section 19 Install Tailgate Bar Mounts
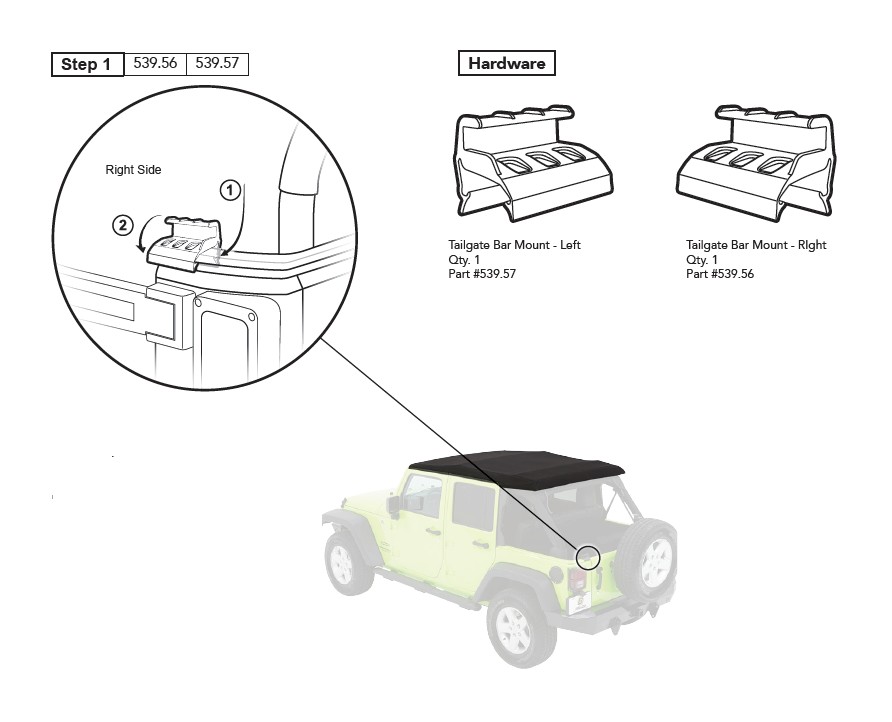
Step 1: Locate the Left and Right Tailgate Bar Mounts #539.57 and #539.56.
Each mount snaps onto the Jeep belt rail just outboard of the tailgate opening.
Snap each Tailgate Bar Mount into place by 1 hooking the inner catch portion of the mount under the belt rail on the inside, and then 2 rolling the mount downward until it snaps into place under the bottom edge of the outside belt rail.
Section 20 Install Quarter Windows
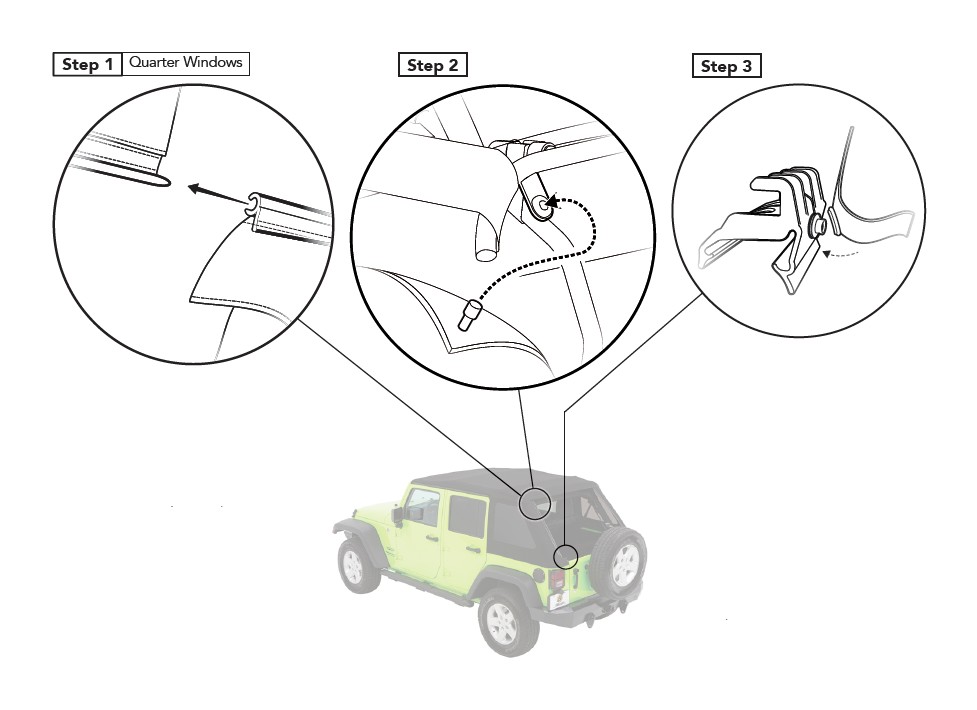
Step 1: Locate the plastic channel along the lower edge of the top fabric.
Insert the tapered tip of the sewn-in plastic tube at the top edge of the Quarter Window into the open end of the rear of the channel sewn onto the bottom edge of the top fabric and slide the Quarter Window forward until it stops at the back of the Rear Door Rail.
Step 2: Fold back the top corner of the left Quarter Window and locate the Pin on the inside top corner of the Quarter Window.
Insert this pin into the grommet on the tab at the left rear side of the #4 Bow.
Repeat on both Quarter Windows.
Step 3: Locate the straps with sewn-in snaps at the bottom inside corner of each Quarter Window.
Snap the end of each strap to the snap on the inside of each Tailgate Bar Mount.
Section 20 Install Quarter Windows (cont.)
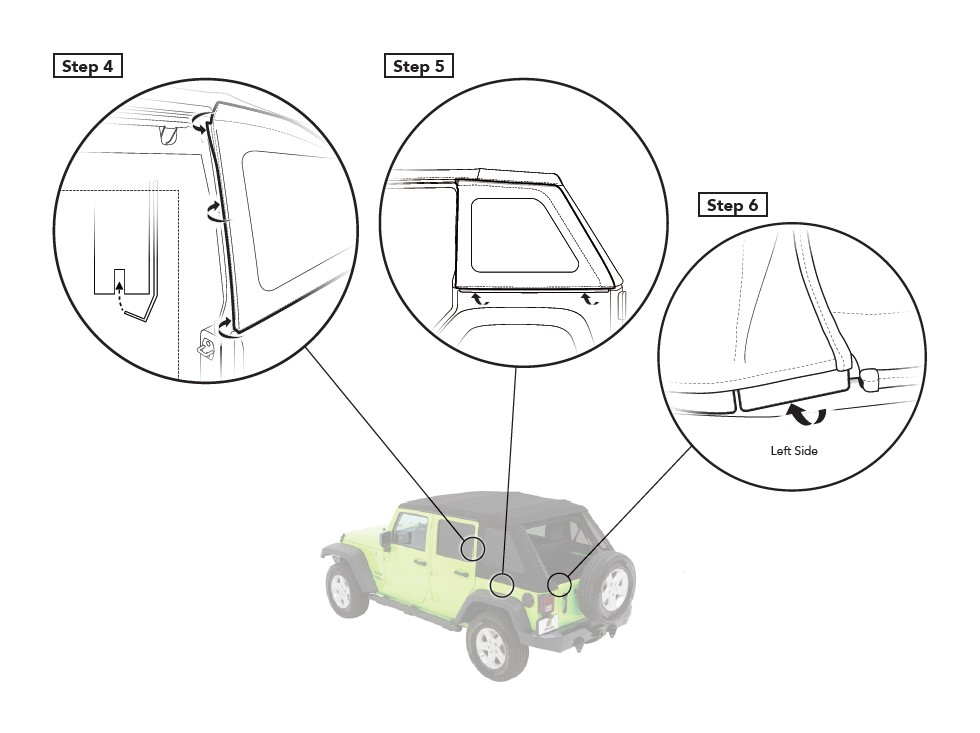
Step 4: Tuck the plastic angle strip along the front edge of the Quarter Window into the vertical channel on the front of the Rear Door Rail. The plastic angle strip and attached fabric must be rolled into place in the channel.
Repeat on both Quarter Windows.
Step 5: Tuck the plastic strip along the bottom edge of each Quarter Window under the Jeep belt rail, by rolling it up underneath the belt rail.
Repeat on both Quarter Windows.
Step 6: Tuck the plastic tabs at the bottom rear corner of the right Quarter Window under the Jeep belt rail, by rolling the tabs up nuderneath the belt rail.
Repeat on the left Quarter Window.
Section 21 Install Rear Window
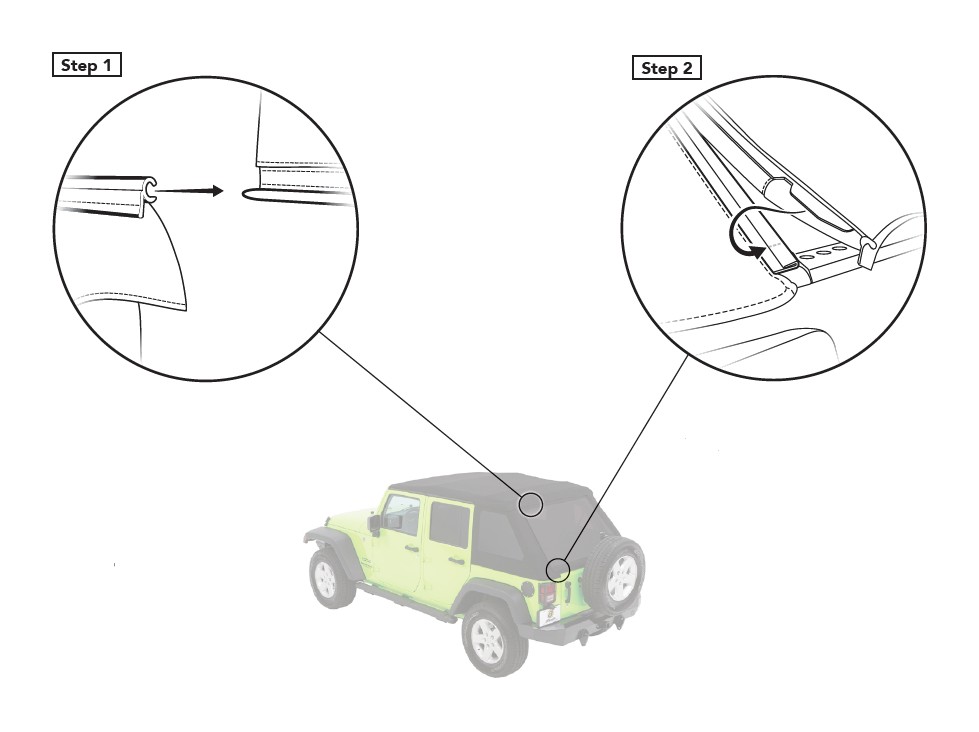
Step 1: Locate the plastic channel along the lower edge of the top fabric at the rear.
Insert the tapered tip of the sewn-in plastic tube on the top edge of the Rear Window into the open end of the channel at the back of the fabric top and slide the Quarter Window to the right until it meets the right end of the channel.
Step 2: Locate the plastic channel along the rear inside edge of each Quarter Window.
Roll the sewn-in plastic tab on the outside edge of the Rear Window into the open side of the channel, starting either at the top and working down, or at the bottom and working up.
Section 22 Install Tailgate Bar onto Rear Window
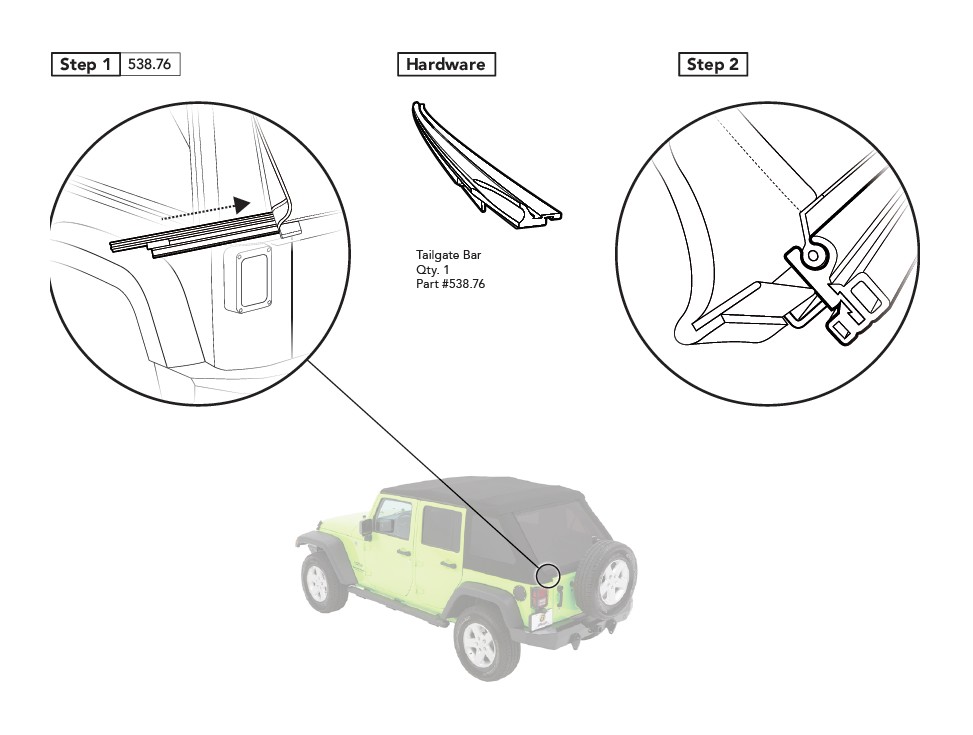
Step 1: Locate the Tailgate Bar, and slide it onto the tubing attached to the bottom inside of the Rear Window.
Step 2: The round channel on the side of the Tailgate Bar slides over the tubing.
Section 23 Snap Tailgate Bar onto Tailgate Bar Mounts; Tuck Plastic Tabs Under Belt Rail
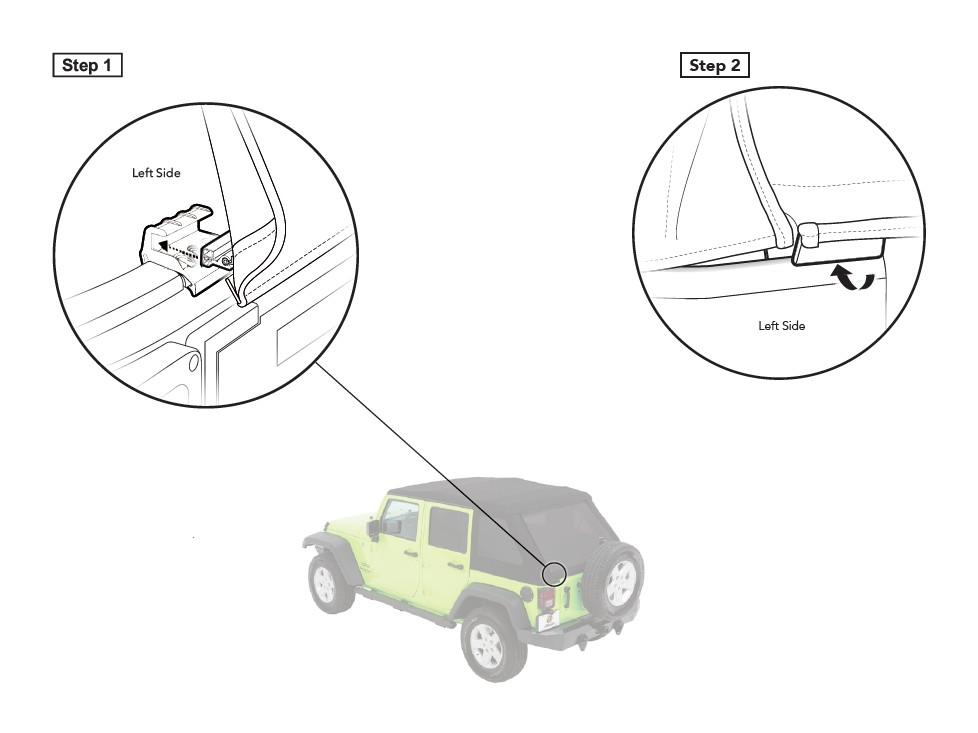
Step 1: Snap the front edge of the Tailgate Bar into the channel on each Tailgate Bar Mount.
Repeat for both sides of the tailgate.
Step 2: Tuck the plastic tab at the bottom right of the Rear Window under the Jeep belt rail, by rolling it up underneath the belt rail.
Repeat on the both sides of the Jeep.
Section 24 Close Front Windshield Header Latches
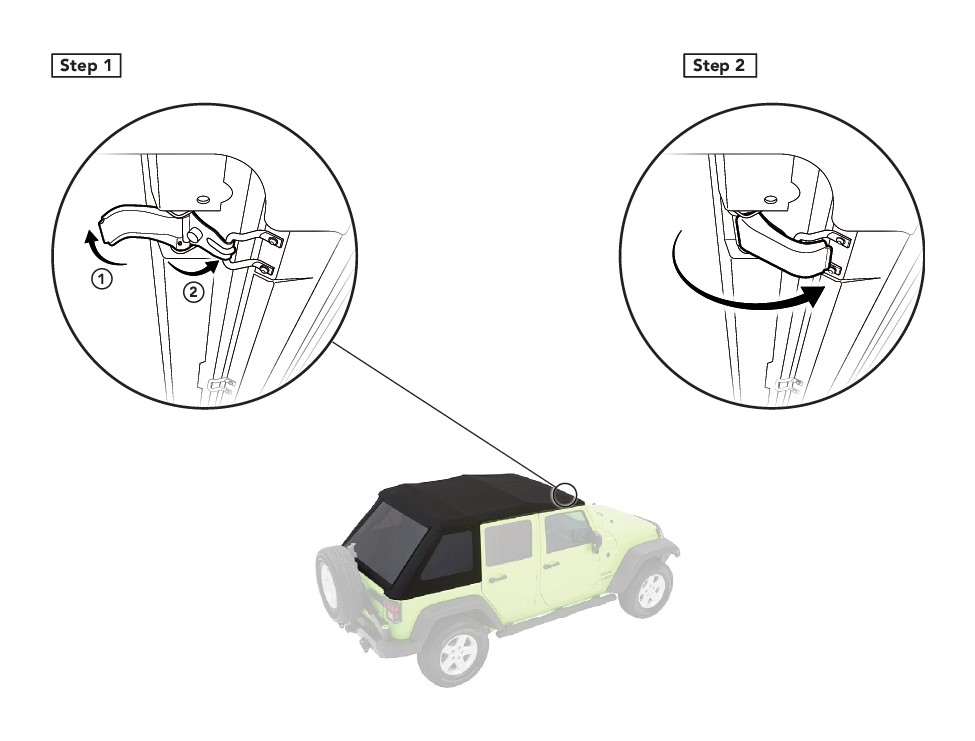
Step 1: From inside the Jeep, locate the two Windshield Header Latches.
To close the latch, pivot the latch handle to the completely open position to allow the hook to engage the windshield loop. Now pivot the hook forward to engage the windshield loop.
Step 2: When the hook is engaged with the windshield loop, close the latch by pivoting it forward toward the windshield.
Section 25 Folding the Top Down
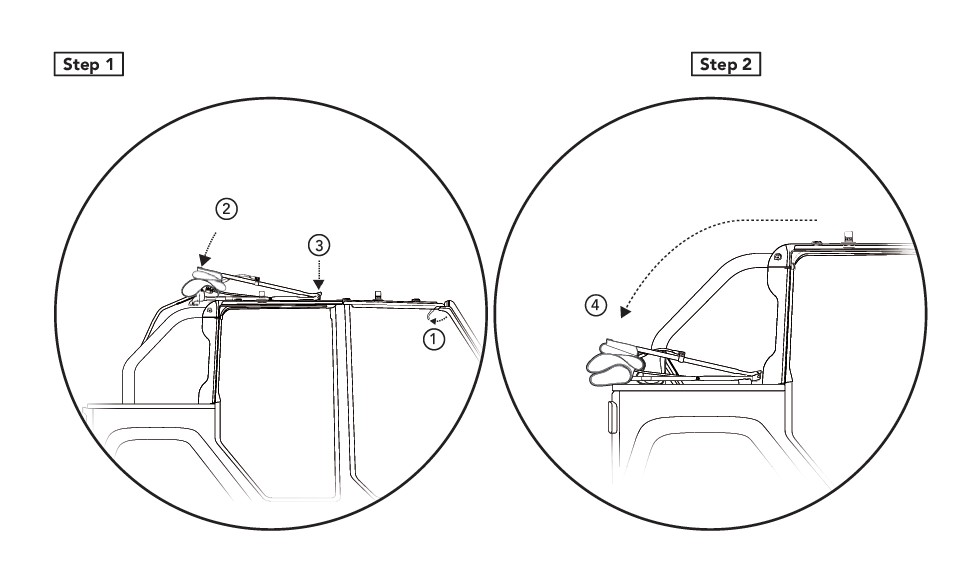
Remove the Quarter Windows and the Rear Window, and stow in a secure place to avoid scratches.
Release the windshield latches. Fold the front header back, keeping the fabric folded neatly. Push down on the spring catch lever to release the side bows. Release the #3 Bow from the Side Bows by pulling on the spring catch knobs, and disengage the #4 Bow from the Bow Stop.
Lift the fabric and bow assembly and swing it back to the rear of the Jeep, resting the entire assembly on the top edge of the Jeep belt rail. Wrap the fabric around the bows, and tuck the #3 and #4 Bows under the fabric. Tuck fabric in around the edges.
