Talk to a Tacoma Sales Tech
1-877-870-8556
M-F 8:30A-11P, Sat-Sun 8:30A-9P
Logo Image
$20K Sweeps! 10 Chances to Win! Enter Daily >

Bestop Supertop 2 Soft Bed Topper (16-21 Tacoma)

Item TT6962
Verify parts fit and get product recommendations.
Tacoma Sales Techs: Connect Now M-F 8:30A-11P, Sat-Sun 8:30A-9P
$0.00
Our Price

$1,149.99

FREE Shipping Market Price $1,264.99 You Save 9% ($115.00) Up to 10% off for Military & First Responders! See Details

Will this fit your Vehicle?

Select a different vehicle Help?
Update or Change Vehicle
Ship to: Ashburn - 20149
Sorry, please enter a valid US or CA postal code
We're sorry, zip can't be updated at this time.
Recommended Install Shops
How It Works
Install Shops are available near Ashburn - 20149

Add Local Shop Installation

Total cost of service $129.00
    Create a list
    Add to New List

    Saved - View your saved items

    We're sorry. We couldn't save this product at this time.

    or use

      Product Videos

      Merideth: Hey, guys. So, today, we're checking out the Bestop Supertop for Truck 2, fitting all 2016 and 2021 Tacomas. Now, if you want the benefits that a bed cap provides, including the protection for your cargo and a covered bed to keep prying eyes away, but you don't like the fact that it's a more permanent solution without much flexibility, this is gonna be right up your alley. Now, this is also just all around a great choice if you're a fan of the bed topper appearance and you're looking for a high-quality and functional option to do it.This will do a great job at protecting everything in your bed on overlanding trips or just day-to-day from the elements with a fully sealed top, thanks to the rail system. Now this will feature a third brake light for DOT requirements, a removable rear window on the back, and a roll-up side window on either side to transform this into more of a safari-style setup.Now, I think what's notable is that you can easily fold this down onto the back of the bed, completely exposing the bed, and it's gonna give you the ability to tuck the windows up into the storage flap to keep everything clean and secure. Now, that's gonna allow you to freely get in and out of the bed or load up larger cargo while also being able to easily take it off if you wanna switch over to the compatible tonneau cover.Now the fabric here is gonna be made of a black diamond vinyl material, meaning water and weatherproof while being able to maintain a long lifespan. This will also have a fully integrated bow system with a durable, as well as lightweight alloy construction, making operation effortless, and also upping the durability of the frame or the skeleton inside of this. Now, this also requires no drilling or modification to the truck, offering a very straightforward install.Now this will be set at a premium price point, but it will be saving you a couple of bucks compared to other hard bed top solutions or bed caps at roughly $1,200. Now, comparing this to other options on the page, this is gonna be pretty versatile, and it's going to have durable materials when it comes to the vinyl and the alloy frame. Now, it will also come with a third brake light, as to where most other soft bed tops may not offer that, or they may be a bed cap, which again is not going to provide as much flexibility as this choice. Now, overall, I think if you want options when it comes to your bed protection and want a premium top to do it, then this is gonna be a great choice.Now, install will be a one out of three wrenches on the difficulty meter, taking you about two hours to get the job done with some pretty basic hand tools. Now, at this point, we can head over to the shop and check out a detailed breakdown of the install and what that looks like step-by-step. So, that's gonna wrap it up for me. Let's go ahead and jump into it.Man: Tools required for this install include a ratchet, wire strippers and crimpers, a 10-millimeter wrench, a 1/8 and 1/4-inch Allen wrench, a 10 and 14-millimeter socket, a couple of male spades, a couple of T-taps, and a test light. What's up, guys? Today we're installing a bed topper on our Tacoma. So, let's get started.So, our first step's gonna be to assemble our side rails. Now, these come as two pieces. We have our set screws in this piece. They're both nice and labeled with these white marks, so you can tell which is which. So, this is just gonna slide inside here, and then we're gonna take a 1/8-inch Allen wrench to tighten these screws down. And now with our first bow fully assembled, we can do the same thing on the right side.Our next step is to lay down our front and rear rails. Now, these are also, once again, nice and labeled with those white stickers. We have these rectangular slots that our side rails are gonna slide into. So, we don't have to lay them down perfect for now. We'll just get them roughly in place. And then we can grab our side rails and start to assemble our frame.So, next up, we can install our side rails. So, these will lay down on the side and then we'll be sliding it into that rectangular groove on our front and rear rails. And then we can do the same thing on the other side. Our next step is to install our two track blocks per side. So, we're gonna have to come down to our track here and pop off the cap at the end, which you can do by just pushing on it. And then we have a shorter side and a longer side. The longer side's gonna be facing down. So, then we can just slide it right in. One's gonna be going down towards the front, and one's gonna stay near the rear. And then we can just reinstall our cap by just pushing it back on.Next up, we can install our brackets to hold our frame to the side of the bed. Now, for our front bracket, we're gonna be measuring six inches from before this starts to turn. So, we're nice and dead center here. And then you just wanna make sure that your track block lines up with that as well. So, now for our lower bracket, we have our 1.5-inch Allen head bolt. That's gonna go through the biggest hole back here and come through the smaller hole right in front of it, just like that. And then we'll get our spacer on. And now we're gonna be threading this bolt into our track block. And then we can take a 1/4-inch Allen wrench to thread that in. And then once you have that done, we can take our bolts, we're gonna be putting that through the bottom and it's gonna thread into the hole into our top bracket. And then once we have that threaded, we can take a 14-millimeter socket to tighten that down.Now moving on to the rear side of the bed, we're gonna be measuring from our straight edge 11.5 inches. So, that's gonna put us right about here. So, now we can install our upper clamp right at that spot. And then we can take our lower clamp. We're gonna be using the 1-inch bolt with the Allen head top, do the same thing, slide it through that top hole and into the bottom. And then we'll take that same 1/4 inch Allen wrench, slide it in there, and then get this installed into our track block. And then we can take our bolt coming through the bottom into our upper clamp, just like on the front. And then once we have that hand-threaded, we'll take that 14-millimeter socket again to tighten this down. And then once we're done on this side, we'll do that same thing on the other side.So, next up, we can assemble our bow assemblies. Now we have two different types of couplers. There's a longer and a shorter, and the longer has a button on the middle of it. Now the one with the button is gonna match up to the two poles that have buttons, and the ones without buttons are gonna match up to the ones without buttons. Also, if you open it up, the number one and number four bows are gonna be the ones that have buttons and get this coupler, and the number three and four in the middle are gonna get the one without. So, now we can just press in these tabs and slide them into place. And then when we connect it to the other side, you're gonna wanna make sure that you pull it up so you connect the correct ones.So, now once we have our bow assembly assembled, we can get it installed onto the truck. So, now we have our bow assembly laid across the bed of the truck. So, now we have this circle hole cut out here where we have this little guide pin on the outside, it's gonna slide into there. And then we have this lever on the back that we can pull out to install into our bracket. The pin's gonna go right through the hole. And then we have this bracket over here that's gonna fold down onto this screw that's sticking out of our rail. So, now we can pop that in.Next, we'll pull that lever and get that bracket installed. And then we can pull up on our bow assembly. Now we'll take this last bracket and lock it in there, and then repeat the same process on the other side. So, now we have our soft top just laid over our bow assembly. Now we're gonna straighten it into place. The side with the clear window is gonna go towards the front of the bed. And then the side with these two flaps, this is gonna be the rear.So, our next step is to remove our front bar. We need to pop this off so that we can slide this tongue here into the groove on the front bar. So, now to do that, we can just pull back on our bar and that'll pop it out. And then you'll do the same thing on the other side. I already popped that side out, so we can pull our bar out. Be careful not to hit it on the window. Now this groove on the backside is where that tongue is gonna go into. So, now once we have that tongue into our groove, we can just slide it across. And then once we have this all the way across, our weatherstrip is gonna go towards the inside of the truck. And then we can slide our front bar back into place, just like that. And repeat the same process on the other side.Now once we have our front bar reinstalled on both sides, we can come over to this side of the soft top. We have two more clips that are gonna be pretty similar to what we just did. With these, we can angle down and push up in, just like that. And then we'll repeat the same process on the other side.So, next, we can hop into the bed of the truck and we'll be coming up to our front-most bow. We'll have to button our front and rear bow. And our two in the middle, we can Velcro. And then we'll do that same thing for the rearmost bows.So next we can install our side windows. We have a zipper on the left, top, and right side that we need to zip to get this into place. And now with everything in place, we have that same setup with the tongue and this groove that we need to pry down and put it into our groove. And then we can do that same thing on the other side.So, next, we can install our third brake light. Now we have some holes that are cut out from the factory. So, the hole in the middle is where we're gonna run our harness. So, we can just wiggle that through and pull it through from the other side. And then next, we can take our screw. That's gonna go through the front side. And then on the back, we're gonna get a washer and our nut. And we'll do the same thing on the other side. And then we can just get an 1/8-inch Allen on the front side and a 10-millimeter wrench on the back, and tighten that down.So, next up, we can run the harness for our third brake light. So, there's this channel that runs along the side, and then it runs down here and exits by the tail light so that we can wire it up there. So, we'll slide it in here. And then in the side here, it's a little hard to see, this is where it's gonna come out. It starts right about here. So, now our harness connector is getting a little bit stuck in here. So, I'm just gonna take that Allen wrench that we used earlier just to push it the rest of the way through.And then next, we can wire that up to the brake lights in our tail lights. So, now with our tailgate popped open, we can remove the second screw from the top and the bottommost screw to pop out our headlight. So, they're both 10-millimeter bolts, so we'll get a 10-millimeter socket on those to get them off. And then we can just pull straight back on the tail light to pop that out. And then we'll disconnect our wire harnesses.So, now with our tail light removed, we're ready to install our extender harness. So, we have one side that's gonna go to the harness that we just ran through our soft top. And then the other side, we're gonna drop down through the tailgate right in the corner here. That way it won't get pinched between the two plastic pieces. So, we'll drop it down through the tailgate and then up through the tail light bucket, and then we can do our wiring. And now we can take the other end of our harness and fish it down through our tailgate. And now we can run it up through the hole in the bottom of our tail light bucket.So, now with the other side of our harness that we're gonna wire to our power for our tail lights, we can take a wire stripper and crimper tool, and we're gonna cut off our connector. And then we can pull apart our two wires and strip back some lead and get our connectors on. And then we'll just twist up those leads. And then we're gonna be installing these using male spades. So, we'll slip one right over the edge, and then we can crimp that down. And then we'll do that same thing for our positive. And now we're ready to get our harness wired up.Now to figure out which wires we're gonna splice into to get our power and our ground, we can grab our harness that controls our brake lights. Now, this is gonna be the one that has the blue wire, the green wire, and the white wire on it. Now we already have connectors connected up to our power and ground wires, but for you at home, we can use a T-tap. Now what this is gonna do is it'll go over the wire like that. You have this metal piece inside that when you close it, it'll pinch the wire. And then we'll take our T-tap that we installed, we'll put it through this hole. And then once we close it up, it'll make contact with that metal piece. So, all you do for this is just put it over the wire and then you can use a pair of pliers to crimp it down. Once again, we already have connectors on here, so we're not gonna be installing the T-taps.Now, to probe our connector to figure out which is our power and which is our ground, the first thing we wanna do is apply pressure to our brakes. Now you can have a buddy do this, or you can put a pole there wedged between the brake pedal and the driver's seat to hold it down. So, then we can take our test light and we'll put our ground side to a ground, and then we can probe our connectors. Now our blue wire is lighting up, so that's gonna be our power, and our white's gonna be our ground. So, now we can plug in our harness. So, once again, our red power wire is gonna go to the blue wire. We can just slide that in. And then our black is gonna go to our white wire.And now with everything hooked up, we're ready to reinstall our tail light. So, now we can reconnect our tail light. So, we'll plug in our three harnesses. They're all different shapes and sizes, so you can't switch two of them. And then we can slide our tail light back into place. And finally, we can reinstall our two bolts that hold in our tail light. And then we can tighten these down with a 10-millimeter socket.So, now once we have all of our wiring finalized, we can install our rear window. Now, it's gonna be exactly the same thing as the sides. We have a zipper on the left, the top, and the right. So, we'll zip all three of those and then put our tongue on the bottom into our groove on our back rail. And now with all of our zippers zipped up, we can fold our tongue here into the groove. And now all we have left to do is to clip down our two rear corners. So, I'm gonna start with this white tab, since this one's gonna be the hardest to get. And then once we're done with this side, we can do the same thing on the other side.So, that'll wrap up this review and install of the Bestop Supertop 2 Soft Bed Topper for your 2016 to 2021 Tacomas. Thank you for watching. And for all things Tacoma, keep it right here at extremeterrain.com.

      Product Information

      Features, Description, Reviews, Q&A, Specs & Installation

      Features & Specs

      • To Learn How to Measure Your Bed Click Here
      • Soft Bed Topper
      • Safeguards Truck Bed from the Elements
      • Ideal Option to Fiberglass Bed Shells
      • Foldable Design Allows Full Bed Access
      • Resilient Black Diamond Vinyl Shell
      • Sturdy Black Powder Coated Alloy Frame
      • Includes 3rd Brake Light and Clear Tinted Rear Window
      • Straightforward Installation
      • Five-Year Limited Warranty
      • Fits 2016 to 2021 Toyota Tacoma Models

      Description

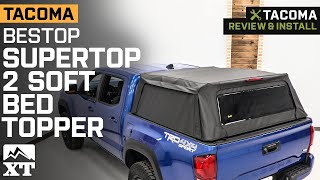
      All-Purpose Truck Bed Topper. Get the extended protection of a fiberglass bed shell with the hauling versatility of a tonneau cover with the Bestop Supertop Soft Bed Topper. This soft bed topper offers the same coverage as a bed shell, making it perfect when you want to go truck bed camping. Likewise, this topper can be folded down, or even removed completely. This feature offers total adaptability when it comes to hauling and carrying jobs. What’s more, this truck bed shell comes with a removable tinted rear window, roll-up side panels, and a 3rd brake light for complete functionality.

      Sturdy Build Quality. This soft bed topper’s shell is manufactured from a sturdy black diamond vinyl fabric that’s treated for UV, fade, and mildew resistance for long-lasting durability. Likewise, its frame is made from high-grade powder coated alloy for maximum strength. Finally, this bed topper comes in a classic black finish giving your truck the look of classic soft tops.

      Straightforward Install Procedure. This bed topper utilizes your truck bed rails as its mounting location. No modifications to your truck are needed. Also, all necessary hardware is included for convenience, and installation requires just standard hand tools.

      Covered by a 5-Year Limited Warranty. The Bestop soft bed topper is covered by a 5-year limited warranty against manufacturing defects. Please visit the manufacturer’s website for more details.

      Application. The Bestop Supertop Soft Bed Topper fits 2016-2021 Toyota Tacoma models.

      Technical Note. Not sure of your bed size? Click here for an instructional video explaining how to measure your bed length.

      Fitment:

      Details

      Bestop 77301-35

      CA Residents: WARNING: Cancer and Reproductive Harm - www.P65Warnings.ca.gov

      Installation & What's in the Box

      Installation Info

      What's in the Box

      • (1) Fabric Shell
      • (1) Rear Window
      • (1) Third Brake Light
      • (1) Wire Harness
      • (2) Side Curtains, Driver and Passenger Side
      • (2) Mounting Rails, Driver and Passenger Side
      • (2) Front Side Rails, Driver
      4.0

      Customer Reviews (8)

        Brand Image

        Reviews of Bestop Exterior products have an average rating of 4.5 out of 5

          Questions & Answers

          10 More Questions

          Will It Fit My Tacoma

          • 2.7L I4 - 16, 17, 18, 19, 20, 21
          • 3.5L V6 - 16, 17, 18, 19, 20, 21