FREE 2 or 3-Day Delivery on Orders $119+ Details

Talk to a Gladiator Enthusiast
1-877-870-8556
M-F 8:30A-11P, Sat-Sun 8:30A-9P
Logo Image
Win $4,000! Enter Daily

Raxiom Axial Series LED Interior Courtesy Lighting

Item JG4380
Call a Gladiator Enthusiast at 1-877-870-8556
M-F 8:30A-11P, Sat-Sun 8:30A-9P
$0.00
Our Price

$9.99

FREE Shipping on orders over $119 Market Price $10.99 You Save 9% ($1.00)

In Stock

Ship to: Ashburn - 20149
Sorry, please enter a valid US or CA postal code
We're sorry, zip can't be updated at this time.
Choose options to add to cart.
    Create a list
    Add to New List

    Saved - View your saved items

    We're sorry. We couldn't save this product at this time.

    or use

      Video Review & Installation

      Merideth: Hey, guys. So, today we're checking out the Axial LED Interior Courtesy Lighting fitting all year Gladiators. Now, this is gonna be an awesome choice for the Gladiator owner who is looking for a very easy and affordable way to switch up the look and feel of the inside of their JT. Now, this will come with four strip LED lights that you can put in the very common footwell area, or really wherever inside of your JT, to create that custom look to match any other color scheme that you may have going on, or any other LEDs that you already have on your truck. Not to mention, these are going to be very noticeable, especially when you take your doors off your Gladiator. If you want that custom look to kinda turn some heads, especially at a car show or a Jeep meet, then this is going to be a great option.Now, this'll also just be a great choice for somebody who's looking for a very easy and straightforward kit, considering that this is fully plug and play, and you don't have to do any additional wiring. Now, in this kit, you are getting 4 strip LED lights with 12 bright LEDs per strip. You're also getting a durable casing around these, which I really like considering that if you take your doors off often, any water, dirt, dust, mud, anything that gets inside of your footwell area that may get to these strip lights, or wherever you put these inside of your Jeep, these are not going to get harmed in the process considering this durable casing on the outside. Not to mention, you're also going to get a automotive grade 3M tape strip on the back to make sure that these stay in place once they're installed.Now, like I said, these are going to go in the very common footwell area, but you can also, because this is a universal kit, put them wherever you'd like within reach of the power source. So, you have two shorter wires to put in the front, and two longer wires to put in the back. And then this'll also come with a control box and a power source. As you can see, this is a very familiar attachment. It'll plug into your cigarette lighter, or your power outlet, and even come with this kill switch up on top to make sure that it's not running power all the time. Now, this little wire here will just plug into the control box, again, making this a completely plug-and-play kit. Now, what I really like about this kit is the fact that it's gonna come with a wireless remote control.You will be able to switch up the color, brightness, and function on the fly. Now, you'll also be able to control the power if you just want to keep these powered on via the cigarette lighter or power outlet. But once you turn it off with the remote, you can do that. Again, you can adjust the brightness. You'll have multiple different color settings, and you'll have multiple different functions. So, if you want a breathing effect, strobing effect, a fade effect, you can do that. And this will even sync up with your music, which I think is really cool. So overall, this is a very inclusive kit, and very user-friendly, perfect for anybody who's just looking for something that's very straightforward, that's gonna add a custom feel to their JT.Not to mention, this is going to be incredibly affordable at roughly $50 for the kit. Now, in comparison to some other options available on the page, some other choices may not come with the color shift. They may only come with one specific color, or if they have multiple different colors, they may not come with all of the features that you see here. I personally like that this adds a level of customization that you don't get with all kits. Not to mention, some other kits will require wiring. So, you may get longer strips of LED lights in the kit where you have to kind of cut and customize to wherever you wanna put them inside of your Gladiator. As for this is completely prewired taking off the question out of the install.So, now again, this is going to do a great job at just being very straightforward, user-friendly, and customizing the interior of your JT at a very affordable price. When it comes to install, I'm gonna give this a very easy one out of three wrenches on the difficulty meter taking you about an hour to get the job done, and most of that is just gonna be making sure that your wiring is routed correctly. Now, you don't necessarily need any tools for this install, but I would just keep a rag and some soapy water or isopropyl alcohol on hand, just to make sure that the surface that you're adhering these to is free of any dirt or dust, just to make sure that they stick for a very long time.Now, one of our customers here has actually installed this on their JT, and is going to walk you through the process step by step. So, that wraps it up for my review. Let's go ahead and get into the install.Man: So, the instructions call for the use of alcohol and microfiber wipes. All right. We're gonna mount it to this steel piece right here, so the fronts have an easy place to mount. So, the adhesive will work just fine. So, for the front, we're going here. We're gonna route the wires behind the carpet, and go straight back for the driver's rear. We're gonna go across for the passenger front and the passenger rear. And then we'll revisit what we're gonna do over there. So, I've made sure to identify the passenger from the driver. The short and the long. The driver's short, we're gonna make to come out right here. So, we'll leave that right here. We'll tuck this behind for now. And then the driver rear, we're gonna go right back through here and hide the wires behind the carpet.One thing to note, later in the instructions, it talks about the controller here with the...where we connect the power supply, which will go in right here. So, for this, it doesn't say early in the instructions, but we're gonna use our good reasoning and say that this needs to be out front close, so the reception is close to your remote and visible. So, we're probably gonna end up mounting this right under here. We'll get to that step later. Okay. So, what we decided to do is we popped this carpet out right here. You can see down there. And we're gonna feed this light under the seat, and make sure that the wires are tight. And we're gonna pull it through the backside.All right, what we've decided to do is...see this? See this bar here? This bar here? Metal bar. We are going to attach the adhesive to this bar. Now, this does move with the seat, so you gotta leave some slack, but at least the wire is not in the track. And we thought about mounting it to our amp, but we're scared that there's be too much heat. So, we are gonna mount it to this crossbar on the seat that's part of the moving seat assembly. So, there's plenty of room to glue it with the tape, but just allow some slack for your moving back and forth.Okay. So, what we've discovered, we've got another carpet installation, so let's do that. I'm gonna pull this carpet out. All right, so obviously here's where we can hide the passenger front. Now, and if you'll see right here, they want you to tuck the wires in there. Well, every time you tuck them in there and pull on this part, it pops back out. So, what we're gonna do is we've got it laid in there like the instructions say, but once we figure out how much length we need for the front and the back, we're gonna come back to this and do a little trickery to hide this. But we'll come back to that later.Okay, for the passenger front, we're gonna tuck the wire under. And so, we've got our wires tucked. And then we can connect our carpet back. But we're gonna leave this unhooked until we get this passenger rear wire hidden through the tunnel between the passenger seat and the console.Okay. So, we unclip this carpet. Pull it back. If you just pull it out of there just a little bit, you can see that it's all exposed. And we're gonna use this notch. We're gonna come out inside that notch, and then take our carpet back over. And then retuck it right here, so that then we can go under the seat instead of along the sliding track, which could then possibly break the wire.Okay. Here's our alcohol and our microfiber that are good for cleaning our surfaces step two in the instructions. All right, so we're gonna clean this entire steel bar right here with microfiber. Now, note to self, the microfiber is catching on the edges, so make sure it doesn't leave fuzz. Okay. So, we're gonna clean this whole thing with alcohol. There. All right. Okay, so the passenger front...whereas the driver front has that metal structure we showed you earlier, the passenger front has this neat groove that we're gonna clean with our alcohol. And check this out, how well this just fits right in the slot. I mean, it's, like, a perfect fit. So, that's where we're going with the passenger front.Right, so we're gonna start padding in the wires, right? So, we've hidden our driver rear wire behind the carpet. We've already tucked it under the back, so it's not on the slider. We're gonna tuck our carpet back under here. Over here. Right here. So, we can see you can flatten out our carpet here. We still have that. We're gonna tuck underneath the passenger...we're gonna take our controller, put it underneath right here knowing that it's gonna be upwards. And then the driver front wire is here. Excuse me. And the front wire goes under the carpet as well. And then we're going to leave enough slack right here, so we can hide this if you're to remove it.All right, so what I've chosen to do is get a small zip tie on this controller and then one of these levers. So, this controller, I'm tucking right under here. Get the small antenna exposed. I'm gonna tuck the carpet after I zip tie this two wires behind the radio. So, here's what we're doing. You see the controller? We're zip tying up out of the way. And you see the little antenna conveniently sticks out, and it'll be exposed just like that. And we're gonna take our 3M tape strips, and we're going to mount this. We're gonna route this right under here, and bring it through here. There's our tape side. Take the tape off, back in, and we're gonna mount it right there. We're gonna take this tape off. Taking the tape off from the back end.So, we got the tape exposed. Put our carpet down. And we've got our channel here. Can you see the channel? Right here. We gotta be able to see where it's going. All right, so it's gonna go in this channel just like that.Perfect. This is nice. This is like it was made for it. All right, and then here we are with our wires. We can easily hide that. We'll leave it lose for now. Okay. Okay. What we're gonna do now is we're gonna bunch up our wiring just like so. And zip ties not provided but recommended. We're gonna zip tie these together. There we go. So, now we've got our bundle of wires zip tied. And then we'll take another zip tie and attach it up to the source at the top. There's plenty, plenty of options here for zip tying. We're just gonna take that right up out of there. Get our coat off. And what we're gonna do here is mount it to this bar right here. Just get this way. Here we go. Here's gonna be perfect. Place it right there.Let the tape do its thing. Okay. And then we'll wrap up our extra wire. Okay. We're gonna take the back end off of that tape. We're gonna take the wires off of it. And then we're going to that same bar right here. Careful. That tape is really sticky. It'll go right there. Okay. All right. So, what I'm doing...this is not in the instructions, but I'm taking electrical tape. I'm gonna take our wiring. Basically, I'm gonna make it fatter, so it will legitimately tuck because there's room in this little passover under the radio from side to side. Right? The wires are too thin to stay under. So, see? We've made it thicker. So, now when you press it under, it stays. So, I'm gonna do that for all the way across.All right, so you can see what I did. Just, like, making it fatter. That way it has something to hold onto underneath there. And therefore, it should stay. All right. So, there's our wires. Make sure they're down below the buckle. We're gonna get them tucked underneath. We'll get this wire under the carpet underneath. And it's supposed to go here too. Get it under here. Go around this corner tucked underneath. Up here, underneath into...so that's buckled up, no wires. And this one's a little challenging over here but it goes... Okay. There we go.Okay, so have to have the key in the car, accessory, hold. And put the power on. Power source. Hey, we have lights.Merideth: So, that is going to wrap it up for my review and the install of the Axial LED Interior Courtesy Lighting fitting all year Gladiators. For more videos and products just like this, remember to always keep it right here at extremeterrain.com.

      Product Information

      Features, Description, Reviews, Q&A, Specs & Installation

      Features

      • Custom Interior Lighting
      • Super Bright RGB LED Strips
      • Includes Remote Control
      • Easy to Install - Plugs into your Cigarette Lighter/Power Receptacle
      • Sold as a Set of (4) Strips
      • Universal Applications - Fits All Vehicles

      Description

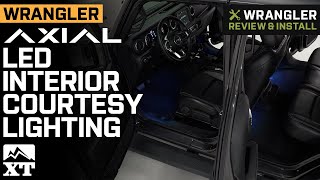
      Custom Interior Lighting. Add unique custom lighting effects to your vehicles interior with an Axial LED Interior Courtesy Lighting Kit. Each kit includes a wireless remote controller that will allow you to select different color options and modes. Light options include a rainbow's array of colors, as well as strobe and a soft fading, "breathing" option.

      Simple Installation. The LED light strips in this Interior Courtesy Lighting Kit feature pre-installed 3M bonding tape on the back for easy installation under the dash or seats. No hardwiring is required for installation, the included harness plugs directly into your cigarette lighter receptacle or power port.

      Application. This Axial LED Interior Courtesy Lighting Kit features a universal design allowing it to be installed in any make or model of vehicle.

      Raxiom U9917

      CA Residents: WARNING: Cancer and Reproductive Harm - www.P65Warnings.ca.gov

      Installation & What's in the Box

      Installation Info

      What's in the Box

      • Harness with (4) LED strips
      • Wireless Remote Control
      • Power Cord
      4.9

      Customer Reviews (35)

        Questions & Answers

        10 More Questions