 FREE 1 to 3-Day Delivery on Orders $149+ Details

How to Install AFE Twisted Steel Connection Pipes - Race Series (12-18 3.6L Wrangler JK) on your Jeep Wrangler
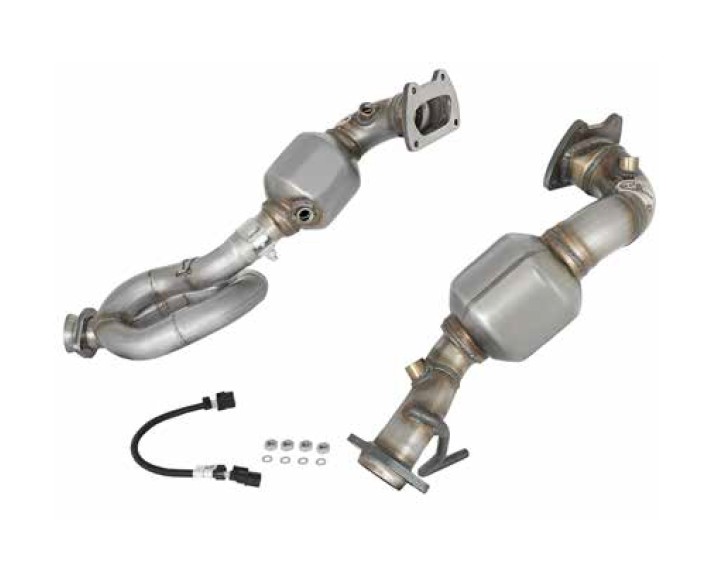
Parts Included:
• P/N: 05-144328 S/A Tube, Passenger Side w/ Cat. (x1)
• P/N: 05-144329 S/A Tube, Driver Side w/ Cat. (x1)
• P/N: 05-144326 S/A Tube, Passenger Side w/o Cat. (x1)
• P/N: 05-144327 S/A Tube, Driver Side w/o Cat. (x1)
• P/N: 05-144330 S/A Tube, Loop Pipe (x1)
Hardware Included:
• P/N: 05-41235 Clamp, Band 2" (x1)
• P/N: 03-50087 Nut, Hex: M8 (x4)
• P/N: 03-50086 Washer, Lock: M8 (x4)
• P/N: 05-46145 Extension, O2 Sensor (x1)
Caution: aFe recommends professional installation on our products. Allow time for your vehicle to cool down prior to installation. When working on or under your vehicle proceed with caution. Exhaust systems reach high temperatures and may cause serious burns. Wear protective safety equipment; eye goggles and gloves to ensure a safe installation.
Step 1: (Read instructions prior to installation.) For faster removal and installation of exhaust a trained professional is recommended for this procedure.
Step 2: Secure the stock exhaust with jack/stands.
Step 3: NOTE: (Disconnect the negative battery terminal).
Step 4: Remove the right and left side inner fender splash guards
Step 5: Remove the right side OE down pipe heat-shields and remove the 2 bolts securing the OE down pipe to the OE y-pipe.
Step 6: Remove the OE bracket hanger securing the right side on the OE down pipe.
Step 7: Unplug right side on the OE down pipe the o2 sensors and remove (NOTE: LABEL EACH SENSOR BEFORE YOU DISCONNECT.) Remove the OE 4 bolts
securing the OE down pipe.
Step 8: Remove the right side OE down pipe.
Step 9: Remove the left side 2 bolts securing the OE down pip to the OE y-pipe.
Step 10: Unplug left side on the OE down pipe o2 sensors and remove (NOTE: LABEL EACH SENSOR BEFORE YOU DISCONNECT.) Remove the OE 4 bolts
securing the OE down pipe.
Step 11: Remove the left side OE down pipe.
Step 12: Install the aFe down pipe right side using provided nuts/washer & OE bolts/gasket but do not tighten.
Step 13: Install the aFe down pipe left side using provided nuts/washer & OE bolts/gasket. Slide the aFe loop pipe over the left side aFe down pipe using 2.0”
band clamp but do not tighten.
Step 14: Ensure that all the parts are in alignment and then tighten the right and left side aFe down pipe & loop pipe band clamp, the flange bolts and nuts securing the OE y-pipe and tighten.
Step 15: Tighten starting from the top on your aFe down pipe to the down.
Step 16: Install the OE bracket hanger to the right side on the aFe down pipe.
Step 17: Install the o2 sensors on the right side aFe down pipe.
Step 18: Install the o2 sensors using provided o2 extensions on the left secondary o2 of the left side aFe down pipe.
Step 19: Install the right and left side inner fender splash guards.
Step 20: Reconnect the battery.
Step 21: Double check all work and ensure everything is tight
Step 22: Start the vehicle and check for any leaks.
Step 23: Congratulations, your system is now complete and fully installed! It is recommended to re-tighten all clamps and bolts after 50-100 miles
Note: aFe recommends that the tailpipe be at least 1/2”-1” away from any body panels to avoid heat related body damage. Tighten and secure.

