FREE 1 to 3-Day Delivery on Orders $149+ Details

How to Install Addictive Desert Designs Stealth Fighter Large Side Pods (07-17 Wrangler JK) on your Jeep Wrangler
Tools Required
- Ratchet
- 18mm Socket
- Phillip’s Head Screwdriver
- 3/4” Socket & Wrench
- 7/32” Allen Wrench or Allen Key Socket
- 9/16” Wrench or Socket
- 5mm Allen Wrench or Allen Key Socket
- 10mm Wrench or Socket
- Cutoff Wheel
- Grinding Wheel
- Black Paint
PREPARATION
1. Disconnect the negative terminal on the battery. Park the vehicle on level ground and set the emergency brake.
2. We recommend reading through the installation instructions in whole before performing the work.
3. Estimated Installation Time: 2 Hours
4. You will need the following tools:
a. Ratchet
b. 18mm Socket
c. Phillip’s Head Screwdriver
d. 3/4” Socket & Wrench
e. 7/32” Allen Wrench or Allen Key Socket
f. 9/16” Wrench or Socket
g. 5mm Allen Wrench or Allen Key Socket
h. 10mm Wrench or Socket
i. Cutoff Wheel
j. Grinding Wheel
k. Black Paint
Note: this installation requires 2 people for best results
5. Included in Kit:
8 – Hex Head Bolts – 1/2”-13 x 1 1/2”
8 – Flat Washers – 1/2”
4 – ADD Dual Nut Clips – 1/2”-13
2 – Button Head Bolts – 3/8”-16 x 3/4”
4 – Flat Washers – 3/8”
2 – Locking Jam Nuts – 3/8”-16
2 – Socket Head Bolts – M6-1.0 x 40mm
2 – Fender Washers – 1/4”
2 – Locking Nuts – M6-1.0
REMOVAL
1. From the bottom of the Jeep, unplug each fog light.
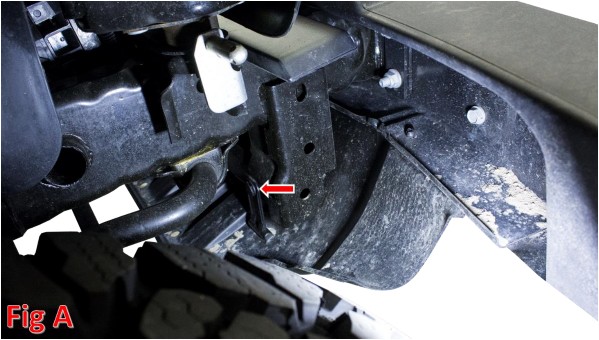
2. There is one plastic clip per side that needs to be removed. The location is shown in Fig A. The picture was taken looking in from the wheel well.
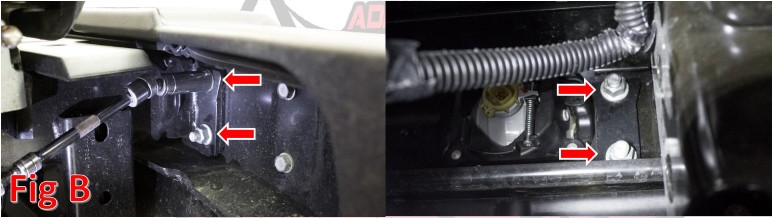
3. From underneath the Jeep, use an 18mm Socket to remove the bolts that hold the bumper to the frame horns. There are 4 per side. (Fig B)
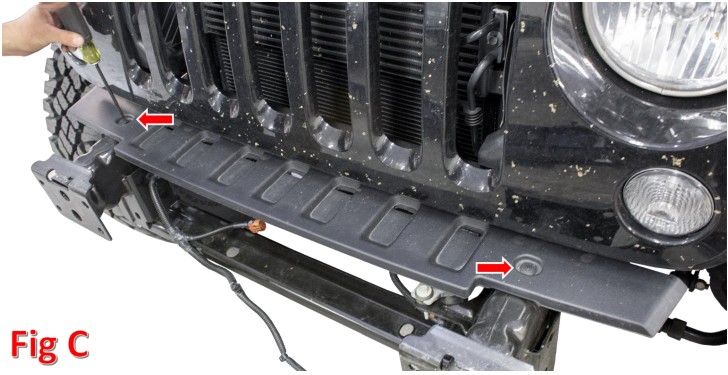
4. Using a Phillip’s Head Screwdriver, remove the two screws holding on the top plastic bumper shroud, then remove the shroud. (Fig C)
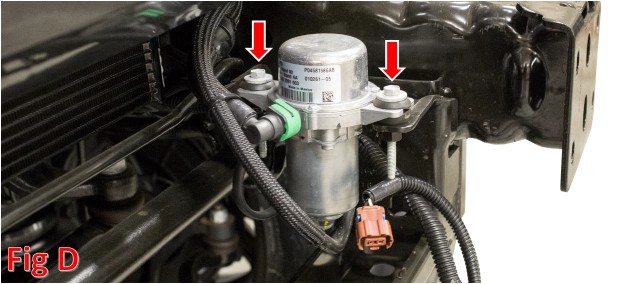
5. If your vehicle has a vacuum pump, remove the two mounting bolts that hold it on (10mm Socket). (Fig D)
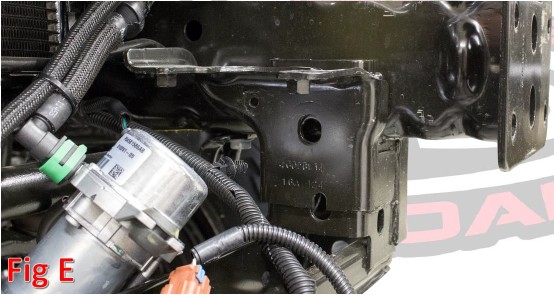
6. Remove the two plastic clips that hold the vacuum pump harness in place, then move the vacuum pump/harness out of the way. (Fig E)
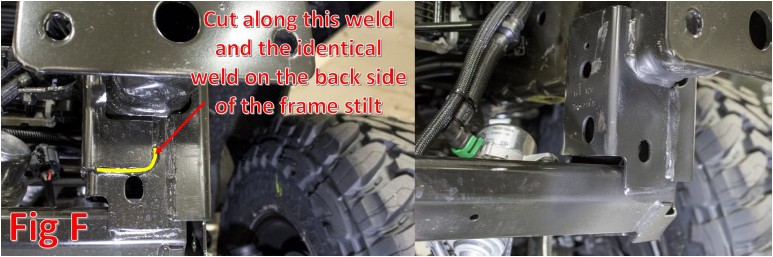
7. Cut off the OEM Vacuum Pump Bracket. We suggest cutting along the weld on the front and back side of the bracket where it wraps around the frame. Once the welds have been cut, the bracket should come off. The area will need to be ground smooth, then painted over. (Fig F)
8. Prepare to install your new ADD Stealth Fighter Front Bumper.
INSTALLATION
1. If you have a top hoop or side caps to add on to your bumper, please follow Installation Steps 2-6. If not, please skip to Installation Step 7.
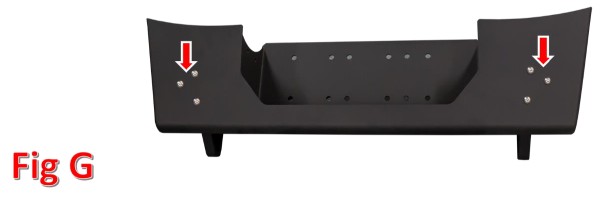
2. Using a 7/32” Allen Wrench and a 9/16” Wrench, remove the bolts/nuts/washers (x6) that are installed in the top hoop mounting holes when you receive the bumper. (Fig G)
3. Set the top hoop in place, and reinstall the same bolts/nuts/washers (x6) that you just removed. For certain top hoops, you may have to mount some of the bolts facing the opposite direction as they were when you removed them to fit an Allen wrench on them. (Fig H)

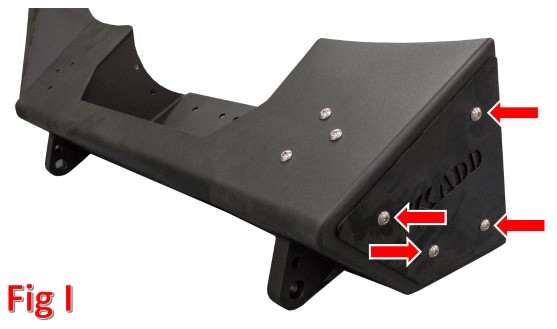
4. Using a 7/32” Allen Wrench and a 9/16” Wrench, remove the bolts/nuts/washers (x8) that hold on the side plates that come with your bumper. (Fig I)
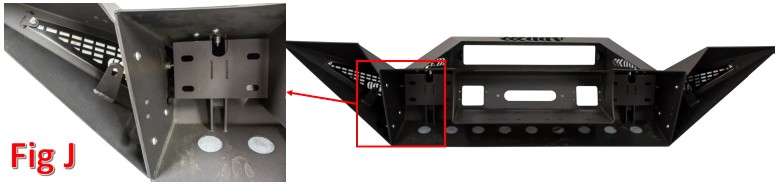
5. Set your new side caps in place, and reinstall the bolts/nuts/washers (x8) that you just removed. For certain side caps, you may have to mount some of the bolts facing the opposite direction as they were when you removed them to fit an Allen wrench on them. (Fig J)
6. If you have any lights to install on your top hoop or in your side pods, now is a good time to do so. Please follow the light manufacturer’s installation guides for mounting and wiring information.
7. Do not install the front flush mount lights or a winch until you’ve mounted your bumper to your Jeep.
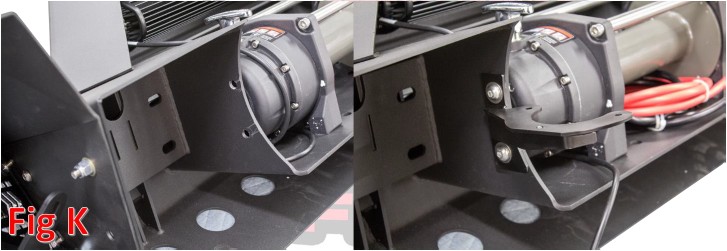
8. If your vehicle has a vacuum pump, mount the relocation bracket to your bumper. Hold the bracket in place, then secure it to the bumper using the supplied 3/8” Bolts (x2), 3/8” Washers (x4), and 3/8” Locking Jam Nuts (x2). (Fig K)
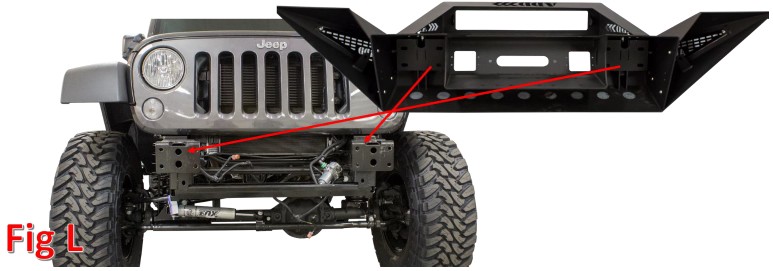
9. Set the bumper in place. Secure to your Jeep using the supplied 1/2” Bolts (x8), 1/2” Washers (x8), and ADD Dual Nut Clips (x4). Leave these bolts loose for now. (Fig L)
10. Align your bumper so that it sits straight in relation to the grille and fenders. Then, tighten the mounting bolts to 70 foot pounds.
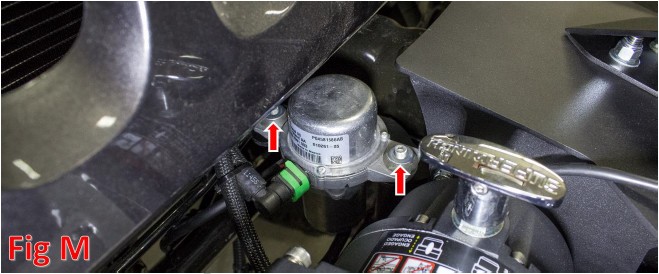
11. If your vehicle has a vacuum pump, set it in place now. Then, secure it to the relocation bracket with the supplied M6 Bolts (x2), 1/4” Washers (x2), and M6 Locking Nuts (x2). (Fig M)
12. If you have a winch or flush mount lights to install, now is a good time to do so. Follow the winch or light manufacturer’s instructions for mounting and wiring information.
13. Stand back and enjoy your new ADD Stealth Fighter Front Bumper.
14. Check and re-tighten if needed, all mounting bolts after 100 miles and periodically thereafter.