Talk to a Wrangler Sales Tech
1-877-870-8556
M-F 8:30A-11P, Sat-Sun 8:30A-9P
Logo Image
$20K Sweeps! 10 Chances to Win! Enter Daily >

ZRoadz 50-Inch LED Light Bar and Four 3-Inch LED Light Cubes with Roof Level Mounting Brackets (18-24 Jeep Wrangler JL, Excluding 4xe & Rubicon 392)

Item J130594-JL
Verify parts fit and get product recommendations.
Wrangler Sales Techs: Connect Now M-F 8:30A-11P, Sat-Sun 8:30A-9P
$0.00
Our Price

$1,181.50 (kit)

FREE Shipping Market Price $1,358.99 You Save 13% ($177.49) Up to 10% off for Military & First Responders! See Details

Will this fit your Vehicle?

Select a different vehicle Help?
Update or Change Vehicle
Ship to: Ashburn - 20149
Sorry, please enter a valid US or CA postal code
We're sorry, zip can't be updated at this time.
    Create a list
    Add to New List

    Saved - View your saved items

    We're sorry. We couldn't save this product at this time.

    or use

      Product Videos

      This ZRoadz 52-inch LED Light Bar with 4 3-inch Light Pods and the Windshield Height Mounting Brackets are for those of you that have a 2018 and up JL that are looking for a way to add an absolute ton of light to your Jeep. You're essentially surrounding the whole windshield in very, very bright light. And whether you're looking to add all of this because you do some night wheeling or because you want a little bit of additional light for those dark back roads, this is gonna be a really nice choice for you.This is going to be a two out of three wrenches for the installation. Because there's a little bit of wiring involved, we usually got two out of three wrenches, but the wiring harnesses that are included in this kit do make that process very simple. And we are going to walk you through it in just a second. So a lot of people will install light bars and auxiliary lights like this for a lot of different reasons. As I already mentioned, they're gonna be great for doing some night wheeling, maybe some night recoveries.They're also gonna be good for driving on those dark back roads when there's no oncoming traffic. But some people will also just install these on their Jeep because they like the way it makes the Jeep look, and that's completely okay as well. Although I would say this is going to be a kit that comes with some pretty high-quality lights, which means that price is gonna be a little bit higher. If you're just looking for lights that don't need to be as functional and you just like the look, you can probably get away a little bit less expensive.These lights are all going to be extruded aluminum housings, polycarbonate lenses, and some very bright LEDs right inside of them. They're also going to be very high quality. So you're not going to end up with individual LEDs burnt out in your 50-inch LED light bar like you can get with some of those much less expensive lights out there on the market.The 50-inch light bar is going to be a dual beam. So the center is going to be a spot. The outside is going to be a flood pattern, and the cubes are all going to be spot patterns. Now, what that means is you have a lot of flexibility. Of course, you can't really change where the 50-inch LED light bar aims, but all 4 of these cubes you can aim at different angles and at different heights to really give you the light exactly where you want it.Of course, this isn't just going to come with the lights. It also comes with these really nice brackets that's going to hold everything. These brackets do a really nice job of being just a little bit off the paint. So they're not going to chafe the paint. They're not going to destroy anything if you ever did wanna take these off. And they put all of the lights in a really good location. As you can see, they stagger this lower light a little bit in further from the upper light. Again, that's going to just change how the lights look visually. Not so much about the function, but this is going to be multi-purpose.So, not only are you gonna get all of the brackets and all of the lights that you see here, but you're gonna get the wiring harnesses to make everything work. And different wiring harnesses come in different degrees of being finished. Some, like this one, are going to have weatherproof connectors on every end of every light and every wiring harness. So you're really just plugging things in, which makes things very, very easy as opposed to the less expensive ones where you have to do some soldering or some crimping.So once you get everything plugged in and connected up with the battery, this is also going to come with the switches that you can drill into your dashboard. So, you don't have to get any sort of additional auxiliary switching. And it's going to have all your fuses and all your relays to make sure that everything stays nice and safe for you.Now, because you are getting some really nice harnesses, great brackets, really bright lights, and a total of 5 of them, this is not going to be an inexpensive kit, running you right around that $875 mark. If you are looking for a set of lights that's not only gonna look good on your Jeep but also be very functional and remain functional for a good long time, this is gonna be a good option for you. And I don't think it's gonna be a crazy price.There are some light bars out there that just for a 50-inch LED light bar are gonna be more than this entire kit. But as I said, if you're looking for a bargain-basement kit that's just gonna make your Jeep look cool and you don't actually wanna be able to use them, you can definitely save some money and go with something less expensive.As I mentioned, two out of three wrenches because of the wiring that's involved in installing this kit. Let's show you how to get it done. For this installation, we used a 10-millimeter socket, a T40 Torx socket, a 4-millimeter and a 5-millimeter Allen head socket with a 3/8 extension, all driven by our 3/8 electric impact. We also use a couple of Allen keys and finally a 14-millimeter wrench.The first step of this installation is actually a little bit of assembly. On the brackets themselves, we're going to be putting some adhesive padding on the backside of it. That's going to ensure that the brackets aren't going to chafe the metal or the paint on the Jeep. And then we're also going to assemble the brackets onto the bottom of the lights before we jump over to the Jeep and get anything done there. So, here we have our first bracket. This is going to be the driver's side bracket. We'll turn this over, and we have the corresponding driver side piece of padding.So as you can see, you just have a little bit of paper covering the adhesive on the back of the padding here. So, we're just gonna see how this is gonna line up before we actually peel the adhesive backing off. It looks like this is gonna go just like this. And this is a pretty heavy rubber. It's not really a foam. So you do wanna make sure that you get all of the bolt holes lined up properly with the metal. Otherwise, it is gonna be a little bit difficult to get your hardware through.So we'll go ahead and peel the backing off of our pad here and then carefully and slowly get the bolt holes lined up and get this pressed into place. All right. Once the large pad is installed, we also have a couple of smaller pads. You're actually gonna put four per bracket, and they're going to go on the backside as well, pretty much staggered along the way here on either side, more or less like this. And again, the idea is just to protect against any chafing up the A-pillar. So these don't have a specific location, again, pretty much laid out how I just had them. I'll just peel the backing off and put them on here one by one.Now that we're done with all the adhesive padding on this bracket, there's just one more thing to do before we jump over to the other one. And that is to assemble this brushed aluminum piece that goes right behind the ZRoadz's logo. And it's really just there to highlight the logo. I guess if you wanted to, you could color change this piece. You could leave it off entirely. But we're gonna go ahead and bolt it on as it's intended.So, it just goes on the inside of the bracket right here, again, just to highlight that logo a little bit. And you have a small Allen head screw and a nut that's going to hold it in place. You are gonna have to provide a small Allen key in order to tighten these down. Now that they're all finger-tight, we'll just take our small Allen key here and tighten them down. As you can see, that's all that does there, is highlight the logo just by adding that little bit of brushed aluminum to the backside of it. So, that's gonna do it. For this bracket, we're gonna set this aside and do the exact same thing on the other one.The last bit of assembly we have to do before we can move on to the installation is getting the brackets assembled onto the bottom of our cube lights. So, each one of the lights is going to come with a U-shaped mounting bracket that we're going to use to attach it on to the bracket that we were just looking at. And it slides into place pretty much just like this. We just need to get it bolted on.So, again, there are four lights. We're gonna do that for each of these. The process is to flip the light face down. Then you have a couple of nuts that you're going to drop into the back of the light. They're gonna drop into a spot that will actually hold the nut from spinning so we don't have to worry about trying to get a wrench in there and hold it. Then we'll slide the bracket in. Make sure we have it going the right direction.Once the bracket is in far enough for the hole in the bracket to be aligned with the hole in the body of the light, we can put the bolt in. To get that tightened down, we can use the Allen key that's included in the kit. I'll switch over and do the same thing on the other side. The hardware that's left is the hardware we're gonna use to bolt the light down to the main A-pillar bracket. So we're gonna set that aside for now, but we are gonna be using that in just a second, so, like I said, four lights. We'll move on to the other three, do the same thing. Now that the assembly is done, we're gonna move on to the installation. And the first step is going to be removing this cowl corner cover.So there are four Torx bolts we're going to remove. That will give us access to this area that we're gonna tuck all of our wiring into. Now that we have the cowl corner cover removed, we're going to run some of our wiring behind there. So we have a pair of our cube lights here, and we have one of our wire harnesses. So this harness is going to plug into both lights and then give us one female end that we can plug the rest of our harness into in just a little while. So we'll get this plugged in to each of the lights. Which one goes where doesn't really matter. They're both gonna plug in pretty nicely here with these weatherproof connectors.And then what we're going to do is take the single end of our wire harness, and we're gonna tuck it underneath the hood. So there's just a little bit of foam here. And if you take your hand back there, you can create just enough space to slide this between the foam and the hood. Of course, you can also pop the hood. It might make it a little bit easier for you. But as long as this ends up on the other side of this piece of foam, we can very easily grab it once we pop the hood and plug it into the rest of the wiring harness.I'm just gonna tuck all that slack in there pretty much right up to where the two lights plug into the wire harness. And then we'll leave the rest of that slack right in the space here. And again, that's gonna get covered up by that cowl corner cover when we reinstall it. Now, we have one more wire we're gonna run down this side. And you can really run this wire down either side. We're just gonna do it here. That's just a preference thing. And it's gonna be for our 50-inch light bar. So what we're actually gonna do is get the light set up on the roof. We're gonna get the wire drape down and underneath this cowl corner cover where it's going to end up. And then we'll be able to bolt our bracket up to cover that wire.I'm just gonna set our light face down up here on the roof. You do wanna be careful. You wanna make sure this isn't gonna slide down. It will cause quite a bit of damage. So we wanna make sure it's gonna stay up there and then just get this wire right down here underneath where that cowl corner is going to go. Then we can get that cowl corner cover back in place. Now, the two wires for our light cubes tucked right in this area around the hinge, and then our wire for our 50-inch light bar up the top that's gonna get tucked right along the edge here. There's a little bit of a space that it'll be able to get tucked into. Now, we're not going to be reattaching this with the factory hardware. We're gonna use some longer hardware with our bracket. So, let's go get the bracket.Now, it's time to get our bracket installed on the Jeep. Before we do that, we're gonna drop a couple of spacers and bushings into these top holes here, because if you take a look at the factory hardware compared to the hardware that comes in the kit, you're gonna need some spacers. So, we have these taller, thinner spacers, they're gonna go right down in these holes. And then we have some thick washers here or thick spacers. They're also aluminum. And they're gonna go right over top of that, and that's gonna help to keep everything spaced properly and make sure that the bolts are going to reach everywhere that they need to reach.Then for these two holes in the side here that are gonna align with the holes in the side of the cowl cover, we're gonna get those bolts started, and we're gonna get our spacers put over top of the inside of those bolts. Now we can take our bracket, make sure that it's over top of the wire for the 50-inch light bar, and get the hardware started. Now, the first bolt started in here, move on to the back one, a couple of turns on that. Now, we're gonna make sure that our wire is tucked behind our bracket, the wire for the 50-inch light bar. Now, it looks pretty good like that. I'll take the bolts for the upper holes and get those started.So we're gonna make sure that all of our bolts are started by hand. That way we can ensure we're not going to cross thread anything when we use a tool. It feels like those are good. And these ones that are down by the side, they started nice and easily. So we're gonna get all four of those bolts torqued down.Now, before we jump over to the other side, we can get our cube lights and bolted up to our bracket. Of course, we're gonna have to hold off on the 50-inch light bar until the other bracket is installed on the Jeep. So we can just set the bolt up through the bracket. I'll set one of our cube lights over top. We have a locking washer that will slide over top of that. Once we have the locking washer in place over the bolt, we can put the nut on and get it tightened down. We can go ahead and do the same thing with our other cube.Installing the bracket on this side is pretty much a rinse and repeat of the other side. The only thing we don't have to get tend with is the wire coming out from the 50-inch light bar, because we already took care of that over there. Those bolts removed, we can take off the cowl corner cover, bring in our lights, and get those plugged into the wire harness. We'll get the harness fed through too under the hood. Make sure our wires are routed how we want them before reinstalling the cowl corner cover. Now that the cover's in place, we can drop in our spacers and bushings up top. And we'll grab our bracket and get it bolted on.Before we install the bolts in the side holes, we'll make sure that we slide the aluminum spacers in place. Everything started by hand, we can torque it down. Now we can get our lights bolted up to our bracket. Now, it's time to get our 50-inch light bar bolted up to our brackets. So we have a long bolt here, slide that washer, and then the large spacer over top of the bolt. Now, we can get that started into the light here with just a couple of turns. Now, the nice thing about this bracket is that it's slotted on both sides. So, I should be able to get the hardware started in both sides and just slide it into the brackets then come back and tighten it up.Now, we'll grab our light bar and slide the new hardware into the slots. Get the close side first beside where I'm standing and get the other one lined up and slid in. There we go. Now, the light bar will stay just like this. We can get it aimed and get that hardware tightened up. Now, it's time to get all of our new lights wired up. In order to do that, we're gonna have to pop the hood. I put that rag up there just to protect the hood, because we're gonna flip it all the way up. It's gonna make it easier for you to see what I'm doing and also a little bit easier for me to work. Of course, you could just put the hood on the hood prop if you wanted to.So when you have the hood popped, you can see that the other end of both of our wire harnesses on both sides are waiting for us, very easy to access. Now, the 50-inch LED light bar plug is a little bit shorter. It's actually still tucked underneath the cowl corner cover. Now, we are gonna be able to reach under there and plug the wiring harness into it. But it probably would have been easier if while we had the cowl corner cover off before we put the bracket in place if we had popped the hood, fed the other end of the wiring harness through and made our connection outside of the engine compartment here then put everything back together. If we had to do it again, then it would be a little bit easier, but we are gonna be able to get it done this way as well.So, what we're gonna be doing is unfurling both of our wiring harnesses and pretty much laying them where they need to go underneath the engine compartment. So we have a couple of ring terminals on each of the wiring harnesses. They're gonna go to the battery. Then we also have a switch on either one of the wiring harnesses. They're gonna go to the driver side. And there's a grommet that I'm gonna show you in a second right by the brake booster where we can pass those through the firewall. The other end of the wiring harnesses are going to be weatherproof connectors, and you have one per wiring harness.So we have three plugs coming off of our lights and only two plugs on our wiring harnesses. So we need two of those to come together. And that's where our last wire harness comes in. So we're going to plug in our other two wiring harnesses that we already used, one from each pair of lights into this last wire harness, and essentially making it so that we can power all four of those cube lights off of one of the wiring harnesses that came in our kit. The other wiring harness that came in the kit will go to the 50-inch light bar. So you have two switches that control the lights independently.Now, the way this is, it gets long enough, but you do sort of have to stretch it along the front of the firewall here to plug it into both of the existing wire harnesses. It's not ideal, but you can make everything work. This is where you're gonna wanna have a bunch of zip ties handy so that you can tie everything up out of the way of anything that's going to get hot or anything that is going to be moving. Now, because we're gonna turn around and take the wiring harness right back out of the Jeep again, we're pretty much gonna lay it where it needs to be, but we're not gonna go through the process of strapping everything down.So, the first thing we're gonna do is, like I said, unfurl our two wiring harnesses. Here's the first one. We have our pair of ring terminals. These are going to go right here to the battery. So we'll roughly lay them where they need to go. Then we have two legs of the harness here. They need to go in opposite directions. This is going to be plugged into our 50-inch light bar. So we're just gonna tuck that in the corner here. We'll plug that in in a second. And then the other leg is going to be for our switch. So this is the one that needs to go across to the passenger side and through the firewall. So we'll get that laying roughly where it needs to go. Just toss it across the firewall for now.Then we have our second wiring harness that we're going to pull out the same way. So we have, again, our ring terminals that are gonna stay right here toward the battery. The difference is that the leg of the harness with the weatherproof connector on it, this one right here, is going to land pretty much right here in the middle of the engine bay. And again, that's gonna get plugged into the other end of that third wire harness. And then finally, we'll find our switched leg here. And that's gonna get tossed across to the driver's side where it's gonna go through the firewall.So with everything very, very roughly laid where it needs to go, we'll plug in a couple of connectors, and then we can go and straighten up our wiring. So, again, the single wiring harness that we have over here, this one's gonna go to our 50-inch light bar. And it's gonna be a little bit tough for you guys to see that and for me to do. But we're gonna get it plugged in underneath this cowl cover. After playing with that for a little while, we got that clicked in.Now we can jump over to our last wire harness. So here is our third wire harness. We're going to plug it into the wire harness coming off of the two lights on the passenger side. Then we'll stretch the other male end of the connection over to the other wire harness going to the two lights on the driver's side and plug it in over there. I'll take the other end and plug it into our other wire harness over here.Now, I have one more connector in the middle that we need to plug into the other end of our wiring harness. Now, the last plug connection we have to make is on the other end of our third wire harness and our other wiring harness. This gets plugged in right here in the middle of the engine bay along the firewall.So, here we have the ends of our two switch legs. And this is where we're gonna pass them through the firewall. There's a hole with a rubber grommet in it. We've already removed the rubber grommet. It's right next to the brake booster. And it's a nice big hole, so we'll be able to pass both of our switches through there with both harnesses attached. We'll push a little bit of slack through. That way we'll be able to go around into the passenger compartment and find our switches and pull them up. All right. Let's jump to the inside of the Jeep and find our switches.Once you've retrieved the switched end of your wiring harness, you'll need to figure out where you wanna mount your switches. So the two switches that come with your kit are the type that are designed to be mounted in a hole. So you'll want to pull one of the trim pieces from your dashboard. Make sure there's nothing vital behind it. Drill a couple of holes in it. Then you can pop the switches into that hole and plug all of the wires back into the back of it the way it was when it came out of the box.Now, if you don't want to drill any holes, you can, of course, just use the wire leads, unplug the switches, and plug them into any other switch that you might wanna use, including but not limited to the factory Mopar switch panel that you may have gotten as an option in your Jeep. Now, again, because we're gonna be removing the wiring harness and all of the lights after we're done showing you how to get this job done, we're just gonna leave these laying here for now.Now we're winding down toward the end of our installation. The next step we're going to be doing is just organizing our wiring a little bit. And I already mentioned that you wanna make sure everything stays away from anywhere that is gonna be hot or anything that is going to be moving, because, of course, that can chafe. So you wanna use a bunch of zip ties. You can zip tie to existing brackets, existing wiring, but pretty much you just wanna make sure that everything is tucked away. Like I said before, we're not leaving this permanently installed on the Jeep. So we're not gonna spend as much time on this. But if this is going to be on your Jeep, you're gonna wanna make sure everything is neatly tucked.Once you're done with that step, we can jump over to where the battery is and make those final connections on those terminals. On the factory battery terminals, there are a couple of posts that you can use for auxiliary connections just like this. So we're gonna remove the nut off of here for the negative and attach the ring terminals under there, jump over to the positive and do the same thing. So if you're looking for a kit that's going to add five new lights to your Jeep and is gonna come with all the brackets in the wiring harness that you need to get it installed, I would recommend taking a look at this option from ZRoadz. And you can find it right here at extremeterrain.com.

      Product Information

      Features, Description, Reviews, Q&A, Specs & Installation

      Features & Specs

      • Lighting Mounts For Your Jeep Wrangler
      • Sold as a Kit
      • Helps Hide Excess Wiring
      • CNC-Laser Cut Steel Construction
      • Powder-Coat Textured Paint
      • Does Not Include Accessory Lighting
      • Bolted Installation
      • Lifetime Warranty
      • Fits All 2018-2024 Jeep Wrangler JL Models

      Description

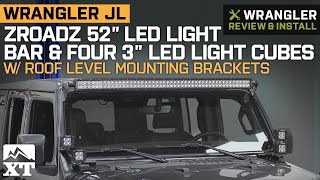
      Nifty Mounting Attachment. Feel like the road is still too dim on your off-roading trips? Install these ZRoadz Cube Roof Level Mounting Brackets, made to accommodate a 50 to 52-Inch LED Light Bar or a 3-Inch LED Light Pods. These mounts are made to hide and protect the wiring necessary for lighting accessories and are also made to hold your light fixtures down in place for convenient and secure off-road lighting.

      Laser-Cut Construction. These ZRoadz Cube Roof Level Mounting Brackets are precision-made from high-standard aluminum using a computer-guided laser cutter, ensuring perfect replication and factory-fit measurements no for every assembly that comes out of production.

      Warranty. This product comes with a limited lifetime warranty which covers all damages and flaws prior to installation.

      Bolted Installation. This product does not require professional assistance to install and would take no more than 1 hour to attach if you include separately purchased lighting accessories.

      Application. The ZRoadz Cube Roof Level Mounting Brackets fit on the cowl cover of all 2018-2024 Jeep Wrangler JL models.

      Fitment:

      Details

      ZRoadz Z374831-KIT4

      CA Residents: WARNING: Cancer and Reproductive Harm - www.P65Warnings.ca.gov

      Installation & What's in the Box

      Installation Info

      What's in the Box

      • (2) Cube Roof Light Mounting Bracket Assemblies
      4.4

      Customer Reviews (5)

        Brand Image

        Reviews of ZRoadz Lights products have an average rating of 4.5 out of 5

          Questions & Answers

          10 More Questions

          Will It Fit My Wrangler

          • JL Rubicon 2 Door - 18, 19, 20, 21, 22, 23, 24
          • JL Rubicon 4 Door - 18, 19, 20, 21, 22, 23, 24
          • JL Rubicon 4xe 4 Door - 21
          • JL Wrangler 2 Door - 18, 19, 20, 21, 22, 23, 24
          • JL Wrangler 4 Door - 18, 19, 20, 21, 22, 23, 24
          • JL Wrangler 4xe 4 Door - 21, 22