Talk to a Gladiator Sales Tech
1-877-870-8556
M-F 8:30A-11P, Sat-Sun 8:30A-9P
Logo Image
$20K Sweeps! 10 Chances to Win! Enter Daily >

Falcon Shocks Nexus EF 2.2 Fast Adjust Steering Stabilizer (20-24 Jeep Gladiator JT)

Item JG1929
Verify parts fit and get product recommendations.
Gladiator Sales Techs: Connect Now M-F 8:30A-11P, Sat-Sun 8:30A-9P
$0.00
Our Price

$405.99

FREE Shipping Market Price $466.99 You Save 13% ($61.00) Up to 10% off for Military & First Responders! See Details

Will this fit your Vehicle?

Select a different vehicle Help?
Update or Change Vehicle
Ship to: Ashburn - 20149
Sorry, please enter a valid US or CA postal code
We're sorry, zip can't be updated at this time.
    Create a list
    Add to New List

    Saved - View your saved items

    We're sorry. We couldn't save this product at this time.

    or use

      Product Videos

      Merideth: If you want optimal steering response and comfortability in your 2020 or newer JT Gladiator, this Falcon Shocks Nexus EF 2.2. Fast Adjust Steering Stabilizer will be one to take a look at. Now, this kit will be for the JT owner who wants comfort and performance adjustments on the fly for the most out of their steering stabilizer. Now this will be great if your factory one has started to show some wearing and you want a quality replacement, or you've added larger wheels and tires that tend to feel flighty and wander and you wanna tighten that up.Not only will it perform incredibly well, but it's also going to look pretty good mounted up to the front of the axle. This will have an aircraft grade 6061-T6 aluminum alloy body, being durable and able to take some abuse, while also featuring a 5/8-inch induction hardened chrome rod with a billet internal piston. Now, this will also have three preset settings, including soft, medium, and firm, which will have the ability to change on the fly to your personal preference for wherever you're driving. Now this will tighten up the steering offering a better response, and again, add a lot more comfort for on and off-road driving.With all that being said, this is going to be a more premium choice coming in at roughly $450. Now, this kit does bring a lot to the table compared to some other less expensive choices, including the robust build and the fast adjust feature. Now, others available on the page may not have a fully aluminum build. They may not include as large of a piston or rod as this one, and they most likely will not be adjustable like this choice.Now, overall, if you're looking for a premium choice when it comes to a stabilizer and you have the extra couple of bucks to spend on a premium one, this is gonna be it. Now, install is gonna be a two-out-of-three wrenches on the difficulty meter, taking about two hours to get the job done with some basic hand tools. Now, at this point, we can head over to the shop and check out a detailed breakdown of what that install looks like. That's gonna wrap up for me. Let's go ahead and jump into it.Man: The tools you're gonna need for this installation include an impact gun, a ratchet, 10, 13, 16, and 18-millimeter sockets, socket extension, 13 and 18-millimeter wrenches, a 13/16-inch wrench, and a pry bar. What is up everybody? Today, we have an aftermarket steering stabilizer that we're gonna install on the Jeep Gladiator. And I'm gonna show you how to do it step by step. So, let's get started right here in the front of the Jeep by removing the factory steering stabilizer.As you can see, we're under the Gladiator and we have it lifted. And if you have access to a lift at home or at least a floor jack and jack stands, it's highly recommended that you do have the Gladiator off the ground while doing this job. But if not, if you're working on the ground, that'll also work. But just make sure that your tires are straight when you start this job. But we will have to be moving the wheels around in order to remove some of the factory stuff. So, we're gonna get started right here at these three nuts here, and we're gonna remove them using our 18-millimeter socket. And we also may need our pry bar in order to help to get those nuts off.All right. So we're gonna be taking out these three nuts and carriage bolts here from our steering arm, but this carriage bolt here, when we try to get this nut off and take the bolt out, it hits this arm here. So what we're gonna do is we're gonna first turn the tire to the right so that we can clear that arm. So, now we have the ability to get that bolt out and, again, using my 18-millimeter socket here.All right. I'm gonna use my pry bar on the top of the carriage bolt here, like so, just to put some compression to be able to get the nut off the rest of the way. Now we can pop this carriage bolt out. And we're gonna turn the wheel back just to decompress our steering stabilizer here and get these other two bolts out.All right. You might have to manipulate the tire just a little bit yet. Now we can get the last one out. Just be careful not to bend your threads. So, another good idea would be to put the nut back on, and now we can actually pry it out from the top. All right. Now we're gonna move on to the other end of the steering stabilizer and get that bracket off as well.All right. We're on the other side of the steering stabilizer here, and this bracket that is holding it onto our front axle here is the one we're gonna take off. And there's three 13-millimeter bolts that we have to get out in order to take that off. And they're one up here, the second one's right next to it, and then the third one's down here. So, we're gonna be using our 13-millimeter socket and an extension, as well as a 13-millimeter wrench.Just get a hand on the steering stabilizer because once you get this pulled out, it's gonna be completely free. All right. Now we can move this out of the way. All right. Now we can start installing our aftermarket steering stabilizer here, and we're gonna secure it in place using the factory hardware here, the three 13-millimeter bolts that we just took out. And the kit does come with thread locks. So, at this point, you do wanna put some thread locker on the end of these bolts here before you put them in. But once we get it in place and get the bolts in, we're just gonna put them in hand tight and then move over to the other side.All right. Now our aftermarket steering stabilizer here does come with its own bracket, and the bracket actually rotates on the stabilizer. So if you notice that it's like off-camber and you can't fit it in, just rotate the bracket so that you can line up the bolt holes, if you will, with the bracket. Now we're gonna take our three factory bolts that we took out earlier with the thread locker on them and put them in hand tight.All right. Now that we got those in, we're gonna move over to the other side and start putting together the other bracket. All right. Now, in order to install the supply bracket on this side here, there is a little bit of install prep work we have to do, which is just loosening this end of the track bar here, the axle end of the track bar. So, we just have to loosen this nut up here in order to get this to come down a little bit so that we can fit the bolts in over here.So, we need a 10-millimeter socket for the top and a 13/16-millimeter wrench for the nut. It does make it a lot easier if you have a ratcheting wrench, but if not, just take your time, get it done. All right. So we're gonna put our wrench over top first so we can get it on the nut. Then our 10-millimeter socket. Make sure that your ratchet, if you're using a ratchet, is in the ON position so that we can loosen this nut up and bring this arm down.All right. So, as you can see, the threads are no longer there. Let's see. And if you get it to come down, you should be able to see part of the ball joint arm here too. The kit comes with brackets and hardware in order to fit the larger end of the steering stabilizer arm. So, we have three...well, we have two brackets and a spacer, I'm gonna show you how those go on, and we have three bolts, one of them being a hex head and three nuts. All right. I'm gonna show you how the bracket hardware gets installed.So there's three pieces here. And once it's all together, the bracket is gonna be on top, and then the spacer is gonna go below that. So that'll be actually sitting on the tracking bar, and then you have a bracket that goes on the very bottom. So, let's set that up. So we're gonna put the spacer, top bracket, and the bottom bracket, like so. And now we're gonna grab the hardware. Let me show you that. So, we have two carriage bolts. So here's one of the carriage bolts. I'm gonna put that through first just to hold this in place. And then grab one of the supplied nuts, just put that on a few threads.All right. Now that kind of holds everything in place. So I'm gonna grab the other carriage bolt. So this is why we had to loosen the tracking arm, is because we needed clearance to get by everything back here. So, that slides right in now, and let's put another nut on. Now grab the stabilizer arm. All right. So we got our steering stabilizer arm here. Route that around. Now you may have to move the tire, manipulate the tire back and forth in order to get this to line up. But once you have the bracket holes and the stabilizer arm holes lined up, we're gonna take our hex head bolt here and actually go in from the bottom through the brackets and the stabilizer and put our nut on top.All right. Now we're gonna grab our tools and tighten everything down. We're gonna go back and tighten up everything that's loose. That includes the track bar here and the left and right bracket. I'm gonna start here at the track bar using my 13/16 wrench and 10-millimeter socket. Now to tighten up the left bracket here, we're gonna need 18-millimeter socket, 16-millimeter socket for this guy, and an 18-millimeter wrench. And also, it's good to have an extension just so you can clear the tire here for this nut and bolt.All right. For your hex head bolt here, you need a 16 for the bolt and an 18 for the nut on top. Now, for our other bracket, we're gonna tighten these bolts down using our 13-millimeter socket and an extension, and our 13-millimeter ratcheting wrench. That's gonna wrap up this review and install of the TeraFlex Falcon and Nexus EF 2.2 Fast Adjust Steering Stabilizer for your '20 and newer Gladiator JT. Thank you for watching. And for all things Gladiator, keep it right here at extremeterrain.com.

      Product Information

      Features, Description, Reviews, Q&A, Specs & Installation

      Features

      • Fast Adjust Steering Stabilizer
      • Three Preset Stiffness Modes: Soft, Medium, and Firm
      • Neutrally Charged Steering Stabilization
      • Constructed Using Aircraft-Grade, 6061-T6 Aluminum Alloy
      • 5/8-Inch, Induction-Hardened Chrome and a Hard Anodized
      • Internal Billet Piston
      • Three-Year Limited Warranty
      • Medium Difficulty Installation
      • Fits 2020-2024 Jeep Gladiator JT Models

      Description

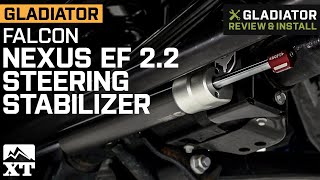
      By Teraflex. Improve your Jeep’s ride by eliminating steering wander with the high-performance Teraflex Falcon Nexus EF 2.2 Fast Adjust Steering Stabilizer. This steering stabilizer comes with 3 preset stiffness modes: Soft, Medium, and Firm. They are optimized depending on aggressive rock climbing, daily driving, or highway cruising modes, using a neutrally charged steering stabilization.

      Aircraft Grade Alloy. This steering stabilizer is constructed using aircraft-grade, 6061-T6 aluminum alloy with a 5/8-inch induction hardened chrome and a hard anodized internal billet piston.

      Warranty. All buyers are protected by a 3-year limited warranty, which covers the product from any defects in materials and workmanship. Any extensive modifications or abnormal wear will not be covered.

      Installation. If you have moderate to expert-level mechanical skills, expect this installation to last up to 2 hours with a medium degree of difficulty.

      Application. The Teraflex Falcon Nexus EF 2.2 Fast Adjust Steering Stabilizer is compatible with the 2020-2024 Jeep Gladiator JT.

      Fitment:

      Details

      Falcon Shocks 09-02-22-110-000

      CA Residents: WARNING: Cancer and Reproductive Harm - www.P65Warnings.ca.gov

      Installation & What's in the Box

      Installation Info

      What's in the Box

      • (1) Fast Adjust Steering Stabilizer
      4.9

      Customer Reviews (80)

        Questions & Answers

        10 More Questions

        Will It Fit My Gladiator

        • 3.0L V6 EcoDiesel - 23
        • 3.6L V6 - 23