Installation Time
(approx) 1 Hour
Difficulty Level:
Simple installation for anyone.
Installation Guides
FREE 2 or 3-Day Delivery on Orders $119+ Details
$215.99 (kit)
FREE Shipping Market Price $287.99 You Save 25% ($72.00)Add Local Shop Installation
Saved - View your saved items
We're sorry. We couldn't save this product at this time.
or use
Hey guys, I'm Eric with ExtremeTerrain. In this video, we're gonna do a quick review and install of this Rugged Ridge 2-Inch Receiver Hitch with Wiring Harness for all 2018 and later Jeep Wrangler JLs. Now, obviously, the only reason you're really gonna wanna buy something like this is you wanna tow stuff. And this is a great option I gotta tell you. I bought my Jeep a few months and had the dealership install the trailer hitch on my Jeep right then and there when I bought it. You could save a lot of money doing this yourself by ordering this from us. It's a very easy installation and it's a very rugged setup.This receiver weighs in right around 16 pounds, and it is a welded one-piece assembly that's very easy to bolt up to your Jeeps frame. It comes in with a 350-pound tongue weight rating and a 3,500-pound towing capacity, which I believe is also the maximum towing capacity for your average JL Wrangler. Now, the one thing that might shy you away from taking on a project like this is the wiring. And I gotta tell you, doing it for the installation, it was not hard at all. You're gonna be splicing directly into the taillight assemblies of the Jeep and running that wiring up to the battery, which is probably the trickiest part of the install. But we'll show you how to do that in just a second.Now, like I said before, this option is very affordable compared to having a dealership put one on for you. Right now, it's currently retailing on our website around $200. You're gonna be saving quite a bit by buying this and doing the work yourself. I know when I bought my Jeep, I paid more than double that at dealership prices. So this is a very good option for you do-it-yourselfers at home. Now, as far as that installation goes, I'm giving this a very easy one out of three wrenches on our difficulty meter. You're not gonna need any exotic tools. You will have to do a little bit of wiring, but I'll show you how to do that. That's not gonna be very difficult at all. Like I said, one out of three wrenches on the difficulty meter, and about an hour's worth of your time using some basic hand tools and maybe some wiring tools that you might not have in your collection, you might need to go out and get, but nothing overly exotic.So let's go ahead. We'll take a look at the tools we're gonna use, and go ahead with the installation. Okay, guys, the tools we're gonna use for this installation include a heat gun, some electrical tape, a wiring stripper and crimper tool, some snips, 21, 18 16, 10, and 8-millimeter sockets, an 18-millimeter crescent, an 18-millimeter ratcheting wrench, a 19-millimeter ratcheting wrench, and a pair of impact drivers.All right, guys, now we're gonna get to the part where we're gonna start installing this hitch onto the frame rail in the back here. We have our Jeep up on a lift. By no means do you need to lift your Jeep at home. You can totally do this down with it resting on its own wheels and tires, but for the sake of getting better video angles for you guys, we're gonna put it up in the air so you can see better what we're doing. The other reason we're gonna remove this bumper is so we have a little bit more room to work. Now, the instructions say you don't necessarily need to do that. But again, for the combination of having a little more room to work and giving you a better shot in the video, we're gonna take this bumper off. It's not that hard to do on these Jeeps to be quite honest. So we're gonna start over in the wheel wells and start removing some hardware over there, and we'll get this bumper off.All right, guys, next, we're gonna remove this plastic trim piece inside the wheel well. We have three 8-millimeter bolts here we're gonna take out. And so we can remove this bracket here, just right by the tire. We're gonna take these two 16-millimeter bolts off and then two more back here. But first, we're gonna start on these. All right. Next, we're gonna go after these two bolts here that are securing the bumper to the frame rail. These are 21 millimeters. I'm gonna take the bottom one all the way out and I'm just gonna back out the top one just so we can keep the bumper secure in place. And as you do this, guys, as you see I'm wrenching right here, just be careful not to have your thumb wrapped around here. That's gonna catch on that exhaust pipe, might cut you up, sting a little bit.Depending on the condition of your Jeep, you might have to soak this with some PB B'laster or something to help loosen it up. We work on these trucks all the time so our experience is a little bit different. All right. I just have that backed out, guys. I'm gonna leave it up there for now. All right. And just like we did on the other side, guys, we've got three bolts here that are 8 millimeters. On our truck here, we actually only have two, but you should have three.All right, guys, once again, you should have two bolts right here that are 16 millimeters. Our Jeep only has one left on here. I'm gonna take that out right now. All right. Now the other end of this metal bracket here, we've got two more 16 millimeters. We're gonna take those out. And when you do the last one, just make sure you're holding the bracket because it will fall. Now on this side, guys, because we have the tow hook here, we have two additional bolts on the underside we're gonna have to take out. I'm using an 18. On your Jeep, they may be 21s. Here or up here, but we have 18s on our Jeep. And this one's tight up top, I'm gonna try using a ratchet wrench here.All right, guys, once you get this backed out, your tow hook will come off. The bumper is kind of hanging there so just kinda keep a hand on it. We still have a bolt on the other side that's loose we're gonna take out now. All right, guys, last step before we just take the bumper off is we're gonna pull this wiring harness out. This is for our license plate lamps. Just has a retaining clip there you can pull it out and it'll allow you to release the lock tab. One of you guys grab me a screwdriver from my kit. Small flat-head. All right, guys, let's disconnect it from the frame here and we're gonna unplug the wiring harness. It might help to get a little screwdriver, pull underneath this tab right here. All right. Now with everything unbolted, we'll just take the bumper away.All right, guys, before we get into this, I wanna talk about some variation in the setup here on your rear bumper. If your rear bumper has what's called a support bracket, which is a bracket in here that uses two bolts to connect to this frame rail and then also connect to your bumper shell, you're gonna wanna retain the two bolts that hold that in. Because the threading on those is different than the threading on these. So make sure you retain those if you have that bracket. We do not. So I'm gonna show you how to do the installation if you don't have that bracket. So right now, go ahead and grab two bolts out of the kit, a lock washer, and a flat washer. And we're gonna hold this up to the frame and thread these through. There are welded nuts on this trailer hitch and we'll bolt that up right now.Go ahead and run your bracket up. I'm gonna thread the bolt in through the back. We'll just get it started a few turns by hand. We'll do the second bolt. We'll leave those loops for now and we'll do the other two bolts here in a second. Now, when we're doing this, go ahead and grab this bracket here. This is what the wiring harness is gonna fit into. We're gonna use this bolt to hold this on. And a flat washer and these are threaded or nylon locknuts. So we'll just get that started as much as we can by hand, we'll have to tighten that with some wrenches. All right. Now you need an 18-millimeter crescent for the backside and a 19 for these locknuts. And again, on the backside, these guys are 18 millimeters.All right, guys, now for this section of the installation, I laid out all the electrical components. We're gonna do some wiring next. Now, this really isn't anything to be intimidated by. It's not as bad as it looks. This bundle of stuff that's all connected together already as it comes in the kit, this is gonna be towards the rear of the Jeep. And literally, all we're gonna be doing is, and I'll show you how to do this in a minute, we're gonna be accessing the interior side of the turn signal lightboxes, okay? And the wiring harness that is there, we're gonna put these in between that. So we're gonna unplug the light, plug it into this wiring harness, and then plug the harness into the light itself. We're gonna do that on both sides. That's gonna give us the power and the connectivity to hook up to our trailer hitch wiring harness, which is this bundle right here. And we're gonna run that down to the clamp that you saw me attaching to the trailer hitch itself or the hitch receiver itself on the frame.Then what we're gonna do is we're gonna run power to this and we're gonna do that by this black wire right here. We're going to splice onto this bundle of cabling. Now, this cabling is what we're gonna use to run it up to the power source, which is the car battery up in the front of the Jeep, obviously. And up front there, we have a fuse block that's included in this kit. Put the fuse in the block, snip this, then we're gonna have two ends. One end will splice into the wiring that's coming up from the back of the Jeep. The other end, we're gonna splice on this connector, which is gonna connect directly to the battery. So that's pretty much a good overview. As far as what else is included in the kit, there's a bunch of zip ties in there for running the wiring along the frame rail if you choose to do that. There's a number of ways you can get it up to the engine compartment, some easier than others. And it kind of depends on how you wanna do it, what you feel comfortable with.So with that said, let's get into it. Okay, guys, the first thing we're gonna do is we're gonna take this wire that's coming out of the wiring harness at the back of the Jeep to the bundle of wiring I showed you before, and we're gonna splice them together using this yellow connector. First thing we need to do is remove some of the protective coating on here. You don't need a whole lot. Just enough, kind of like what they have from the factory right here. And we're gonna insert it in here. And hold that in firmly like this, and we're gonna crimp it down. And we're gonna do the same thing with this side. There are pretty good quality connectors in this kit. Pretty heavy-duty.Once you get that crimped down and these aren't gonna pull out, you can also get a heat gun and we're gonna shrink-wrap them or heat-shrink them. And once you have that done, go ahead and set it aside for a second. Let it cool off a little bit. We'll do something else here. All right, guys, now at this point, we're gonna work with what's in front of me here in this shot. We're gonna use the bundle of cable, obviously, the other end and these components here. Before we forget, let's take our fuse that's included in the kit and get it in the fuse block. It's a 15 fuse if you need to get another one. At this point, we're gonna make a cut here. Make sure you have enough to work with there, you don't need a whole lot, but maybe a little more than I had before. And we're gonna connect with another one of these connectors here. [inaudible 00:17:15] Same thing to the other side.This one's a little bit tighter fitting than those connectors we were just working with so you might need to twist this down a little bit. And we're gonna go ahead and tape this. All right, guys, so we're inside the driver's rear corner of the Jeep. You're gonna wanna remove this panel here and it's gonna expose this little bolt right here. It's a plastic bolt. So you probably don't wanna use any power tools on it. It's a 10-millimeter. Go ahead and pull it out, and we'll be able to remove our taillight after that. And just pull this out just enough to disconnect the wiring harness. We can set that taillight aside. All right. We're gonna go ahead and do the same thing on the passenger side.All right, guys, now in my left hand, I have all the stuff that's gonna be connected on the driver side. This yellow section of wiring harness, as well as this white cable that has the connector on it. Hold onto that. The rest of this, the trailer hitch wiring harness plug, this yellow wire that we're gonna run to the battery, and all this other stuff. We're gonna actually drop down...there's an opening inside here that leads to the wheel well, we're gonna drop it down in here. Do what we gotta do here at the driver-side taillight, and then we'll take the wiring that's dangling down below and run it across the rear frame and cinch it up with zip ties as we go.Okay. Now, the kit comes with this self-tapping screw right here, and the instructions recommend that you either drill a hole or use this self-tapping screw to create a mounting point. And this is basically a grounding wire is what this white wire is. You're gonna wanna ground it to your vehicle. This isn't gonna be a permanent installation on our Jeep. So I'm not gonna do that today, but it's easy enough. And there is a metal flange right here that if you can drill it up to inside there, you can ground out the wiring as needed by tapping into this metal right here. It's just a thin metal brace right here behind your fender. So I'm just speaking to that right now. And now we can go ahead and take the wiring harness here and connect it into our license plate wiring there. So we can take this wiring harness here and connect it into our turn signal wiring.Now that we have that all tucked in, I'm gonna grab our taillight. All right. So go ahead and grab the plug attached to our turn signal brake lights, plug that back in, and push in the lock tab. Tuck everything back in. Then we can go ahead and reinsert the bolt. All right. Now we've fed the wiring across from the other side guys. Now the plugs that are coming up in here have the green wires on them. And you can see I'm reaching from inside the wheel well, and we'll bring this up, and connect it in like this. And then this plug will plug into our taillight. All right. So go ahead and grab your taillight assembly. And we'll bolt that up just like we did on the driver side.All right, guys, now we have our cabling here for the trailer hitch wiring harness kind of zip-tied up in here. And that's what I recommend if you have that wiring harness or wiring zip tied up to the frame, it's really not gonna go anywhere. Because I gotta tell you, this bracket here, not my favorite design. But with it closed like this, pinch the cable, and kind of press this up into place. And that's kind of wedged in there. To be honest, not my favorite design, but if you have your wiring zip-tied, it's not gonna fall down as you hit bumps and go down the road. It's fairly secure.All right, guys, so now we're up here at our engine compartment by our battery, which is on the front passenger side. Now for some reason, the instruction booklet that comes with this kit, in their diagrams says to run the wiring up along the driver side to the battery that's on the driver's side corner, which obviously it is not. So I don't know if they're using that diagram from another kit. However, we recommend bringing it up the passenger side frame rail that also keeps it away from your exhaust, which is on the other side and could heat up this wiring and you don't want that. So now that we have it up in here, remember this connector that we spliced on earlier, I'm simply going to access one of the auxiliary posts here on our battery and connect it to a positive terminal.And this particular post is a 10-millimeter. We have a couple of larger ones here. Look to be about 12, but I'm using the 10-millimeter right here. We're simply gonna connect this on. I'll tuck that down out of the way. All right, guys, we're gonna replace our factory bumper back in place. I have the tailgate open to make it a little bit easier to eyeball things from the top. All right, guys, we're gonna reinstall these. These are 16 millimeters. And repeat that on the other side. Now we're gonna reinstall our factory tow hook. Now our Jeep here has one bolt up top and two down below here. I think it's because our welded-on nut on the inside there has popped off. Your Jeep is probably gonna have another nut here so you're gonna have to do four bolts. The ones we have here are 18-millimeter.All right. And in case I didn't say this before, guys, these are 18-millimeter bolts that we're cinching up right now. All right. Now we have to bolt this bracket back up to the frame. On our Jeep, guys, we only have one bolt we can put in here because our threading is broken off and gone, but you're gonna have two here and it's gonna be the same thing on the passenger side of the Jeep. And these are 16 millimeters. And don't forget to plug in your license plate lamp harness. All right. We're gonna replace our wheel well liner piece. All right. To tighten these down, grab an 8-millimeter socket. All right. That pretty much wraps up the installation. Just don't forget to tighten down the two 21-millimeter bolts that are up here. You've only got two that are attached in the bumper to the frame rails as opposed to the three we had on the other side where the tow hook is, and also replace your wheel well shroud as well.All right, guys, that wraps up this review and installation of this Rugged Ridge 2-Inch Receiver Hitch with Wiring Harness for all 2018 and later Jeep Wrangler JLs. And for all things Wrangler, keep it right here at extremeterrain.com.
Subscribe to our YouTube Channel
Features, Description, Reviews, Q&A, Specs & Installation
Brand | Rugged Ridge |
Hitch Type | Receiver Hitch |
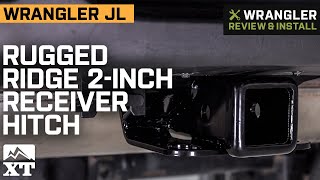
Better Hauling Power. If your Jeep Wrangler pulls double-duty and requires a quality receiver hitch, then this Rugged Ridge 2-inch Receiver Hitch a with Wiring Harness is for you. Featuring a 3,500-pound towing capacity, this Receiver Hitch will help you tow anything from heavy trailers, supplies, and even vehicles. This Receiver Hitch is also perfect for emergency recovery operations whether it’s you or another driver who’s stuck.
Premium Construction. This Rugged Ridge Receiver Hitch is manufactured using premium solid steel. The entire Hitch is constructed using a 1-piece welded assembly designed to provide more strength needed for those heavy pulling operations. This Receiver Hitch is completed with a black powder coated finish that effectively prevents rust and corrosion.
Simple Bolt-On Installation. Rugged Ridge designed this Receiver Hitch for a simple bolt-on installation process. All the necessary hardware you need is included and no drilling, cutting, or welding is required.
Backed by a 5-Year Warranty. This Rugged Ridge Receiver Hitch is backed by a 5-year limited warranty. This warranty covers defects in material and workmanship and is only extended to the original purchaser of this receiver hitch. This 5-year limited warranty is non-transferrable. For more details, please visit the official site of Rugged Ridge.
Application. This Rugged Ridge 2-inch Receiver Hitch a with Wiring Harness will fit all 2018-2023 Jeep Wrangler JL models.
Fitment:
Rugged Ridge 11580.57
CA Residents: WARNING: Cancer and Reproductive Harm - www.P65Warnings.ca.gov
Installation Info
Installation Time
(approx) 1 Hour
Difficulty Level:
Simple installation for anyone.
Installation Guides
What's in the Box
10 More Questions