 FREE 1 to 3-Day Delivery on Orders $149+ Details

How to Install Poison Spyder Brawler Lite Front Skid Plate - SpyderShell Armor Coat on your Wrangler
Installation Time
1 hours
Tools Required
- Paint and paint supplies (if painting)
- 9/16" end wrenches (2)
- Abrasive cut-off wheel or other suitable metal cutting tool
- 3/8" transfer punch and hammer
- Drill motor and 3/8" drill bit
- Touch-up paint or clear coat

Shop Parts in this Guide
BEFORE YOU BEGIN
The JK Brawler Lite Skid is shipped un-painted. Before you paint or powder coat, perform the entire installation of the product to ensure that it fits without risking damage to your paint or powder coat finish. Poison Spyder Customs is not responsible for paint or powder coat costs in the event you damage the finish during installation, or that the parts are incorrect or defective.
You will want to paint or powder-coat these components prior to FINAL installation. If painting them yourself, we recommend starting with a quality etching primer and allowing sufficient cure/dry time between coats and before you apply color. Quality spray-can paints are fine, however be sure to thoroughly paint all of the inside corners and hard-to-reach areas of the bumper. A little extra time and attention to detail on your preparation and paint process will pay off in longer-lasting good looks and rust prevention.
The following installation instructions assume that the customer already has a Brawler Lite or front bumper, and that the OE bumper or the Brawler Lite bumper has already been removed from the Jeep. See the instructions that came with your Brawler Lite front bumper for details on that procedure.
INSTALLATION PROCEDURE
1. Park vehicle on a level surface and set the emergency brake. You will want to wear eye protection beyond this point. It is assumed the stock bumper has already been removed, and that the Brawler Lite bumper installation is already in progress (The bumper shuold not be mounted on to the Jeep yet). Perform the following steps for installing the Skid Plate, within the bumper installation procedure where noted in the instructions for the bumper.
2. Bolt the Skid Plate to the bottom of the Brawler Lite Front Bumper, using the nine (9) provided 3/8-16X1 Gr8 Hex Head Cap Screws through the holes in the mounting flange for each piece, fastened with the provided 3/8 Gr8 Flat Washers and 3/8-16 Gr8 Nylon Insert Lock Nuts. These holes will align when the two pieces are properly mated together. Note that the bolts at the front-outermost corners on each side may interfere with the Jeep's bumper mount flanges. This is due to some year-to-year manufacturing variances in Jeep models. If yours does not fit properly during test fitting, simply pull the bumper/skid, remove the two front-outer bolts, and continue with the installation. Deletion of these two bolts will be insignificant to the integrity of the bumper/skid structure. Tighten the 3/8" bolts.
NOTE: The factory "crash bar" is the thin sheetmetal crossmember which runs from one side to the other, at the front of the Jeep's frame, just behind the bumper (the bumper should already be removed at this point). There is some small interference between the crash bar and the skid plate, the amount of which will vary by Jeep year model. At your discretion you may choose to either trim the crash bar to accomodate the skid plate, or remove the crash bar altogether. We recommend complete removal of the crahs bar. The crash bar's purpose is superficial once the skid plate is installed, so it may be removed without any compromise of the Jeep's structural integrity.
3. If the choice is made to REMOVE the crash bar, use a pneumatic cut-off wheel to simply cut the crash bar and its side bracketry completely off of the frame. Clean up the cuts with a grinder, and paint the bare metal to discourage rust. Skip this step and move to the next step if the choice is made to keep the crash bar.
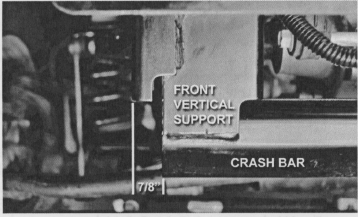
4. If the choice is made to KEEP the crash bar, the lower corner of the crash bar at either end must be trimmed for proper fitment of the Brawler Lite Skid Plate. Use an abrasive cut-off wheel or other suitable cutting tool to trim off the end of the crash bar. On most year models, your cut should be adjacent to the outside edge of the front vertical support, or 7/8" inboard from the outside edge of the outermost frame bracket as shown in Figure 1. Due to variances in different year models, your JK may require more or less trimming than shown. So some test-fitting and further trimming of the crash bar may be required.
5. Once the crash bar has been trimmed for fitment of the skid, use a file or die grinder to de-burr the cut edge, then apply touch-up paint or clear coat to the exposed bare metal for protection against corrosion.
6. Install the bumper and skid plate assembly onto the frame. There are eight (8) threaded studs located on the inside/backside of the bumper, which will correspond with the bumper mounting holes on the frame. It may be a tight fit due to slight manufacturing variances from Jeep to Jeep, but the bumper will fit with some gentle persuasion. You may need to use a rubber mallet or soft dead-blow hammer to tap the bumper into place. Be careful not to mar your paint or powdercoat finish. Note the possible bolt interference that was discussed in Step 2, and remove the two denoted bolts if they cause a fitment issue.
7. Locate the 1/2-13 nylon insert lock nuts and 1 /2" flat washers that came in the hardware kit with your Brawler Lite front bumper. Install a flat washer and lock nut onto the two bumper mounting studs at the outside of the frame rail on either side of the Jeep. Snug these with the 3/4" deep socket, extension and ratchet but do not over-tighten. Do not install the inboard nuts at this time.
8. OPTIONAL: The four 3/8 holes along the bottom edge of the skid plate may be used to bolt the skid to the crash bar, if desired and if the crash bar was not removed earlier. This will require corresponding holes to be drilled into the bottom edge of the crash bar. Use a hammer and a 3/8" transfer punch through each of the four holes to mark the drill locations along the bottom of the crash bar. Once these marks have been made, remove the bumper and skid plate. Note that bolting to the crash bar is considered optional, and its omission will not be a considerable detriment to the bumper/skid structural integrity.
9. Use the drill motor and 3/8" bit to drill the five holes along the bottom of the crash bar that were located and marked in the preceding step.
10. De-burr the edges of the holes then use touch-up paint or clear coat to protect the bare metal.
11. Proceed with the remainder of the front bumper installation procedure. If using the option to bolt to the crash bar, use the four (4) supplied 3/8-16 X 1 Gr8 Hex Head Cap Screws, along with 3/8X1 Fender Washers and 3/8-16 Gr8 Nylon Insert Lock Nuts to bolt through the bottom of the Brawler Lite Skid Plate, into the crash bar.
Congratulations, you have completed the installation of your Poison Spyder JK Front Brawler Lite Skid Plate! Now, please proceed with the remaining instructions to complete the installation of your JK Brawler Lite Front Bumper.
