 FREE 1 to 3-Day Delivery on Orders $149+ Details

How to Install Poison Spyder Trail Cage Kit for Factory Roll Bars on your Wrangler
Tools Required
- Mechanic’s tool set including Torx bits
- Welder and proper welding equipment
- Protective welding blankets
- Square and measuring tape
Shop Parts in this Guide

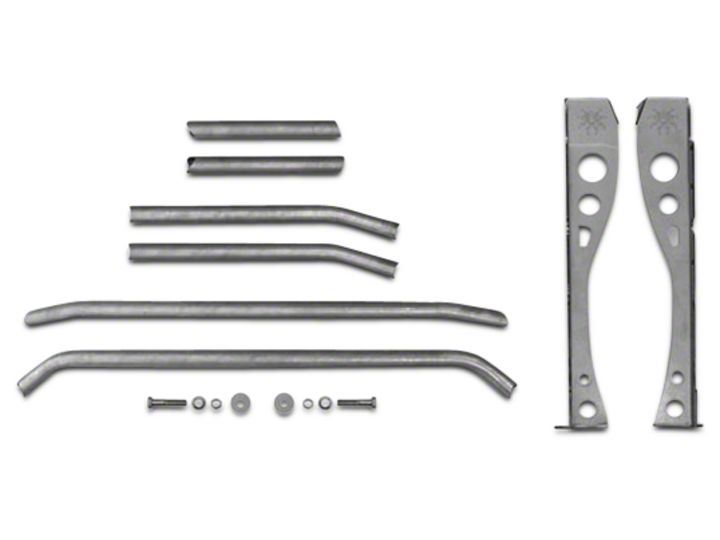
PARTS LIST
Please check your packages immediately upon arrival to ensure that everything listed is included, and to check for damage during shipping. If anything is missing or damaged, call Poison Spyder at (951) 849- 5911 as soon as possible.
(2) Lower A-Pillar L&R 4
(2) Upper A-Pillar Tube L&R 7
(1) Dash Bar 9
(1) A-Crossbar 10
(2) Forward Stringer L&R 11
(1) TJ Trail Cage Kit Hardware Kit
PN: HWKIT-14-18-010 includes:
(2) 1/2-13 X 2-1/2 Gr8 Hex Head Cap Screw
(2) 1/2” SAE Hardened Flat Washer
(2) 1/2-13 Nylon Insert Lock Nut
(2) Washer Plate
INSTALLATION NOTES
Installation of the Trail Cage Kit can take up to 4 hours. This kit requires welding, which should be done by a certified welder. You will need a friend or two to assist with the installation.
IMPORTANT: It is imperative that the top, doors, seats, plus any other components that are going to be reinstalled after the cage install be test-fitted BEFORE final welding of the cage! Poison Spyder Customs is not liable for fitment issues due to negligent install.
INSTALL PROCEDURE
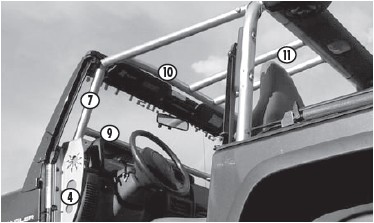
NOTE: Throughout these procedures, refer to the assembled trail cage image below for reference identification and in proper general orientation of cage components. In most cases, the laser-cut notches and laser-etched assembly marks will eliminate all guesswork. Regardless, carefully inspect each part and its placement prior to tacking and finish-welding. Also, each step should be extrapolated for both sides, where any procedure is to be duplicated on both sides of the cage.
1. Park vehicle on a level surface and set the emergency brake. You will want to wear eye protection beyond this point.
2. Clean ALL bare metal pieces provided in the kit, using a clean rag and brake cleaner. This will ensure an easier, cleaner installation and better welds later in the installation.
3. Grind or sand the paint from the locations on the factor roll cage where the pieces of the Trail Cage will be welded in. This includes the forward edge of the main hoop, at the center where the Forward Stringers attach. It also includes the underside of each windshield support bar near the windshield, where the Upper A-Pillar Tubes will attach (if not using the optional Header Bar Kit).
4. If you are installing the optional heavy duty Header Bar Kit, remove the OE windshield support bars and install the Poison Spyder Header Bars according to the instructions that came with that kit.
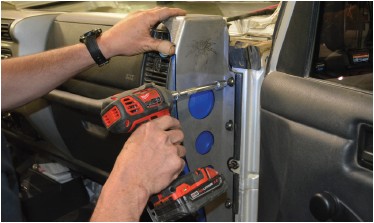
5. Install the Lower A-Pillars L&R 4 . Bolt each Lower A-Pillar into place using the three Torx bolts you removed during Step 5 of the Factory Cage Removal process. Use the supplied 1/2-13 Gr8 hex head cap screws, washer plates and lock nuts to secure the bottom foot of each Lower A-Pillar to the existing hole in the floorboard of the Jeep.Note that once installed, the Lower A-Pillars will NOT be oriented perpendicular to the Jeep. They will angle slightly inward. Be sure to test-fit the doors for proper closing, before proceeding.
6. Install the A-Crossbar 10 and the Forward Stringers L&R 11 at the same time. Have a friend help with holding the three pieces in place. Start by holding the A-Crossbar in place between the two windshield support bars (or Poison Spyder Header Bars, if used), toward the front of the Jeep.
7. Next, hold the two Forward Stringers in place between the A-Crossbar and the main hoop of the factory cage. Use the laser-etched marks to properly locate the tube junctions along the A-Crossbar. Use a square to ensure that the Forward Stringers are perpendicular to the main hoop of the factory cage.
Use the Forward Stringers to locate the A-Crossbar the proper distance forward from the main hoop of the factory roll cage. Use a measuring tape to confirm that the A-Crossbar is the same distance from the windshield at each end.
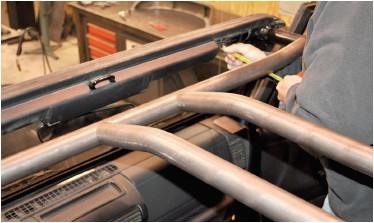
While holding everything in place correctly located, tack the A-Crossbar and Forward Stringers into place.
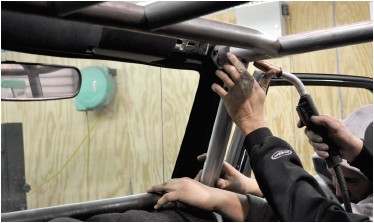
8. Install the Upper A-Pillar Tubes L&R 7 and the Dash Bar 9 at the same time. Have a friend help with holding the three pieces in place. Start by holding the Upper A-Pillar Tubes in place between the Lower A-Pillar and the OE windshield support bar or PSC Header Bar. Next, hold the two Dash Bar in place horizontally between the C-Hoop and the lower ends of the Main Side Upper A-Pillar Tubes. Use the laser-etched assembly marks as guides to properly locate the tube junctions. While holding them in place correctly located, tack the Upper a-Pillar Tubes and Dash Bar into place.
9. Fully test-fit all equipment that is located within, near or around the cage or any portion of the cage. This includes soft tops, doors, seats, etc. Test each component for both fit and operation. It is EXTREMELY IMPORTANT that you verify proper fitment of all components at this time. If any tube placement needs to be adjusted, it is a simple matter of grinding the small tack welds to make any adjustments. Making these adjustments will be impossible once the cage is fully welded.
10. Finish-weld each joint in the cage. Before you begin, you may wish to place welding blankets or some other suitable protection for your Jeep’s interior. You will need to tilt the windshield forward to fully access each seam that must be welded.
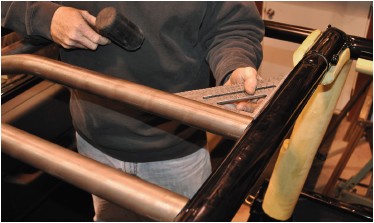
11. Paint or powder-coat your cage to protect it from rust. If painting it yourself, use a good quality self-etching primer on the bare steel of your cage prior to painting in the color of your choice. It is recommended to remove the entire cage for painting in order to cover the hard-to-reach parts of the cage.
Congratulations, you have completed the installation of your Poison Spyder Trail Cage Kit!

