FREE 1 to 3-Day Delivery on Orders $149+ Details

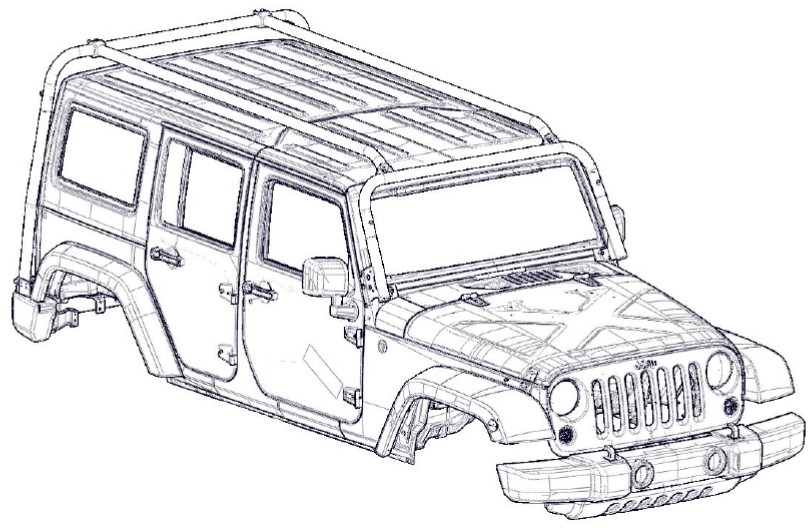
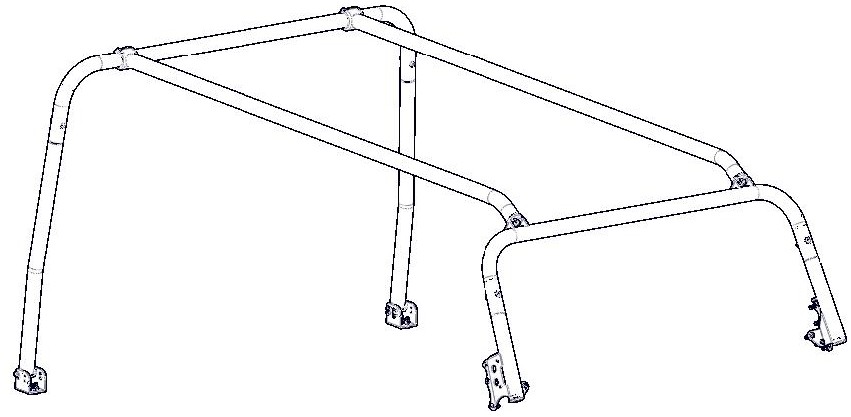
How to Install Kargo Master Congo Cage 2.0 Sport Cage on your Wrangler
Tools Required
- 5mm Allen Wrench
- T40 Torx
- 7/32” Allen Wrench
- 9/16” Wrench or Socket
- 3/4” Open end wrench
- 1/2” Open end wrench
- 1/4" Allen Wrench

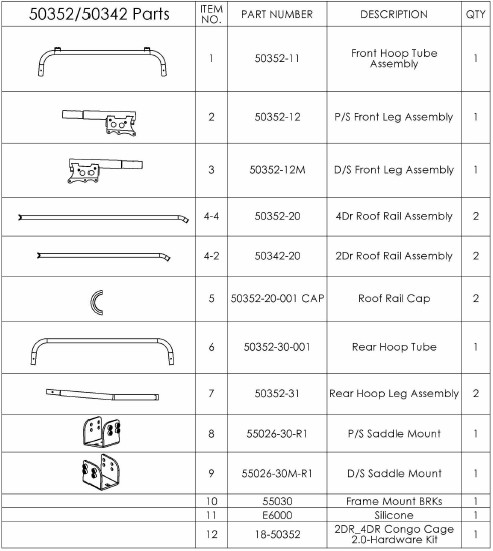
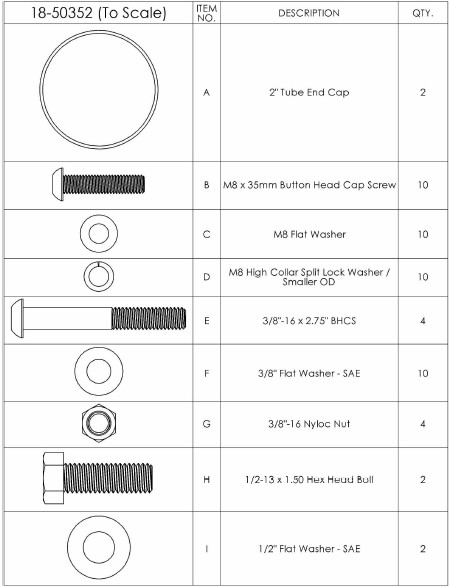
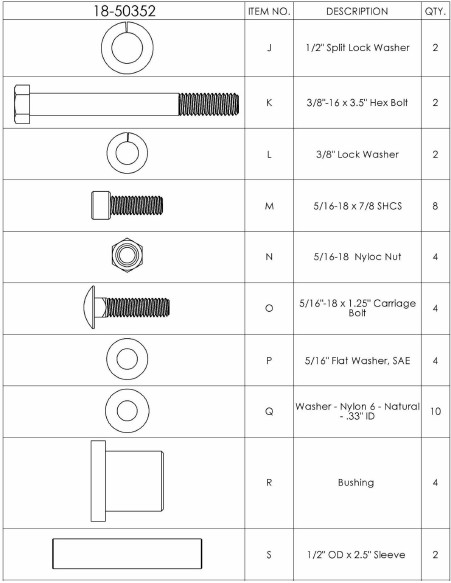
Shop Parts in this Guide
Before You Begin
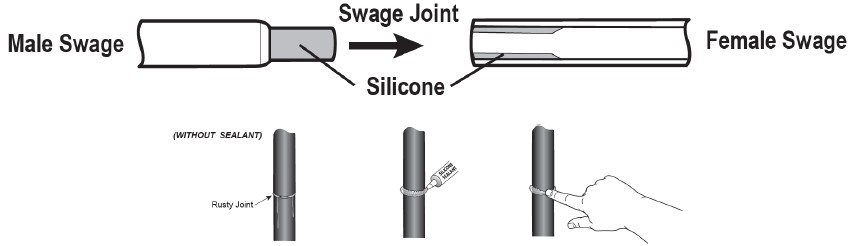
• Be sure to place a generous amount of E6000 where all swage joints come together. This helps prevent rust. Place on both male and female sides.
**Decide if you are mounting to an aftermarket bumper or mounting with the stock bumper**
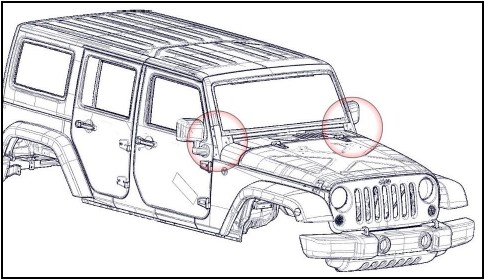
Step 1 – Front Hoop Installation
• Locate the factory torx bolts near the windshield. You are going to use the two parallel with the windshield and the top 3 on the side of the windshield.
• Remove bolts using a Torx 40 bit.
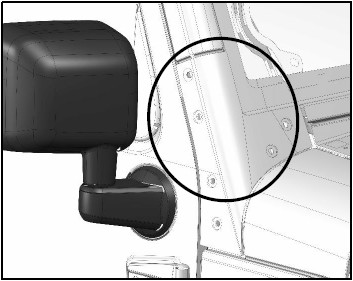
Step 1A – Plastic Spacers
• Place plastic spacers (Q) into countersunk emboss from previously removed bolts. You may want to put a little bit of E6000 to help hold the spacer in place.
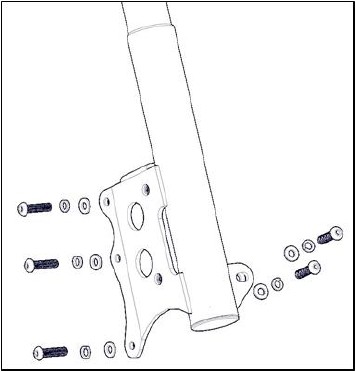
Step 1B – Front legs
• Bolt Passenger Side Front hoop leg (2) to JEEP. Use factory bolts. Leave loose.
• Once all bolts are in, go back and replace each factory bolt with M8x35mm button head (B), M8 split lock washer (D) and a M8 flat washer (C).
• Repeat on Driver side.
• Leave bolts loose to allow movement.
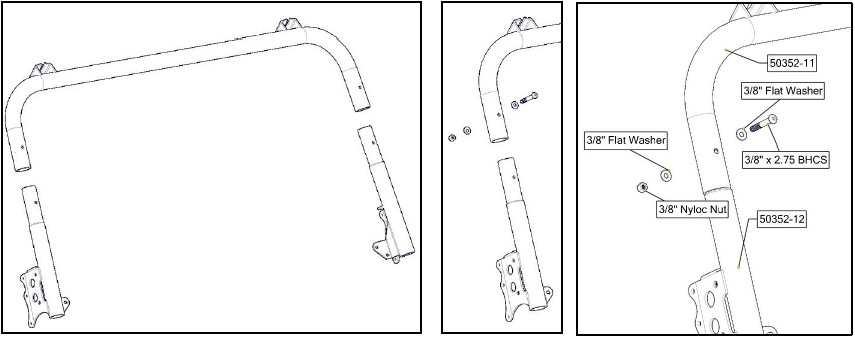
Step 1C – Top Hoop
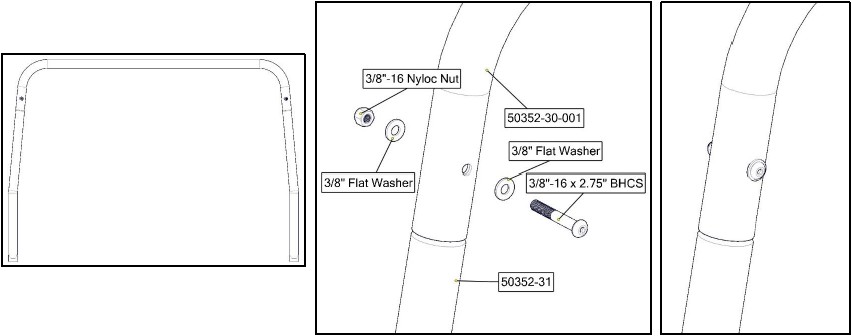
• Place top hoop assembly (1) on the previously installed front hoop legs.
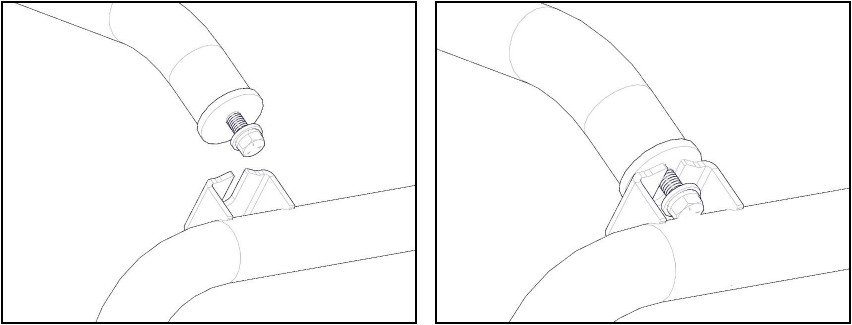
• Bolt top hoop assembly to both front legs using 3/8”x 2.75” BHCS (E), two 3/8” flat washers (F) and a 3/8” Nyloc nut (G).
• DO NOT TIGHTEN
• Apply E6000 as described in the before you begin section.
• The Top Hoop only accomodates up to a 36” Light Bar.
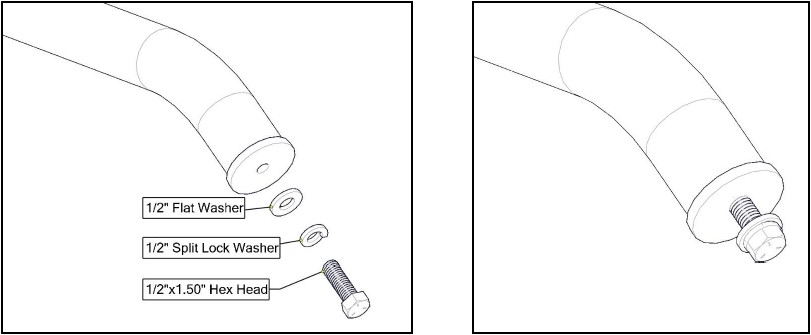
Step 2 – Roof Rail Installation
• Use appropriate roof rail for either a 2Door (4-2) or 4Door JEEP (4-4).
• Bolt 1/2” Hex Head (H), 1/2" Split lock washer (J) and 1/2" Flat washer (I) to end of roof rail.
• Leave about a 3/8” gap between roof rail and flat washer.
Step 2A – Roof Rail Installation
• Place roof rails onto roof. Slide down onto previously installed front hoop. Be sure to have the flat washer towards to inside of the front hoop welded bracket.
• Rest rear of roof rail nicely onto top of JEEP.
• Repeat for both brackets on front hoop assembly.
Step 3 – Rear Hoop Assembly
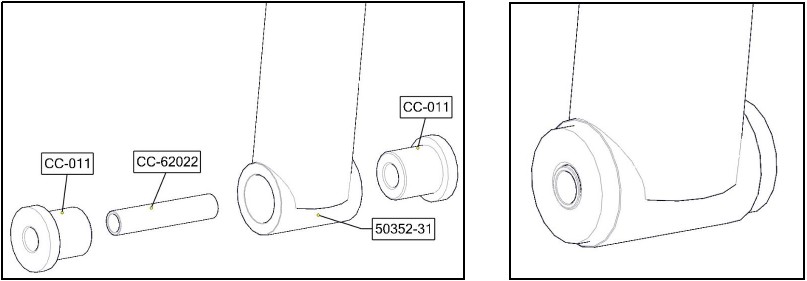
• Insert bushings (R) and metal sleeve (S) into the bottom of each rear leg assembly (7)
Step 3A – Rear Hoop Assembly
• Bolt rear hoop (6) to each leg using a 3/8” x 2.75 BHCS (E), two 3/8” flat washers (F) and a 3/8” Nyloc Nut (G).
• Be sure to have the bend in the legs bending inward.
• Apply E6000 as described in the before you begin section.
Step 3B – Rear Hoop Installation
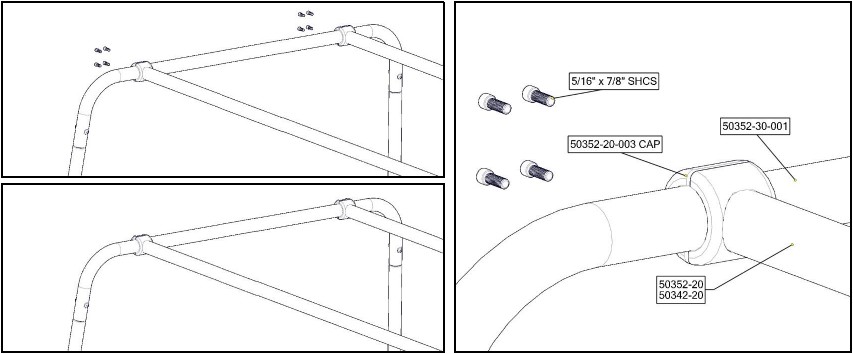
• Place rear hoop at the rear of the JEEP.
• Attach rear hoop to roof rail using four 5/16 x 7/8” SHCS(M) on each roof rail (4-2 or 4-4).
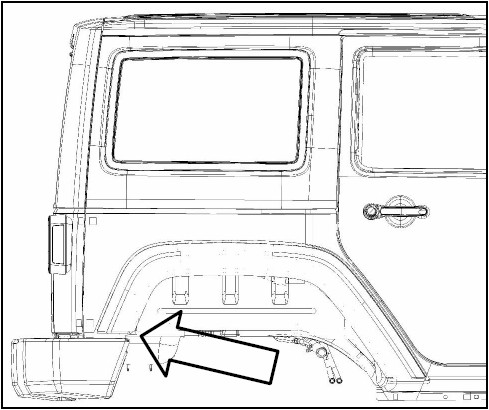
Step 4 – 55026 Rear Saddle Installation
• There are three options to mount the rear saddles (8&9) to the JEEP.(Choose appropriate instructions below)
A. If using stock bumper, or an aftermarket bumper that does not extend to the rear of the rear fender, one must use the 55030 frame mount brackets (10).
B. If using an aftermarket bumper with a solid metal area directly behind the rear fender, the 55030 (10) is not needed.
C. If using with and AEV bumper, AEV bumper bracket must be purchased. Contact KMS for more information.
• Mount saddle to bottom of the rear hoop assembly from step 6.
• Be sure the pemnut on the rear saddle is towards the JEEP.
• Passenger side shown using saddle mount (8).
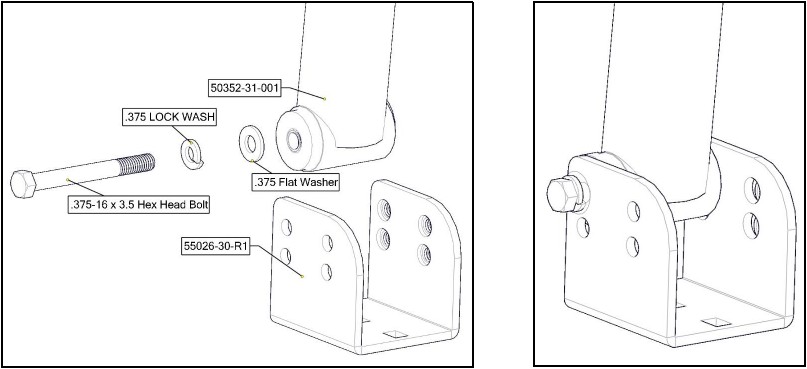
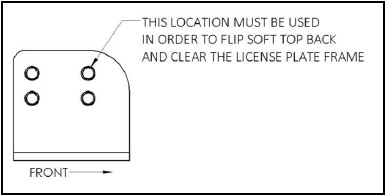
• The location of where the rear leg goes into the rear saddle does madder. Put rear leg into position that best levels your rack.
• If installing on a soft top, with the stock license plate location, The UPPER-FRONT location must be used.
Repeat on driver side using opposite saddle mount (9).
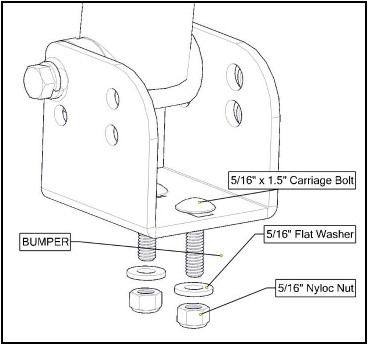
Step 4A – Saddle installation aftermarket bumper
• Place bracket on top of bumper. Align rear hoop to your liking.
• Be careful if an aftermarket gas cap cover is installed. You will need to mount bracket as close to the license plate as possible.
• One may need to move rear hoop assembly to a different hole location in the saddle assembly to get the desired look of the rack.
• Once the orientation of the rack is achieved, mark onto the bumper through the rectangular slots on the rear saddles.
• Move saddles out of the way and drill a hole to accommodate a 5/16” bolt.
• In the orientation shown, bolt through previously drilled holes using two 5/16” x 1.5 Carriage bolts (O), two 5/16” flat washers (P) and two 5/16 Nyloc Nuts(N).
• Snug Tighten
• Repeat on opposite side.
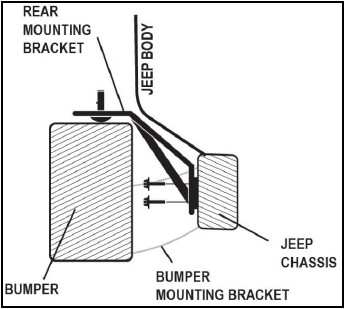
Step 4B – 55030 Installation
• Locate bolts in the rear of the JEEP where the rear bumper attaches to the frame.
• Remove factory bolts that connect bumper to frame.
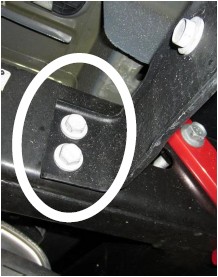
• Mount rear frame bracket to previously removed bolt location. Use the appropriate frame bracket. There is a driver and passenger side. The bracket should be orientated so the platform above the bumper is the furthest to the rear.
• Be sure to place 5/16” x 1.25” (O) carriage bolts on top of bumper, facing upward, through the rear frame bracket (as shown).
• Use the H spacer in between bracket and frame if necessary.
• DO NOT TIGHTEN at this point.
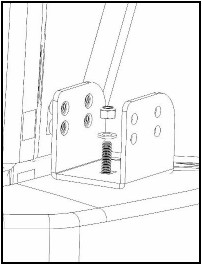
Step 4B-2
• Align rear saddle (8&9) on top of the rear frame mount bracket. Have the pemnuts on the rear saddle brackets towards the JEEP.
• Bolt rear saddle to frame mount bracket by using two previously installed carriage bolts (O), two 5/16” Flat washers (P) and two 5/16 Nyloc nuts (N).
• Removal from the rear hoop may be necessary to tighten nuts.
• Go back and tighten all bolts from previous steps
• Be sure to have applied E6000 in all swage joints to ensure a tight and rust free connection.