 FREE 1 to 3-Day Delivery on Orders $149+ Details

How to Install a JKS Rear Trackbar Skid-Brace System on your 2007-2017 Jeep Wrangler JK
Installation Time
3 hours
Tools Required
- Metric/Standard Socket Wrench Set
- Torque Wrench
- Die Grinder with Sanding Wheel
- (or equivalent tool for removing paint)
- Welding Equipment
- Weldable Corrosion Resistant Coating
- 3M
- PN 05917 (or equivalent)
- Satin Black Spray Paint
- Anti-Seize Lubricant
- Factory Service Manual (recommended)
Welcome
CONGRATULATIONS on your purchase of a new JKS Rear Trackbar Brace! At JKS Manufacturing, we are committed to providing you with the best products available and your satisfaction is our first priority.
PLEASE READ these Installation Instructions carefully, and save them for future reference, as they contain important installation and maintenance information.
Important
INSTALLATION REQUIRES WELDING by a qualified welder or metal fabricator.
Installation
1. REMOVE REAR TRACK BAR
Remove the rear track bar mounting hardware from the axle and chassis brackets per the factory service manual instructions for your vehicle. Retain original hardware.
Remove rear track bar from vehicle.
Prime entire surface of Trackbar Brace with 3M® Weldable Corrosion Resistant Coating (or equivalent – must be weldable).
2. PREPARE AXLE FOR WELDING
To ensure a proper fit, clean any dirt, debris or grease from the surface of the factory track bar bracket.
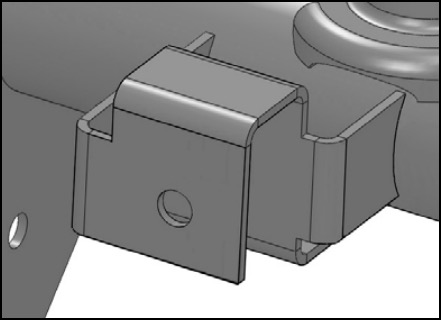
Slide the Trackbar Brace over the factory track bar bracket as illustrated below. Make sure the hole in the Trackbar Brace aligns with the bolt hole in the factory track bar bracket.
HINT: The snug fit should hold the brace in position for welding.
IMPORTANT: The Trackbar Brace must be welded to bare metal. Remove any paint, rust or other contaminants before welding.
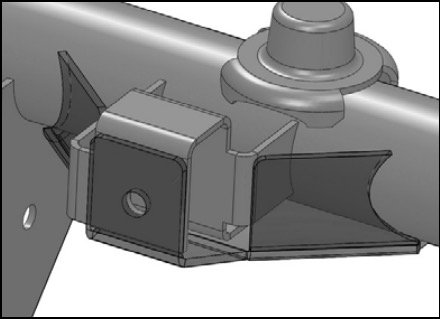
Thoroughly clean the locations marked by an “X” on both sides of the factory track bar bracket.
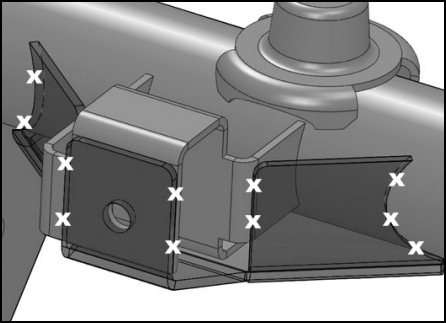
The indicated locations on the back side of the axle must also be prepared for welding.
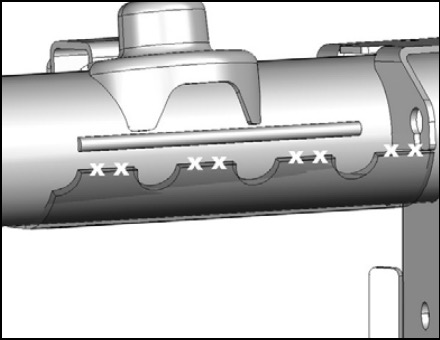
HINT: A die grinder with sanding wheel or similar tool is useful for removing paint from axle housing. This step may be easier with the Trackbar Brace temporarily removed
3. WELD TRACKBAR BRACE TO AXLE HOUSING
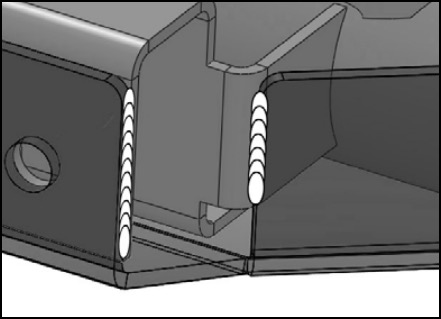
With the Trackbar Brace correctly positioned over the factory track bar bracket, tack weld the brace to the axle housing.
Next, fillet weld the Trackbar Brace to the axle housing in the locations indicated in the previous section.
IMPORTANT: Avoid overheating axle tube by allowing the surface to cool off regularly.
Once all welding is complete, spray paint the entire Trackbar Brace and any bare metal on the axle housing to prevent corrosion. All exposed metal must be completely covered.
4. REINSTALL REAR TRACK BAR
Apply anti-seize lubricant to bolt threads of original track bar mounting hardware.
Insert axle end of track bar into the reinforced axle bracket first. Loosely install the original mounting hardware.
Mount chassis end of track bar and loosely install the original mounting hardware.
IMPORTANT: The vehicle must be on level ground and the coil springs supporting the full vehicle weight before the mounting hardware is tightened.
Using a torque wrench, tighten mounting hardware at both ends of track bar to 125 ft-lbs.
Maintenance
Check torque specifications regularly.
