Installation Time
(approx) 1 Hour
Difficulty Level:
Simple installation for anyone.
FREE 2 or 3-Day Delivery on Orders $119+ Details
$604.99 (set of 4)
FREE Shipping Market Price $707.99 You Save 15% ($103.00)Saved - View your saved items
We're sorry. We couldn't save this product at this time.
or use
Merideth: Hey, guys. So, today, we're checking out the Tubular Matrix doors with mirrors, fitting all 2020 and newer Gladiator JTs. Now, this will be a great option for the Gladiator owner looking for a set of doors to gain a little peace of mind while driving around, and of course, a rugged look while the full doors are off. Now, this set will come with two front doors and two rear doors. I only have two on the table right now because of the size of them. We are also going to get mirrors in the kit, which will be great if you're looking for a complete package. Now, these will also be great for anybody who's a fan of the netting look over a full metal or full tubular option. Now, the doors themselves will be very strong, made of a rugged 1.25-inch tubular steel finish in a nice black powder coat finish, to make sure that these hold up, protecting the steel underneath from any rust, and of course, matching with any other textured accessories. Now, the mesh panels will also be very tough, made of heavy-duty nylon material, with heavy-duty Velcro, so you can ensure that these are gonna hold up, especially if you take your Jeep out on the trail and these get snagged on any branches or brush.Now, speaking of that, this will add a little bit of protection to the inside of the cab, making sure that these take the heat from any of those branches or brush, instead of your legs. Now they're also going to be very easily removable, so if you do find that they get muddy from a day of off-roading, or just over time while you're driving around in the street, they're very easily removable. You can take them off, clean them, and easily reinstall them. Now, what I really think is helpful, especially with this open concept of the netting here, is the visibility that you get with these that you don't get with your factory doors. Now, it's helpful in regular driving situations, but especially helpful to get a better look at your line while you're off-roading. Now, speaking of visibility, these mirrors will also be pretty big in comparison to other trail mirrors available, and will bolt in the factory location, giving you the visibility that you would expect out of your factory doors, while also having some very sporty styling, and matching the two doors very well, with the angular construction.Not to mention, these will come with lockable latches that are very easy to use, and rubber bump stops that are pre-installed, to make sure that the doors shut properly, without any rattling, which is very important for a little bit of peace of mind while driving on the street or bumping around on the trail. Not to mention, it'll come with limiting straps, to make sure that they're not going to swing all the way out and ding the body of the Jeep. And it comes with all of the necessary hardware, all of the hinges, everything that you need in order to get these installed on your Gladiator. Now, with all that being said, these are gonna cost you right around the $600 mark, putting this at a pretty average price for a set of doors. Now, what I like about this is that it's a very inclusive kit. Some other options available in the category may not come with the front and the back included in the kit. They may just come with one or the other. And some may come with mirror mounts, but they may not come with the mirrors themselves. I think if you're looking for a one-stop shop, then this is going to be a great choice to choose.Not to mention, this will be great for anybody who's looking for some more simplistic styling, doesn't want something that's over the top when it comes to styling, and is really a big fan of this netting look, in comparison to a door that's going to have more of a tubular construction, maybe steel plating, and some cutouts. This is going to keep it more of the safari-style look. So if that's something that you're looking to achieve with your Gladiator, then this is gonna be an incredible setup to choose.Overall, I think if you're looking for a functional set of doors, a very inclusive kit, something that's going to be very stylish on the side of your JT, then this is going to be right up your alley. Now, when it comes to install, these will be pretty straightforward. I'm gonna give this one a one out of three wrenches on the difficulty meter, taking you about an hour to get everything set up and installed.Now, the tools that you'll need to install the doors will include the toolkit that comes with the Gladiator. That will include the T50 Torx bit and the ratchet. You're also gonna need a 13-millimeter wrench and a 5-millimeter Allen wrench. Now, speaking of the install, one of our customers here has installed this on their JT, and is gonna walk you through that process step by step, so that wraps it up for my review. Let's go ahead and get into the install.Man: We're gonna start with our front passenger door. Go ahead and got our tools laid out here. We have our T50 Torx bit and ratchet. We're gonna use our Jeep-supplied set here. We have a 13-millimeter wrench, and our 15-millimeter Allen wrench. This is gonna be what we need for most of the installation. We'll get started here. Like I said, starting on the front passenger door, what you wanna make sure that you do here is these hinges are directional hinges, and they're different size. So, the shorter hinges are for the front doors. I'm sure you've noticed that if you've taken your factory doors off already. If you haven't, get out in the sunshine and do so. But go ahead and use these shorter hinges here. What we're gonna use is our shorter supplied bolts here. As you'll see, go ahead and thread those bolts through. This is our bottom hinge, so we're also gonna make sure to install our door strap, to keep our door from swinging too wide here. Slide that on there. Then we'll start with a flat washer. A split washer follows that. And then we're just gonna finger tight our nut on here. That's our ticket right there.So, even though the instructions are a little unclear, what you wanna do is, let's go ahead and use those long bolts, just for these two right here. Get everything lined up again. We'll go flat, split, and finger tight that nut on there. We got a good connection there. We feel pretty good and comfortable about that. Go ahead and grab our other hinge. These ones, we'll go ahead and use those shorter bolts. That's what they're there for. [inaudible 00:06:25] in there real good. Again, we're going flat washers, our split washers. Some people refer to those as a lock washer. I've always called them a lock washer. You can call it whatever you want. The instructions refer to them as a split washer, though. Get those good and finger tight. Very nice. And then what we're gonna grab here it we're gonna grab our wrench and our Allen wrench. We'll go ahead and get these snugged up. This is your 13-millimeter on the back side. We're just gonna hold that. And we've got our 15-millimeter Allen on the other side. Get those real good and snug here. Do the same thing on the bottom. And then repeat those steps on this hinge here.Again, we went ahead and used those longer bolts on this hinge. I think that that's probably the best decision there, just so you get a good bite. And we're gonna get that good and snugged up there. You don't wanna over tighten this because you do wanna be able to take those off if necessary. We'll go ahead and do the hinges on the rear passenger door, then we'll finish up with our mirror installation on the front passenger, and go ahead and start taking our factory doors off here. We're gonna do the same thing here as we did before. Go ahead and remove our rubber protectors here. These hinges, again, they are directional. Now, as I mentioned earlier, and I wanna reiterate on this, is that these are longer points here, so you wanna make sure that you're using the longer hinge on the rear doors. Slide those in there. Now, I had set up to use longer bolts on the back side, because that's what the instructions kind of made it sound like they wanted you to do, but what I'm gonna do is I'm gonna go ahead and grab those shorter bolts, so that I have long bolts to do up front on the other side.We're doing the same thing here. Just our flat washer, our lock washer. I'm just gonna finger tight, right there. Get that good and snug. And we're gonna do the same thing here on the back side. Go ahead and grab your hinge. Get that bolt started there. One thing that I really like so far about these doors, as you're putting it together, you can really feel the build quality on the EAG doors. I was kind of going back and forth on which model of doors I wanted to do. I really like the idea of the net doors, but I worried about these nets getting loose over time. You'll notice there's actually adjustments here on these nets, and I think that's a really nice touch that EAG did on these doors. I expect as these are on the site longer and more of these start to sell, you'll see that in the reviews that people really latch onto that. So, we're gonna do the same thing here. We got our 13-millimeter wrench and our 15-millimeter Allen wrench. And we're gonna go ahead and hold on here and tighten these up. You want these tight, but you don't want it so tight that you're never gonna be able to get them off. There we go. That feels pretty good and snug to me. We'll go ahead and lay these doors down here, and then you can start working on removing our factory doors.Now, again, if you've had a Jeep very long, this is probably standard practice for you. But if it's not, we're gonna go ahead and walk you through it anyway. Again, I'm using my Jeep-supplied tools here. So, my T50 Torx bit and my ratchet here. Something that I had to learn the hard way when I first got my Gladiator was to make sure you have the windows rolled down before you go to take the doors off, otherwise, you got a whole big old pain on your head. Go ahead and start here. We're gonna remove this panel, pull that panel, and then we're gonna release this relay right here. Once we've got that relay released, then we can go ahead and start working on taking these bolts out over here. Always make sure that your door is extended. Take these out, then extend your door. Otherwise, you can get yourself in a bind when it comes to the actuator arm inside the door.Let's go and start with these right here. Your T50 fits right on in there. I was really wary when I first got these that I was gonna mess my door up taking these off. But actually, Jeep has done a really good job of making these pretty heavy-duty right here, so any small, little mistakes you make aren't gonna cause too much of a problem here. And the door will go and hang here once these are off, so don't worry about going and opening it up and messing with that relay. Once these are off, it'll still be fine. It's not gonna go anywhere. Drop those down. [inaudible 00:13:06] All right. Those are out. We are gonna use those later, so we're gonna keep those handy for putting our other doors on. I'm gonna go ahead and lay them right here with our replacement door. And open this door up here. This is what I'm talking about. This actuator arm right here, this is the one that you're gonna wanna keep extended. If this pops back inside there, you can get it out, but it's kind of a mess to fiddle with.Right here, on our relay, there's a release. You have to lift that up. Once you've lifted that up, you can pop this white part, and go ahead and pull that relay out. Once that's released, that relay just pulls straight down, and you lift that strap right off the hook. Give yourself just a little bit of slack to do so, keeping a close eye on that actuator arm. Once you've pulled that off, we're gonna push that actuator arm back all the way out, and then we're gonna grab our smaller Jeep-supplied Torx bit here. Again, that's in my Jeep kit. You wanna make sure that you go ahead and have a pretty solid place set up for where you're gonna store this door before you take it off. Go ahead and pull that out. Now, it does have a washer with it. It's real easy to lose that washer. So, in the Gladiators, they actually have a storage bin under the rear driver's seat. I always make sure [inaudible 00:15:22] on yours. Now that we've got this extended, everything is removed, this is ready to be pulled off. You're gonna get a good grip on it, and pull straight up and off.One thing that I also appreciate about the EAG product, it comes with this rubber stopper for the mirror here, and the nuts and bolts for the mirror are in a separate package, that I also appreciate. On these, the installation is gonna be just like it is with the doors, where it's gonna be the bolts. And then on the back side, you have a flat washer, a lock washer, and a nut. Let's go ahead and thread those now. Thread those through right here. Actually, we're getting that on the wrong side. We'll throw them through from this side, just like we did with the door hinges. Have to bear with me. Sometimes my left-handedness kind of peeks its way through when working on cars. And the other lefties out there know exactly what I'm talking about. And then, you'll go ahead and finger tight, just like you did with the door hinges. You can go back through and tighten those up a little bit later. You just want it on there to hold. You can get it finger snug. And repeat those steps right here on these two. So, the flat washer, lock washer, then thread this last nut on there. We've got those finger tight. I'm gonna go ahead and tighten those up.Now, this is where the directions are a little bit unclear. And in the required tools, it didn't lay out what we needed here on the back side, as far as a wrench. Now, at one point when we did get into the directions, it mentioned using a 5/32 back here, but we are gonna have a different size wrench and a different size Allen wrench. So we're gonna go ahead and grab those here. All right. We've got our correct parts here. What we're gonna use here is we're gonna use a 10-millimeter wrench and a 5/32 Allen wrench. And what I've done here, which, if I had read the directions carefully, I would've noticed, but I forgot to put this washer on this side here. So, good thing we've kept those just finger tight. We're gonna go ahead and throw that washer on this side as well, which is just gonna give you a cleaner look and finish anyway. So, that's just another one of those things that EAG did that I appreciate the attention to detail that they did on those. Slide that off there. I'm gonna go ahead and put a flat washer here on this side of the bolt, slide that through. Give you a more clean finish there. And then, again, just on the back side, you go with your flat washer, your lock washer, and then your nut.Since I'm here, I'm gonna go ahead and tighten that up, [inaudible 00:19:14] right there. Tighten that up real good. The last thing you want is this mirror coming off while you're driving down the highway. Now, this is my favorite part. You can see the fruit of your labor. You're gonna hang this guy right back on here. Again, this is something to be real careful about, because you can really scratch these hinges up. Make sure you get it right down on there. We're gonna go ahead and hook our strap that we bolted on earlier, we're gonna hook that right back onto this hook right here before we go ahead and bolt the door back on. All right. That prevents that door from swinging out too much wider. And then what we're gonna do is go right back to our Jeep-supplied products here. That's our T50 Torx head. And get those just a little finger tight. I always like to torque these by hand. I know that some people don't mind using a power tool here, but I'm always afraid that I'm gonna cross thread it or strip it out, so I always recommend just using the hand-supplied tools from Jeep. Got those good and snug.Now we're gonna go ahead and take our factory rear door off, put on our aftermarket. Same thing as before. There is a relay to remove. You take this panel right here. It just pops right off. And this relay is tucked right up in there, and it'll release and pull straight down. Make sure that you pull right there to release that relay. And then, what you need to do is give yourself a little slack, and release the door right there. Now, still using our T50. And she's free. Now, again, make sure before you take that door off that you extend that actuator arm. We're gonna go to our longer Torx bit, provided by the Jeep factory kit, just to remove that hinge. That should have a bolt and a flat washer. Once that's removed, you can go ahead and pull this door straight up. And she's free. Now that we've got our factory door stored, we can go ahead and bolt on our EAG. Be real careful, again, with those hinges, not to scratch these up. Right on down and in. And for this, we're gonna go back to our Jeep T50. We're gonna go ahead and strap, providing the loop back onto the hook here.With the rear doors, we didn't have to install this loop like we did with the fronts. And then we can go ahead and close this panel here, so it's not flapping in the wind as we're cruising with our doors off. Change back to that T50 bit. Get our bolts going right back on here. We were having a little trouble getting this to line up here, and I noticed there's a little bit of play in this hinge. So just loosened it up a little bit and gave ourselves a little more room, and go ahead and tighten it back up here. See if we can get this to give better bite. So, I'm just tightening up this hinge now, now that we've got this play adjusted, and we were able to get a bite on this bottom bolt. And that's something that you may just have to play with a little bit. This top one, start it up again. And again, I'm gonna go back to my Jeep-supplied ratchet and T50 Torx. And we're gonna go ahead and crank these on. Since this is being finicky, I'm just gonna put a little bit of pressure on each bolt before going all the way tight.These rear doors always take a little longer to get bolted up, just because it's got those longer extensions on the hinges. Get that good and snug on there. Finish up our bottom here. And the last part of our instructions here are gonna be to go through and adjust your door closures. I'm gonna walk you through that here in just a minute. I wanna make sure that we get a good latch on those doors, so it's important to go through the process of adjusting those. Get that good and snug on there, and our doors aren't going anywhere. On this front door, I'm not gonna need to do any adjustment, because you can see that that went ahead and latched right up. On the rear door, you can see that it's just not quite catching. All right, for our latch adjustment here, we're gonna take our 5/32 Allen wrench. We're gonna remove this top bolt here and this bottom one here. And that slides this plate off, right here. That plate slides off. And then what you need to do is loosen these two on the end.Now, this may take a few tries, just like the instructions say. For me, I moved these all the way over to the end. Now I got a good latch. Once you've got a good latch, you can go ahead and tighten these back up. Take your plate, slide it back on, and once you strap these last two bolts up, you are ready to ride.Overall, I'd say the installation of this is pretty straightforward. If you've taken your factory doors on and off before, I think this is something that is well within your wheelhouse of being able to do. But, one thing that I would mention is make sure that even though the instructions don't say so, that you go ahead and get a 10-millimeter wrench and a 5/32 Allen wrench, and make sure that you use the longer bolts on the front, so that you can attach your bracket for the strap to go on into your hook to keep your door from swinging too wide. Other than that, I think she's ready to ride. We're gonna go Jeeping.Merideth: So, that's gonna wrap it up for my review and the install of the Tubular Matrix doors with mirrors, fitting all 2020 and newer Gladiator JTs. For more videos and products just like this, remember to always keep it right here at extremeterrain.com.
Subscribe to our YouTube Channel
Features, Description, Reviews, Q&A, Specs & Installation
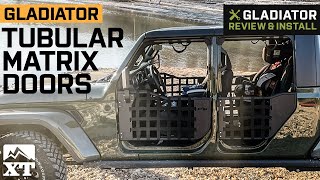
Outdoor Exploration. You don't need any complicated upgrades to your Jeep if you're only in search of something that enhances your outdoor experience. The solution could simply be a new perspective, these Tubular Safari Doors provide exactly that. Get up-close and feel the open air with these non-restricting doors.
Tubular Steel Composition. These tubular replacements are composed of Cutting edge tubular steel constructs that have been precision-sliced into 1.25 diameter pipes and infused with fortified steel plating for added durability. for increased durability and strength. These delicate-looking doors appear to be made for dummies, yet they can withstand a beating and provide protection just like any other door.
Textured Protective Layer. These Tubular Safari Doors are not only built of strong steel but they're also protected from rust and road debris thanks to a textured powder finish.
Installation. This product is a bolt-installed item and doesn't need professional installation, only taking an hour to equip.
Application. These Tubular Safari doors are manufactured to fit all 2020-2023 Jeep Gladiator JT models
Fitment:
CA Residents: WARNING: Cancer and Reproductive Harm - www.P65Warnings.ca.gov
Installation Info
Installation Time
(approx) 1 Hour
Difficulty Level:
Simple installation for anyone.
What's in the Box
10 More Questions