FREE 1 to 3-Day Delivery on Orders $149+ Details

How to Install DV8 Off-Road RS-11 Rear Bumper (07-18 Jeep Wrangler JK) on your Jeep Wrangler
Installation Time
2.5 hours
Tools Required
- 3/8 Drive Socket Wrench with 16 and 18mm Socket
- 18mm Wrench, Ratchet Wrench, or second 18mm Socket Wrench
- Wire Cutter/Stripper
- 3/8 Breaker Bar (optional)
- Approximately 10 feet each of red and black wire (14 or 16 gauge)
- Wire Nuts
- Quick Splice connectors, other wire connectors (optional)
- Liquid Wrench (optional)
- Electric Tape
- Zip Ties

Shop Parts in this Guide
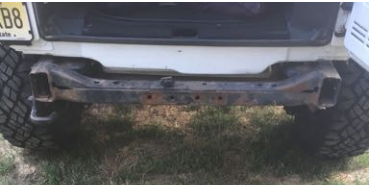
1. The first step of this process is to remove your factory plastic bumper. This is a fairly straight forward task, but trouble with bolts can add significant time. For this reason, consider having Liquid Wrench and/or a 3/8 breaker bar on hand. It may be helpful to remove your spare tire but this process can certainly be completed while leaving the spare in place.
• If you have a hitch installed, that is the first thing to remove. Use a socket wrench with an 18mm socket to remove the 4 bolts and take off the hitch.
• Next, remove the bolts that hold the bumper in place. There are 2 bolts that attach the bumper to the side of the frame rail behind the rear tire on each side. Use a 16mm socket for this step.
• There are now 4 bolts remaining on the rear cross member (area where you removed the hitch). Use 16mm socket to remove.
• Now the bumper can be pulled off your jeep.
• The last factory item that needs to be removed is the J-hook on the driver’s side. Use an 18mm socket to remove the bolts on the J-hook. This is the step most likely to benefit from the use of Liquid Wrench and/or a breaker bar.
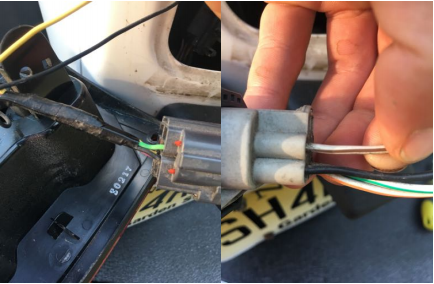
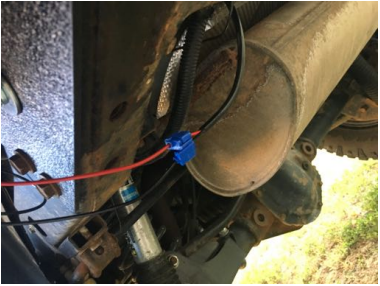
2. Before putting your new DV8 Offroad bumper on your Jeep Wrangler, you will prepare the wiring for your new DV8 auxiliary reverse light pods by splicing lengths of red and black supply wire into the reverse lighting behind your taillight.
• Remove four screws on each taillight and pull tail light out. Reverse power wire color differs on Wranglers from year to year (and sometimes within a model year), and on my Jeep the reverse wire on the driver’s side was a different color than the reverse wire on the passenger side. We will be splicing into this.
• On my tail lights, the wires coming from the reverse lights are green (power) and black (ground). To find the reverse power and ground on the battery side of the harness, simply match that entrance hole on the battery side with the exit hole on the taillight side of the connector. Ground should be black, and, in my case, for the driver’s side green became white with brown.
• Splice approximately 4 feet of red wire to the reverse power wire and 4 feet of the black wire to the ground wire, by either cutting and connecting using wire nuts and electrical tape, or using a Quick splice or other splicing connector. Do this on the battery side of the harness, not the taillight side. Run the red and black wire down behind the driver side taillight assembly and through existing wiring hole and they will come out by your inner fender. On passenger side, it may be necessary to use a long screwdriver to create a hole through insulating foam from beneath to pass wires to outside of Jeep. Alternatively, both LED pods could be supplied from driver side using 6 feet lengths of wire.
3. Bumper and LED pods install
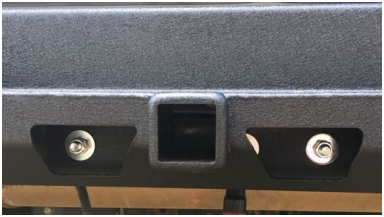
• Place the pods in the cut outs in the bumper and put the provided bolts through the four holes on the LED side. On the back side put a washer, followed by a spring washer, then the nut, and tighten. Repeat this process for both lights.
• To install the bumper to your Jeep, first slide the provided brackets into the frame rail and make sure the holes line up.
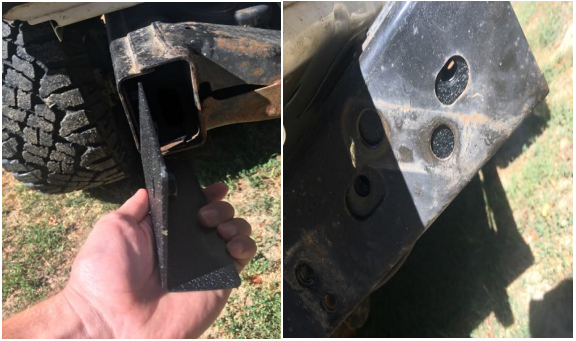
• Place 4 long bolts with a washer through the same holes where your hitch was secured.
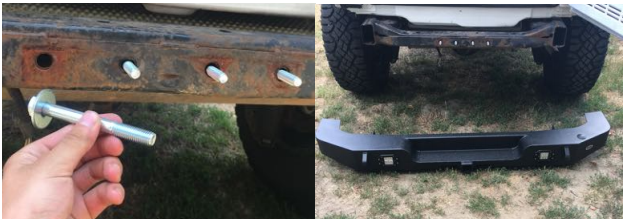
• With the help of a friend, lift the bumper onto the frame rail. The cross sections on your new bumper will go outside of the frame rail not inside so it will be helpful to have a second set of hands.
• Once the bumper is on, fasten the bumper to the hitch bolts with a washer followed by a spring washer than a nut. Use a 18mm socket and 18mm wrench to tighten.
• Once secured, go to the sides and fasten the bolts to the frame rail with a washer against the cross section and a spring washer between the nut and the washer. Use 18mm socket wrench (shiny new bolts on left). With a 16mm socket fasten stock bolts for extra strength (stock bolts right)

• Once the bumper is fully secured, trim length as needed from spliced wires and connect to the red and black wire on the light pods – red to red and black to black. Use zip ties to secure wires.
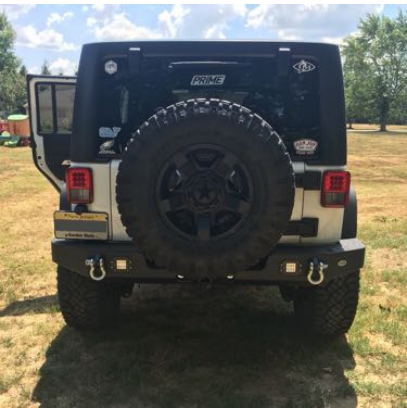
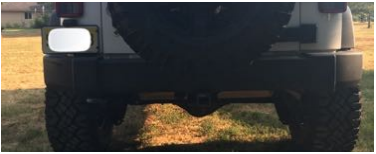
Final Look
Installation Instructions Written by ExtremeTerrain Customer Jacob Metheny 7/31/2018