
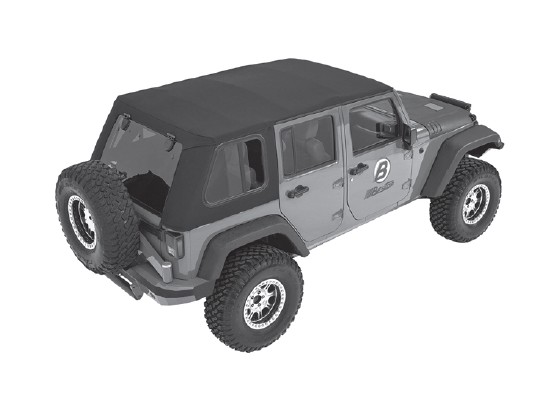
How to Install Bestop Trektop Pro (07-17 Wrangler JK 4-Door) on your Jeep Wrangler
Installation Time
4 hours
Tools Required
- Utility Knife
- #2 Phillips Screwdriver
- 10mm & 13mm Wrench
- 4mm Allen Wrench
- Safety Glasses
- 13mm Socket
- Socket Wrench
Installation Tips
Before you begin installing your new Supertop NX, please read all the instructions thoroughly, and watch the Bestop installation video. (See Support section on this page.)
For a smooth fit: For easier installation, the top should be installed at a temperature above 72° F. Below this temperature, the fabric may contract an inch or more, making it difficult to fit the vehicle.
It is normal for the fabric to contract and wrinkle when stored in the shipping carton. Within a few days after installation, the fabric will relax and the wrinkles will disappear.
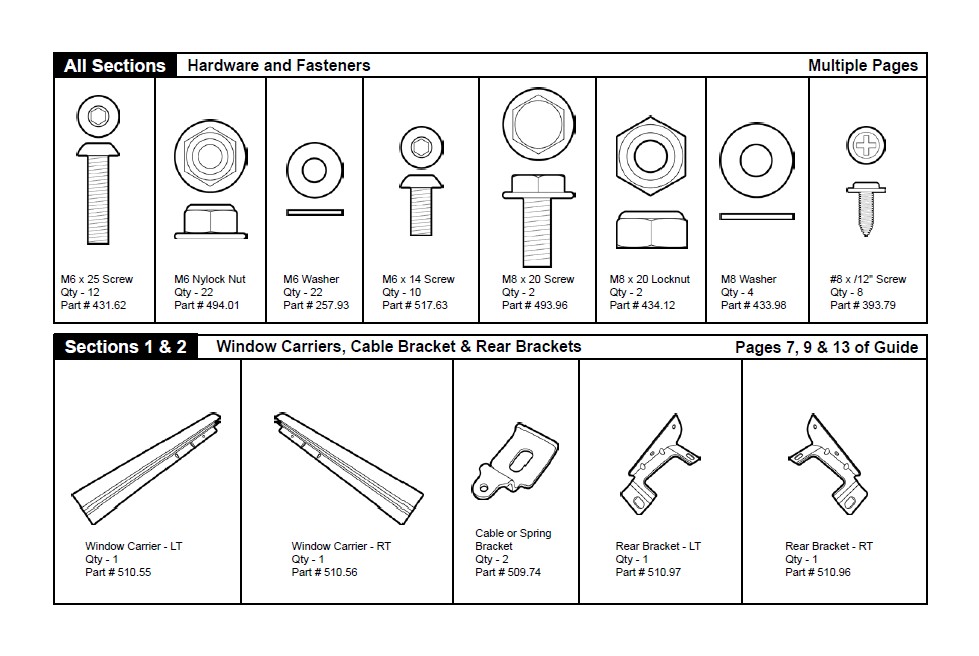
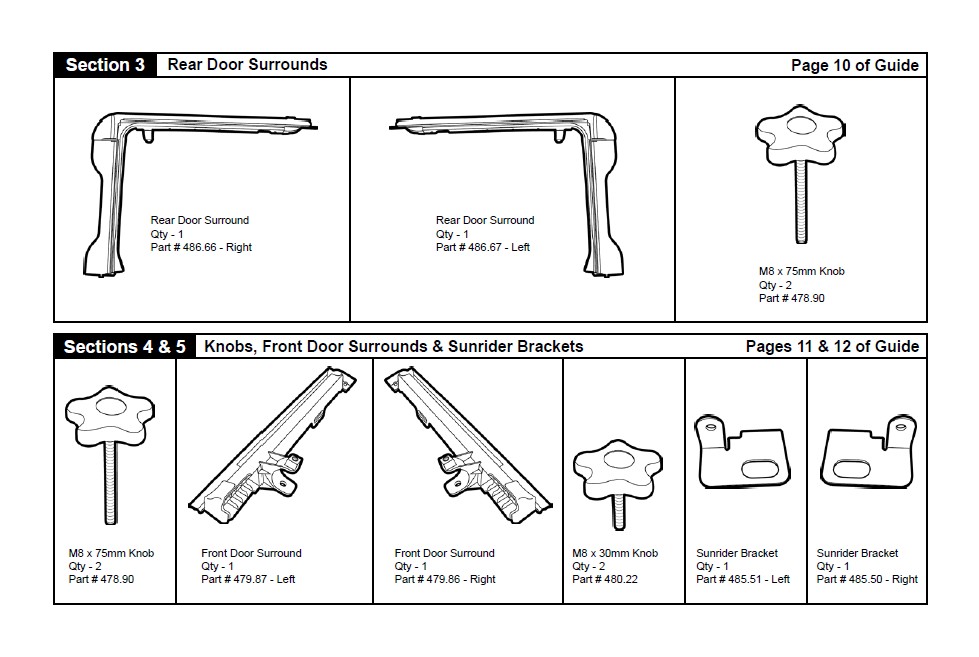
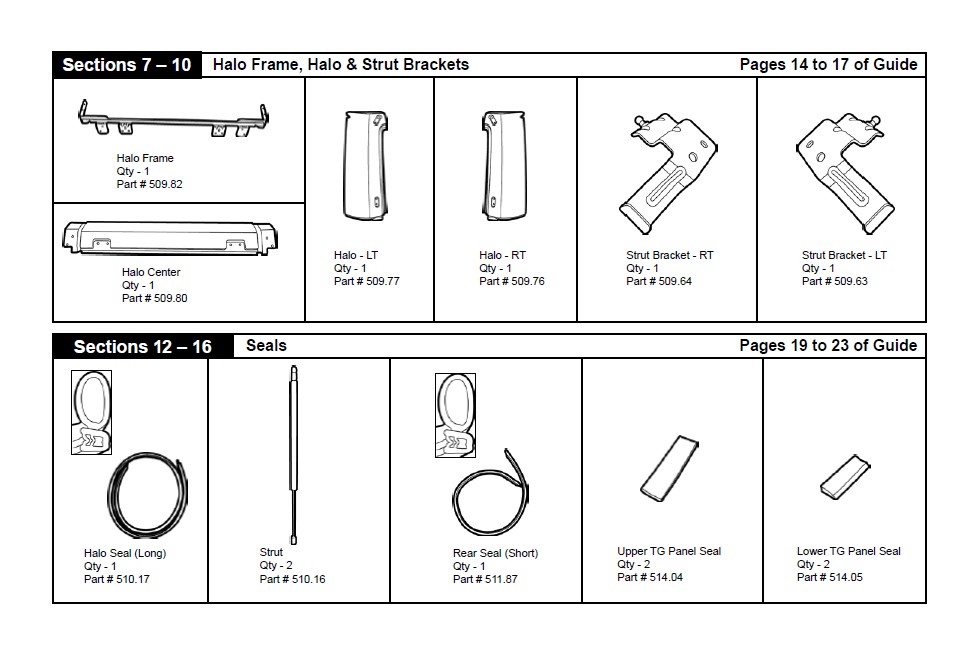
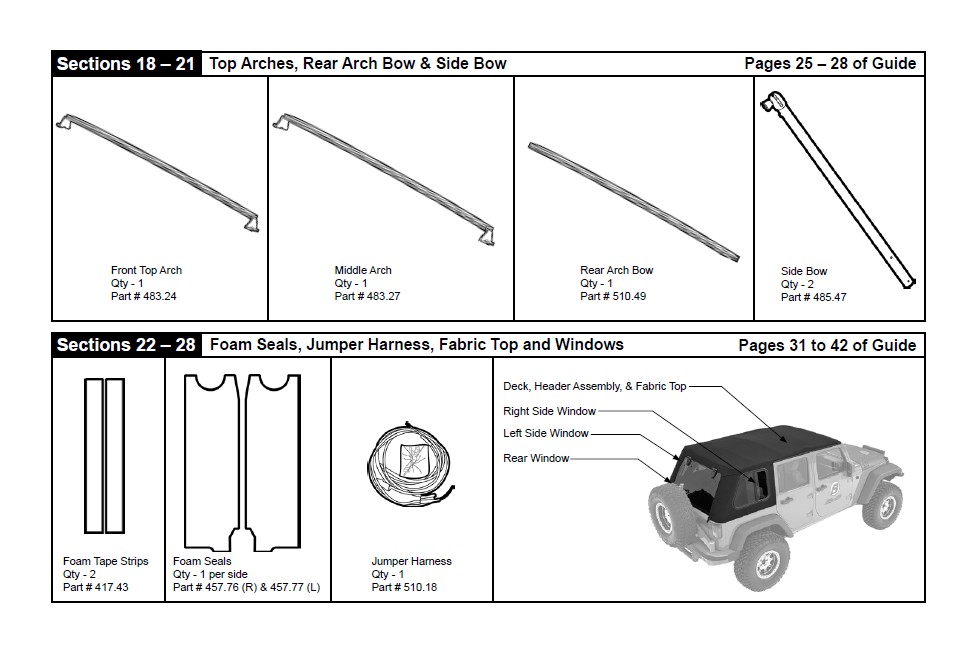
Parts List- Required parts for each installation section
Section 1 Install Cable or Spring Bracket to Window Carrier
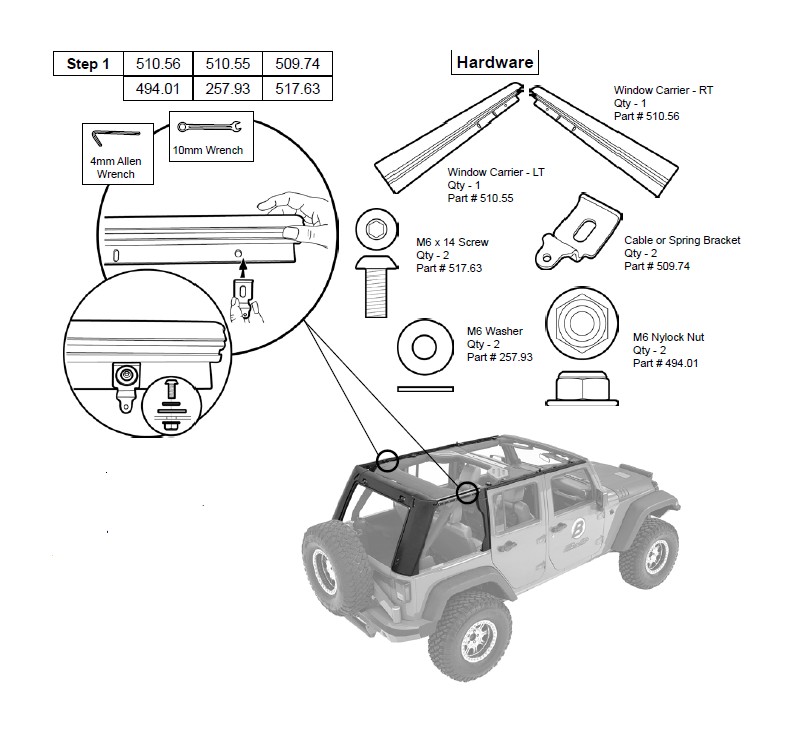
Step 1: Install the Cable Bracket on the Window Carrier in the hole closest to the front (the side with the molded cap).
Install the screw and washer from the top and the nut from underneath the carrier and tighten the screw.
Section 2 Install Rear Brackets
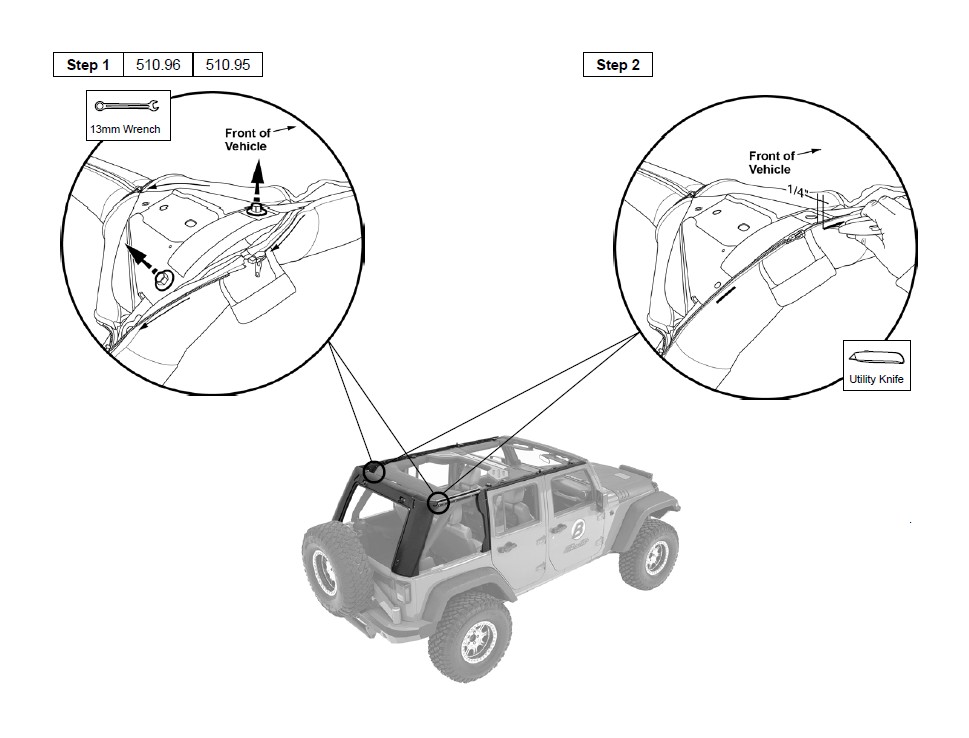
Step 1: Unzip the upper rear and rear leg sport bar covers and locate the upper sport bar bolt. Use a 13mm socket and ratchet to remove the bolt and set it aside to be reused.
Step 2: Cut two horizontal slit the same width as the Cable Bracket in the sport bar cover 1/4" below the zipper and aligned with the bolt hole.
Section 2 Install Rear Brackets (cont.)
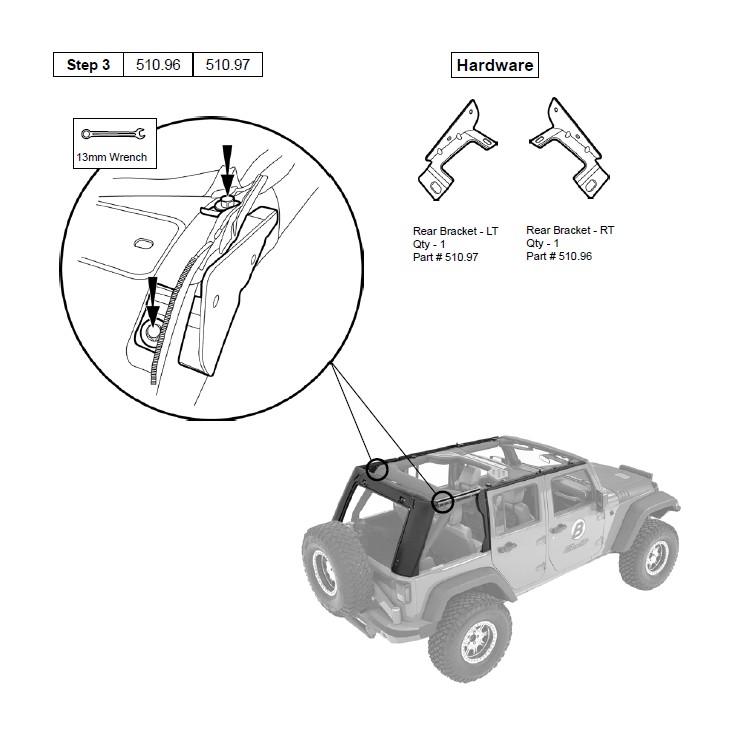
Step 3: Use the bolts that were removed to mount the Rear Bracket to the sport bar through the holes cut in the sport bar cover.
Repeat on both sides of the vehicle.
Tighten bolts just snug so that the bracket cable can be adjusted in the slots for side-to-side movement.
All bolts and screws will be tightened later in the installation process.
Section 3 Install Rear Door Surrounds
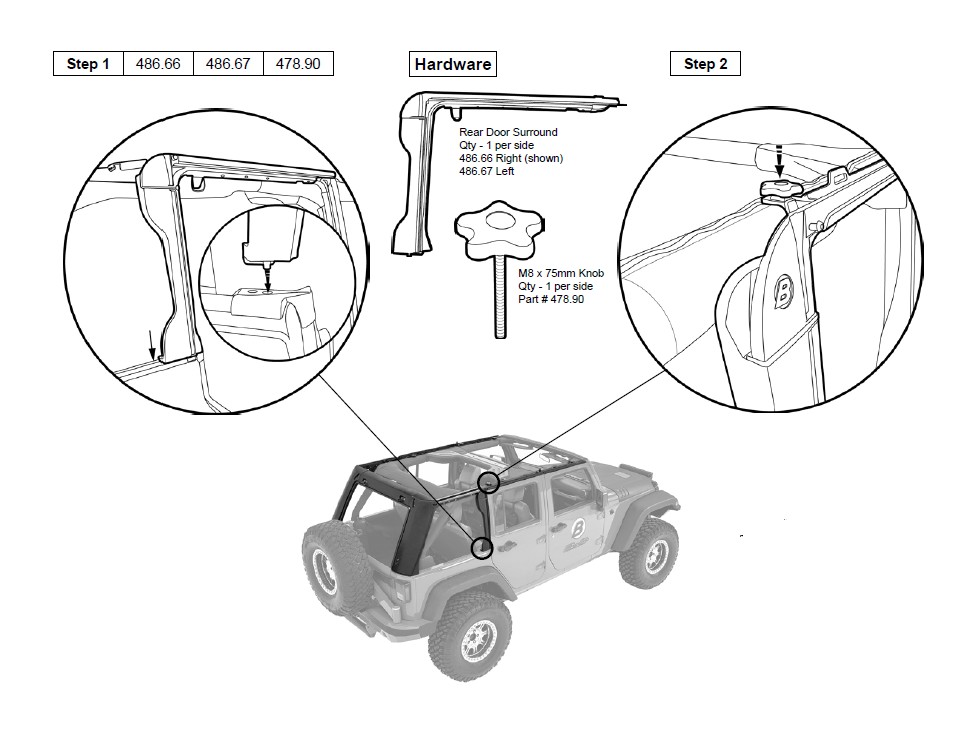
Step 1: Insert the pin in the bottom of the Rear Door Surround into the hole in the belt rail behind the rear door opening. Press the channel along the top of the Rear Door Surround around the horizontal sport bar.
Passenger side shown. Repeat on the driver side of the vehicle.
Step 2: Insert an M8 x 75mm Knob into the rear position on the Door Surround, and tighten the knob.
Passenger side shown. Repeat on the driver side of the vehicle.
Section 4 Install Front Door Surrounds
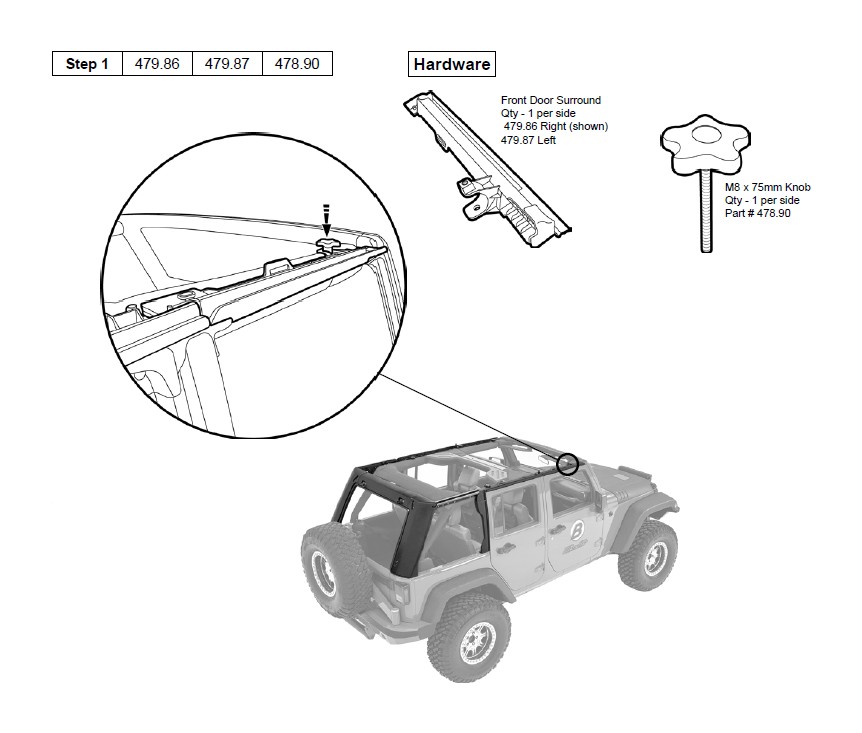
Step 1: Position the Front Door Surround on the sport bar above the passenger side door and press it into place as with the rear.
Passenger side shown. Repeat on driver side of the vehicle.
Step 2: Insert an M8 x 75mm Knob into the front position on the Door Surround, and tighten the knob.
Passenger side shown. Repeat on the driver side of the vehicle.
Section 5 Install Sunrider Bracket
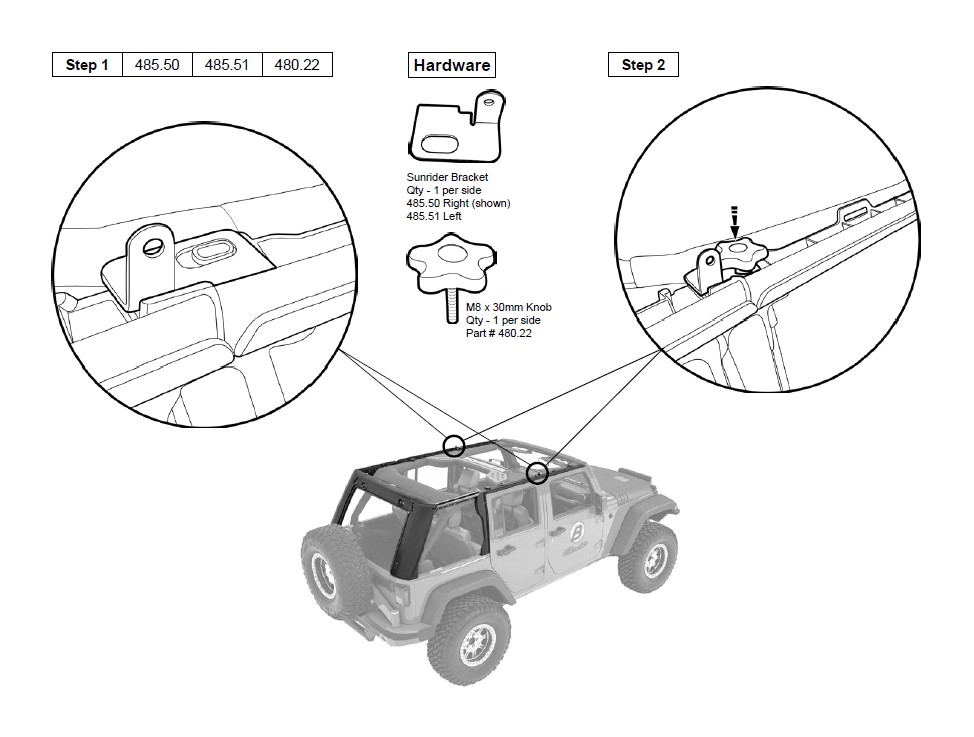
Step 1: Place the Right Sunrider Bracket part #485.50 over the hole where the Front and Rear Door Surrounds join.
Passenger side shown. Repeat on driver side of the vehicle.
Step 2: Insert an M8x30mm knob part #480.22 into the rear position on the Front Door Surround, and tighten the knob.
Passenger side shown. Repeat on the driver side of the vehicle.
Section 6 Install Window Carrier
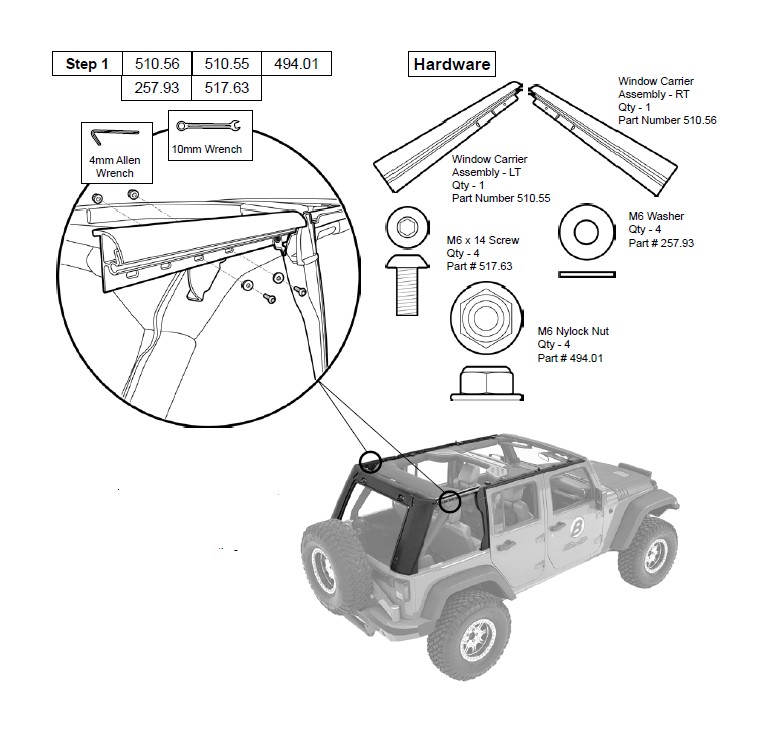
Step 1: Install the Window Carrier to the Rear Bracket. The plastic cap with the ‘B’ logo goes towards the front and the open end of the carrier goes towards the rear.
Tighten fasteners just snug at this time. All bolts and screws will be tightened later in the installation process.
Repeat on both sides of the vehicle.
Section 7 Install Halo Frame
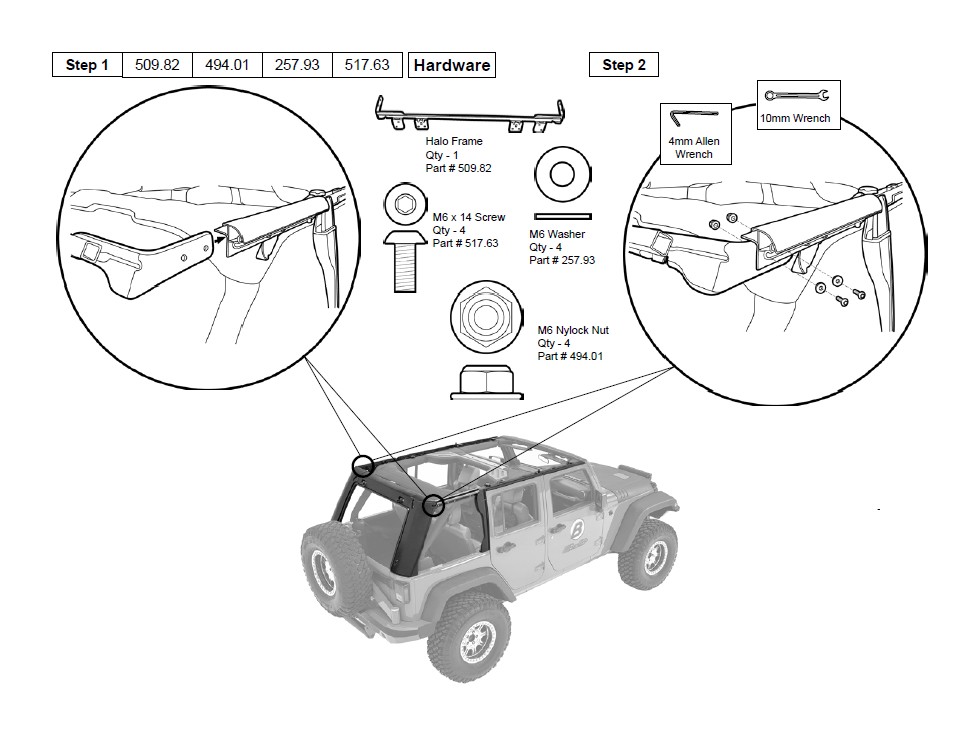
Step 1: Install the Halo Frame to the Window Carrier.
Step 2: Secure the Halo Frame to the Window Carrier using two (2) M6 x 14 Screws and two (2) M6 Washers from the outside and two (2) M6 Nylock Nuts from the inside.
Tighten fasteners just snug at this time. All bolts and screws will be tightened later in the installation process.
Repeat on both sides of the vehicle.
Section 8 Install the Halo Center
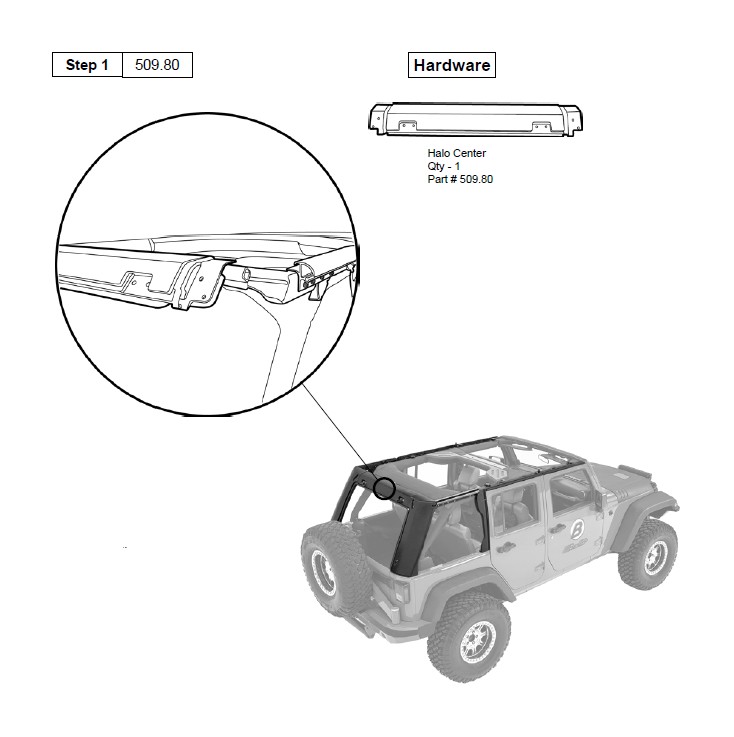
Step 1: Position the Halo Center on the Halo Frame. No fasteners required for this step.
You may need an assistant to hold the Halo Center in place for the next section.
Section 9 Install Halo
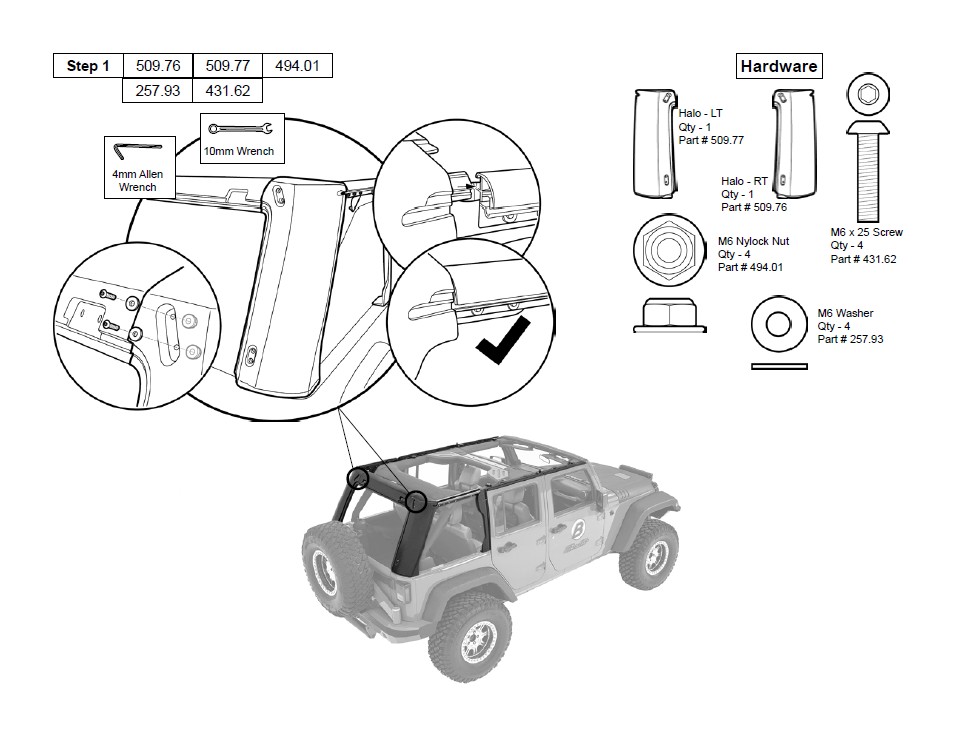
Step 1: Install the R/L Halo to the Window Carrier.
Install the tab feature on the upper section of the Halo in the open end of the window carrier. Secure with two (2) M6 x 25 Screws and two (2) M6 Washers from the outside and two (2) M6 Nylock Nuts from the inside in the outermost holes on each side.
Tighten screws just snug so that the Halo can be adjusted.
All bolts and screws will be tightened later in the installation process.
Section 10 Install Halo Strut Bracket
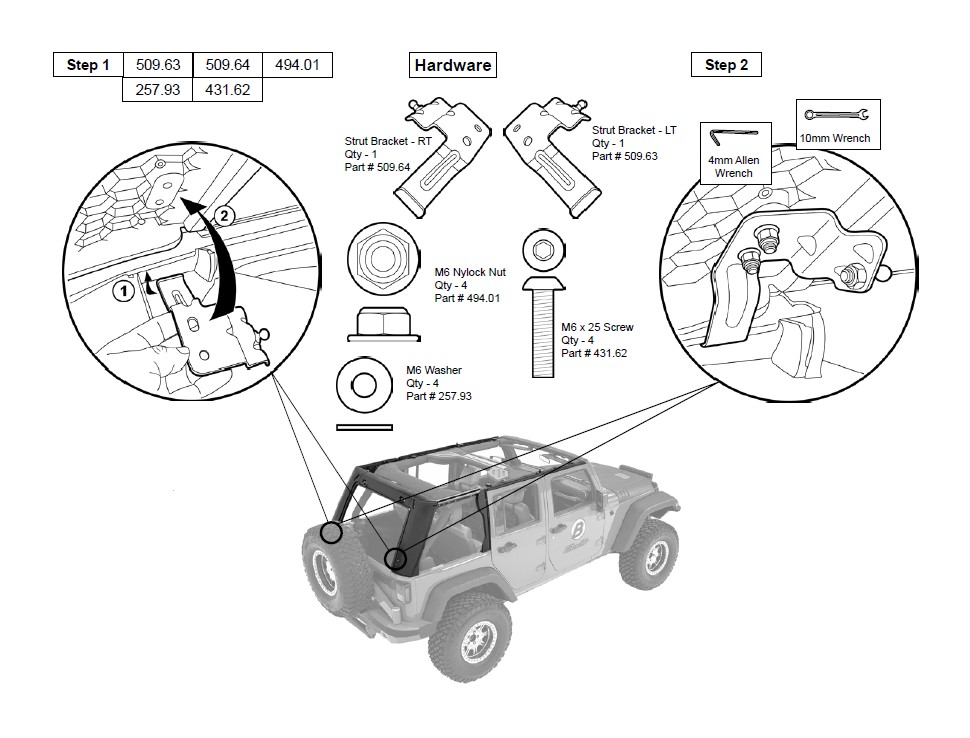
Step 1: Hook the Strut Bracket under the belt rail inside the vehicle and rotate up.
Step 2: Secure bracket to the Halo and belt rail using the two (2) M6x25 screws, two (2) M6 washers, and two (2) M6 Nylock nuts.
Tighten screws just snug at this time in case Halo needs adjustment.
All bolts and screws will be tightened later in the installation process.
Repeat on both sides of the vehicle.
Section 11 Install Halo Lower Screw
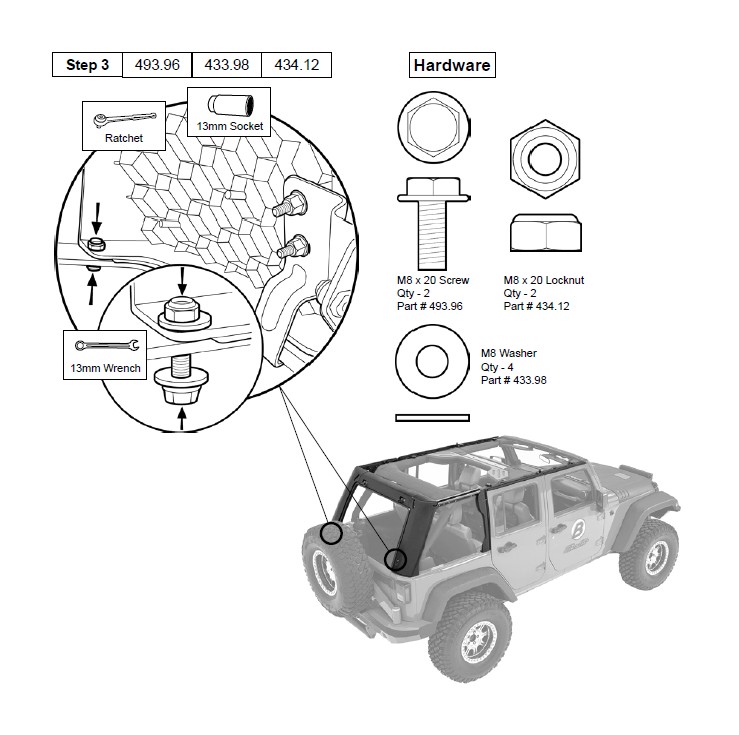
Step 3: Use M8 x 20 Screws, M8 Washers and M8 x 20 Locknuts to secure the Halo to the belt rail. It may be easier to install the bolt from the bottom up and the nut on top.
Tighten screws just snug at this time in case Halo needs adjustment.
All bolts and screws will be tightened later in the installation process.
Repeat on both sides of the vehicle.
Section 12 Install Halo Seal
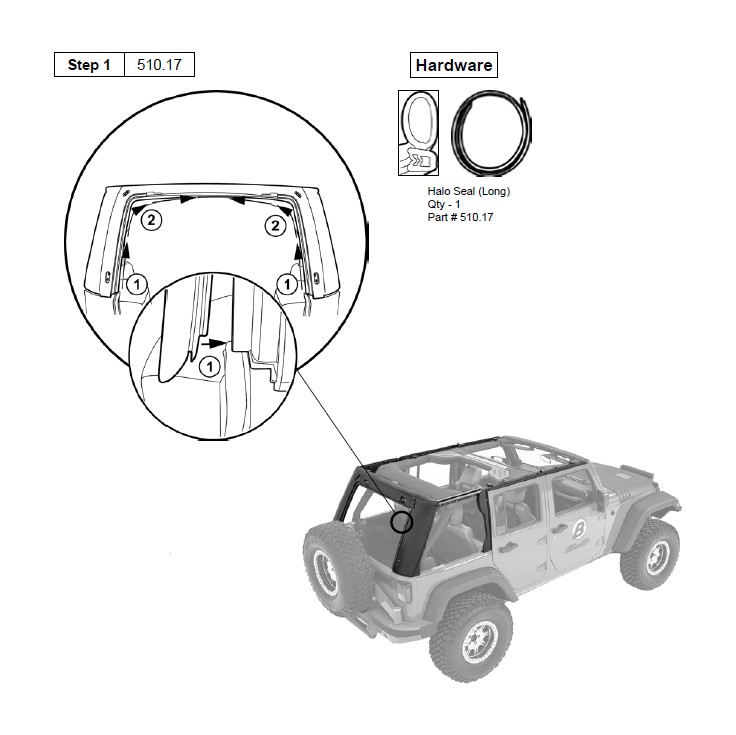
Step 1: Install the Halo Seal on the Halo. Start at the bottom on each side and work toward the center.
Align the bottom of the seal to match the angle on the tailgate opening.
Section 13 Install Rear Window Glass
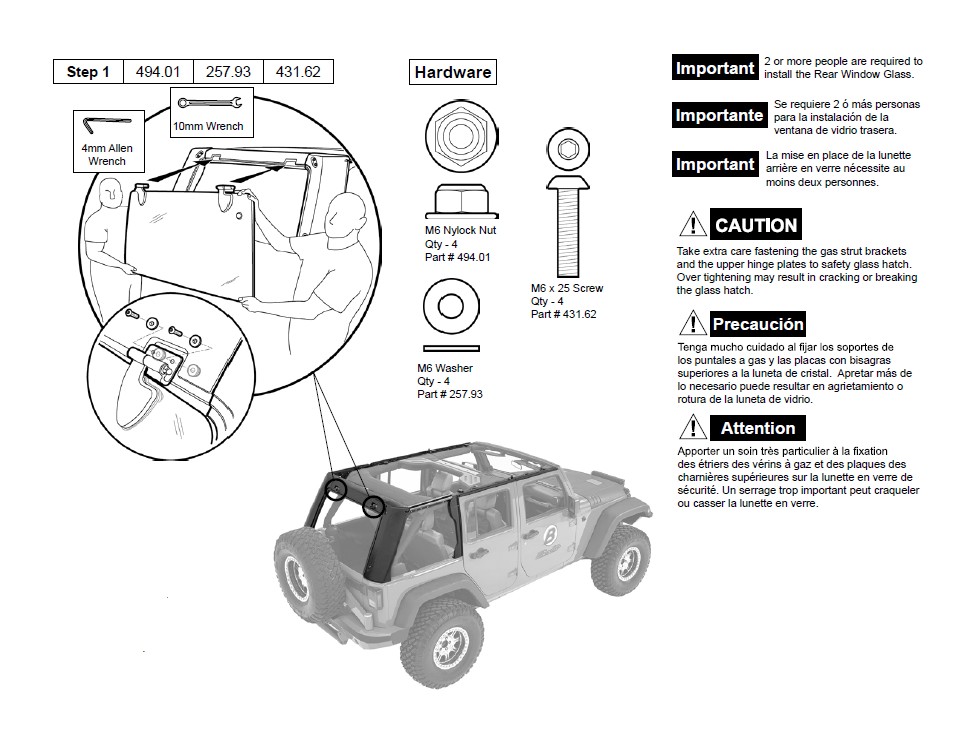
Step 1: Close the rear tailgate. With at least 2 people, install the Rear Window Glass on the Halo. Rest the bottom of the glass on the rear tailgate, with one person holding the rear glass in place.
Secure with two (2) M6 x 25 Screws and two (2) M6 Washers from the outside and two (2) M6 Nylock Nuts from the inside in holes for the hinges on each side.
If the hinge holes don’t align, insert a screwdriver in the hole to align the parts first.
Step 2: Observe the window installation.
Make sure the window is centered in the opening, and has an even gap from glass to Halo on all sides.
Adjust the hinge mounting or Halo fasteners to achieve an even gap between glass and Halo.
Section 14 Install Struts
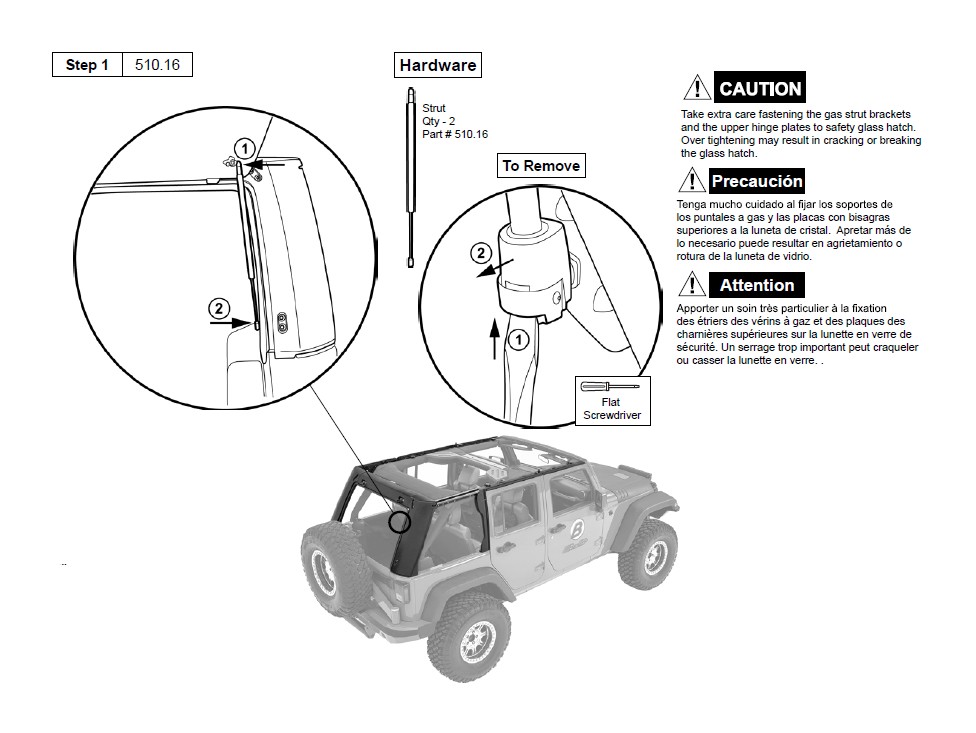
Step 1: To install the Struts: 1) Secure the top (tube section) of the Strut to the Rear Window Glass by pressing the end onto the round stud. 2) Secure the bottom to the lower Strut Bracket.
You may have to rotate the end of the Strut to align properly with the stud.
Repeat with both Struts.
To Remove: (1) Use a screwdriver to pry up the retainer ring and then (2) pull end off round stud to remove strut. Repeat with both Struts.
Section 15 Install Rear Seal
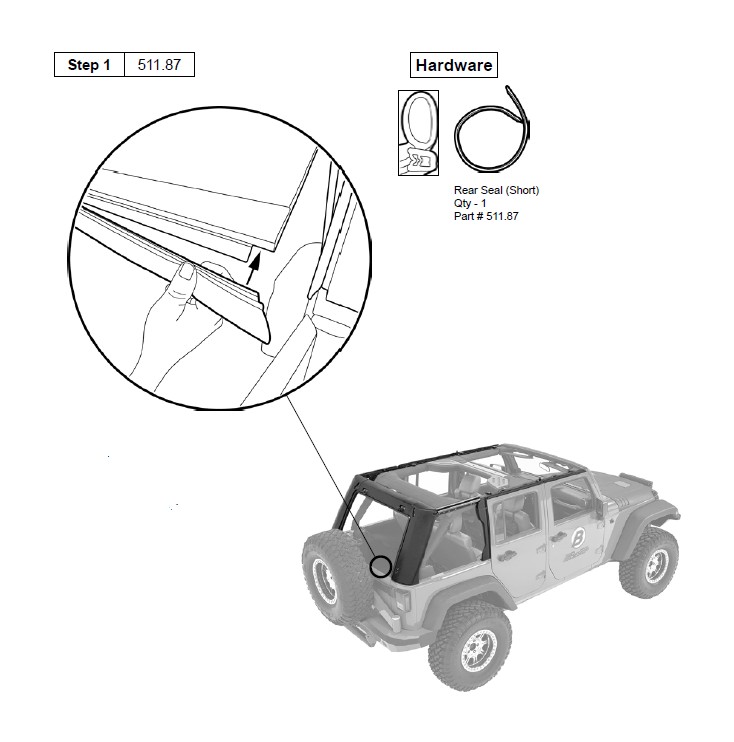
Step 1: Install the Rear Seal on the bottom of the Rear Window Glass. Start on the outside edges and work toward the center.
Section 16 Install TG Panel Seal
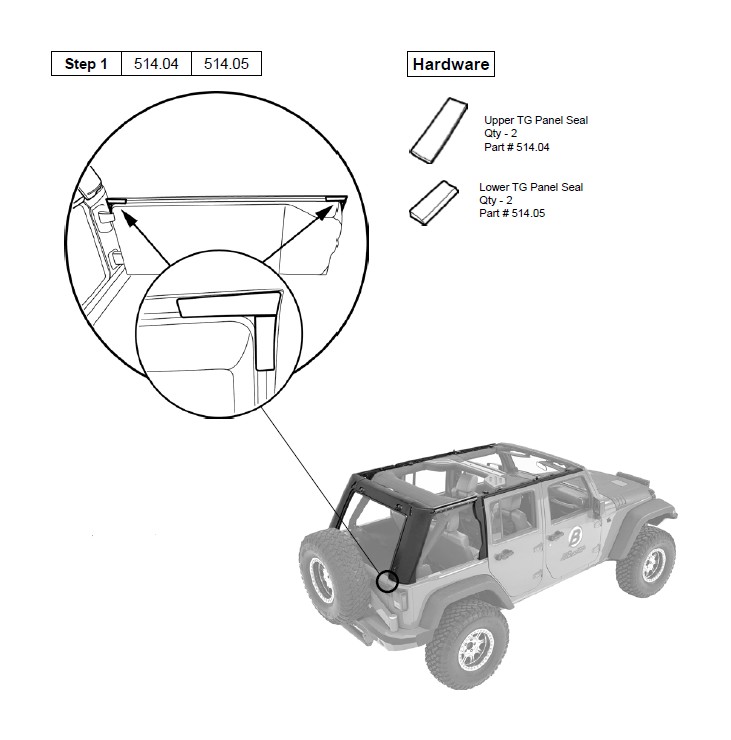
Step 1: Install the TG Panel Seals on the tailgate panel. The Upper TG Seal aligns with the top and the Lower TG Seal aligns with the Upper TG Seal.
Section 17 Adjust Hardware Fit to Vehicle & Tighten All Fasteners
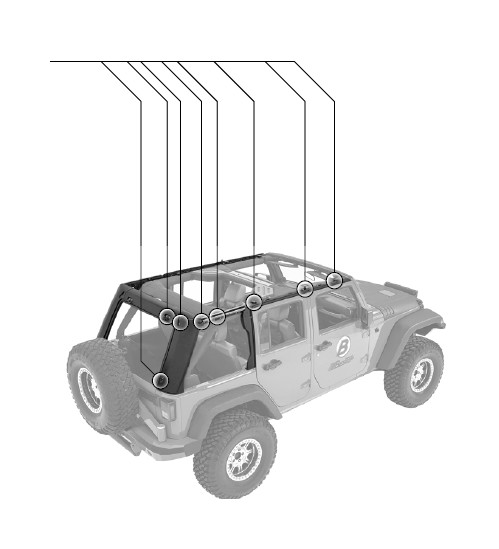
Step 1: TIghten glass hinge fasteners.
Tighten Window carrier fasteners.
Tighten bolts on sport bar holding rear brackets.
Zip sport bar covers closed.
Tighten all Halo frame fasteners, including lower Halo strut bracket and Halo lower screws.
Passenger side fastener locations shown.
Repeat on both sides of the vehicle.
Step 2: Open and close rear window.
Make sure window operates smoothly.
Make sure the window is centered in the opening
and has a nice even gap and good seal contact on all sides.
Section 18 Install Front Top Arch
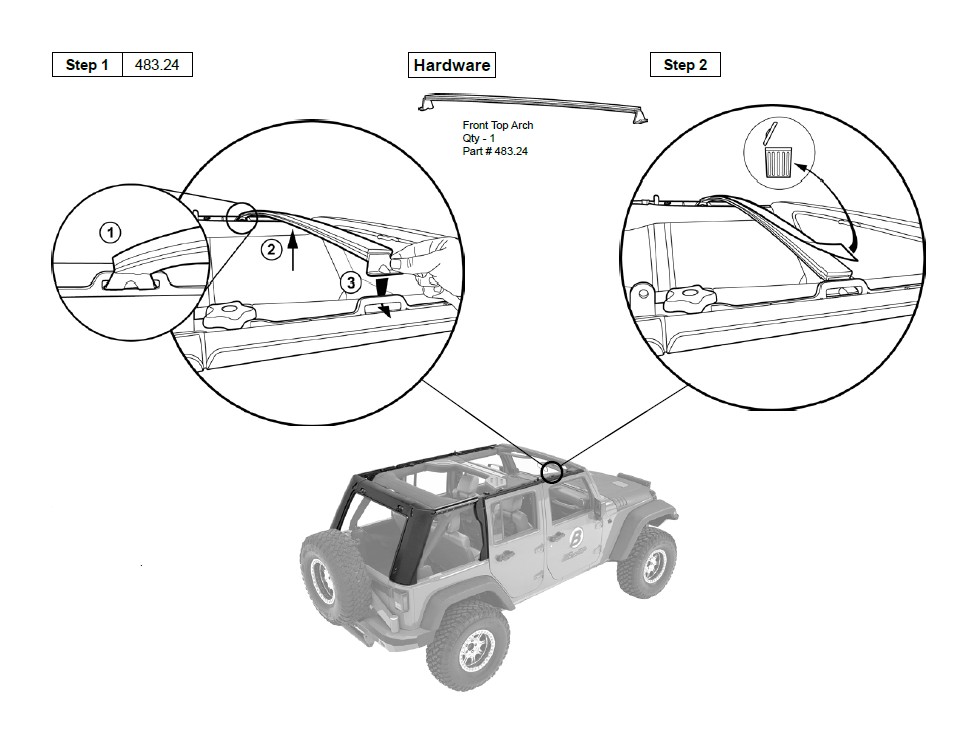
Step 1: (1) Insert one end of the Top Arch in to the slot in the middle of one of the Door Surrounds.
(2) Push up from the bottom while (3) pushing the other end inward to flex the bow and insert into the slot in the Door Surround on the other side of the vehicle.
Step 2: Remove and dispose of paper film.
Section 19 Install Middle Arch
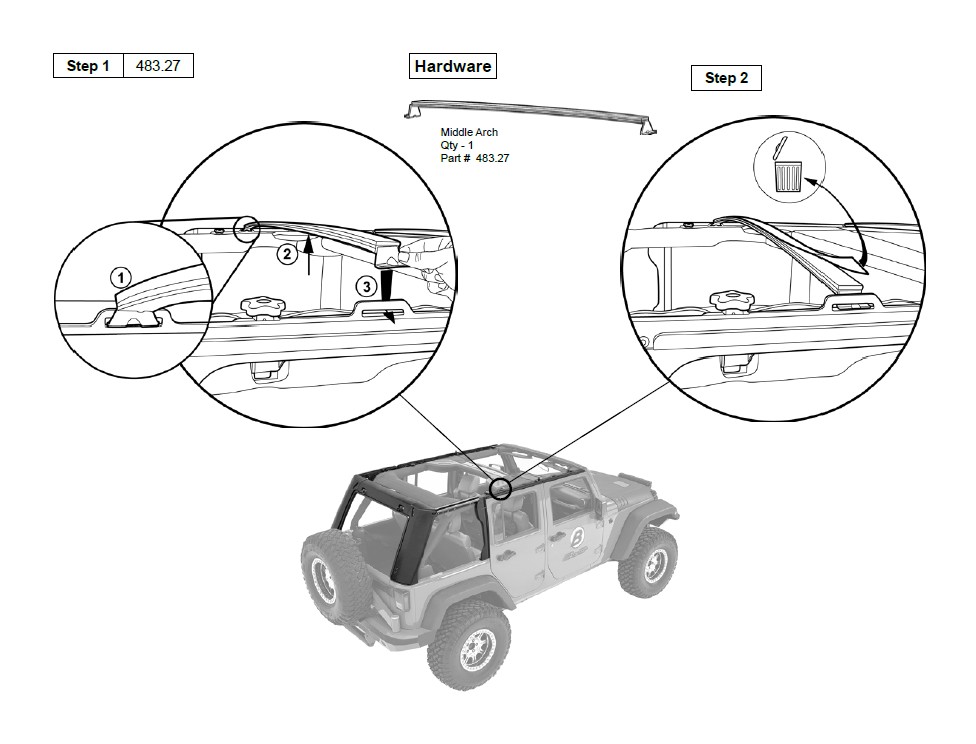
Step 1: (1) Insert one end of the Top Arch in to the slot in the middle of one of the Door Surrounds.
(2) Push up from the bottom while (3) pushing the other end inward to flex the bow and insert into the slot in the Door Surround on the other side of the vehicle.
Step 2: Remove and dispose of paper film.
Section 20 Install Rear Arch Bow
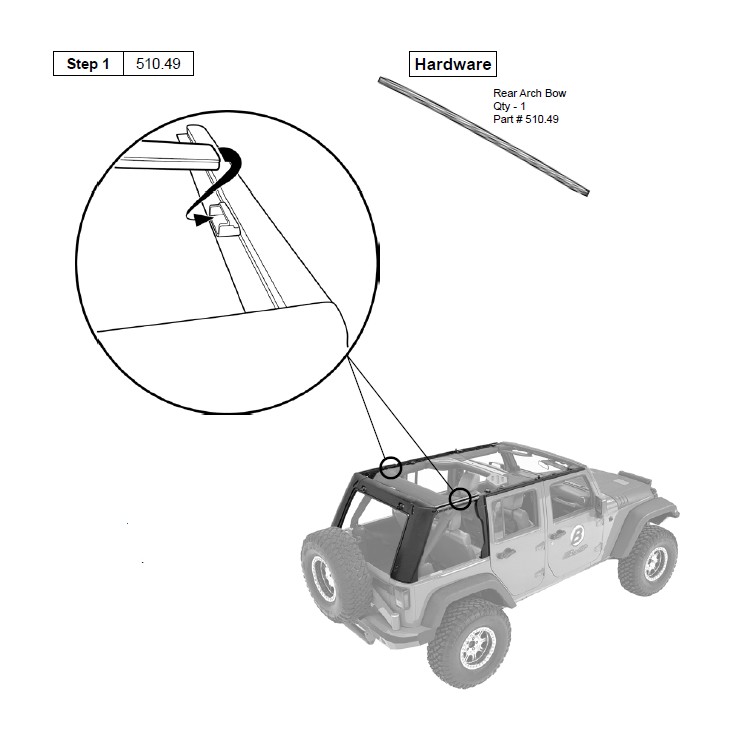
Step 1: (1) Insert the Center and Rear Arch Bows into the plastic mounts on the window carrier.
(2) Push up from the bottom while (3) pushing the other end inward to flex the bow and insert into the slot in the Door Surround on the other side of the vehicle.
Section 21 Attach Side Bows to Header/Fabric Assembly
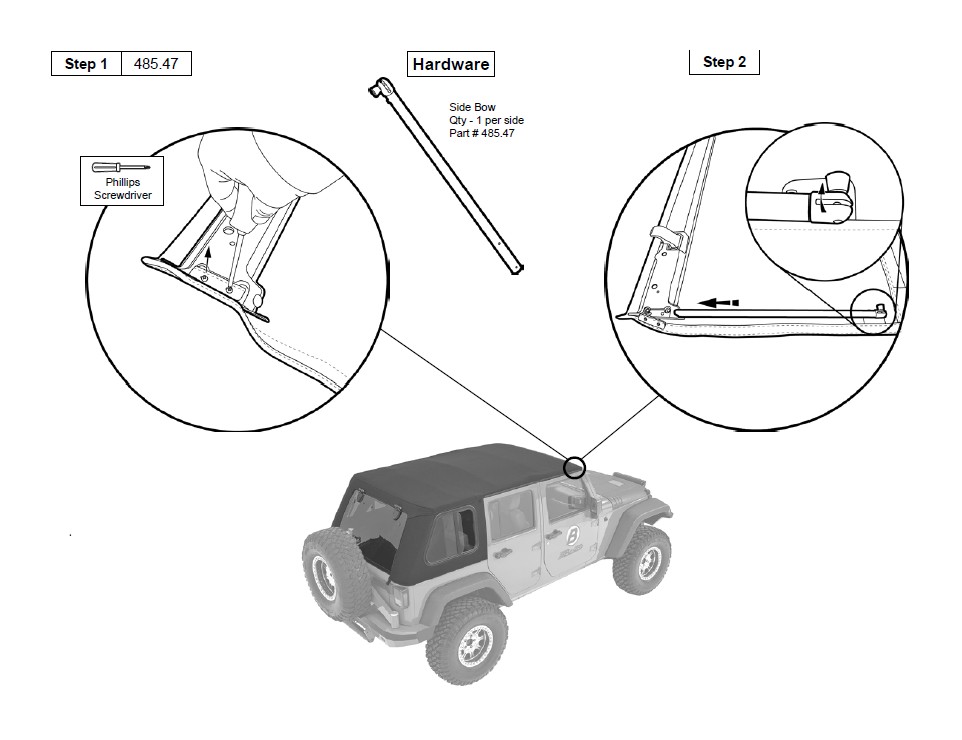
Step 1: Lay the Header/Fabric Assembly upside down on a clean surface.
Remove the screws on both the left and right sides of the Header Assembly and set them aside for later use.
Step 2: Insert Side Bows into Header Assembly on each side.
Pivot quick release knobs to face toward inside of assembly, and align the holes in the Side Bow with the holes in the Header Assembly.
Section 21 Attach Side Bows to Header/Fabric Assembly (cont.)
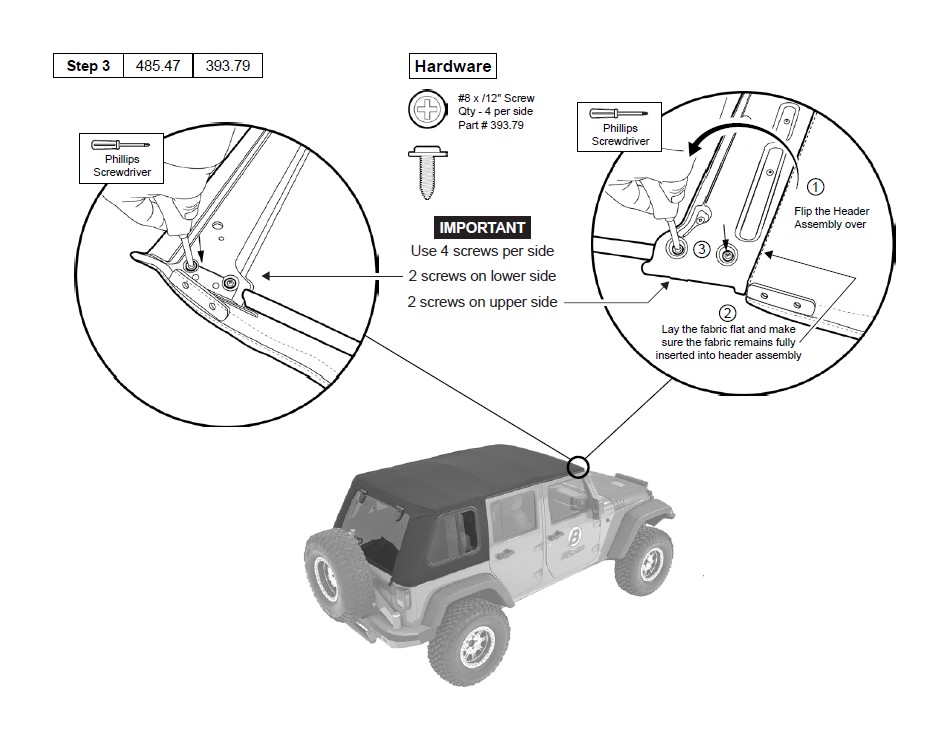
Step 3: Once the holes are aligned, use two (2) #8x1/2” screws to mount the Side Bow to the lower side of the Header Assembly.
Repeat on both sides of the vehicle.
Step 4:
1 Flip the Header Assembly over.
2 Be sure the fabric lays flat after you flip the header assembly over to expose the upper screw holes.
3 Insert two (2) #8x1/2” screws on the upper side of the header assembly.
Repeat on both sides of the vehicle.
Section 21 Attach Side Bows to Header/Fabric Assembly (cont.)
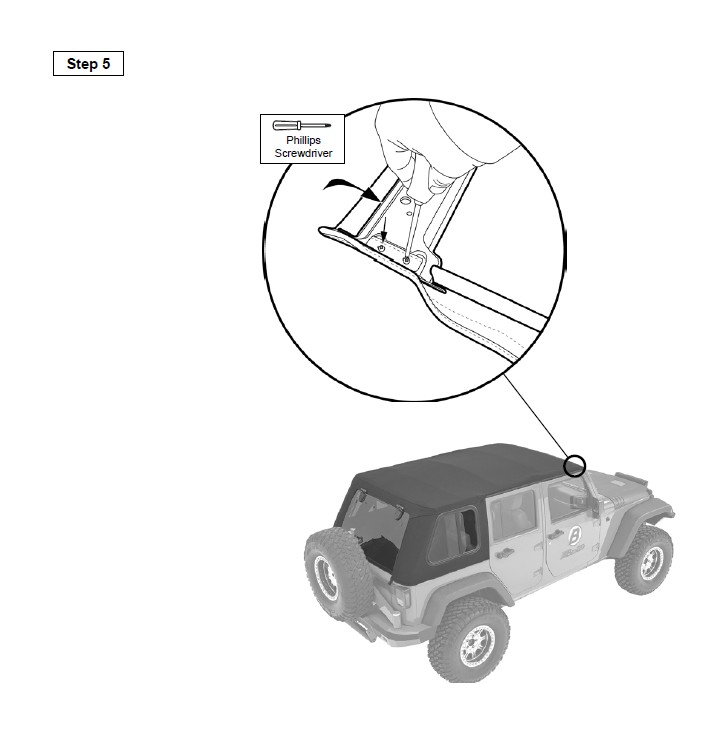
Step 5: Flip the Header Assembly back over and reinstall the screws removed in Step 1.
Repeat on both sides of the Header Assembly.
Section 22 Install Foam Tape Strips and Foam Seals
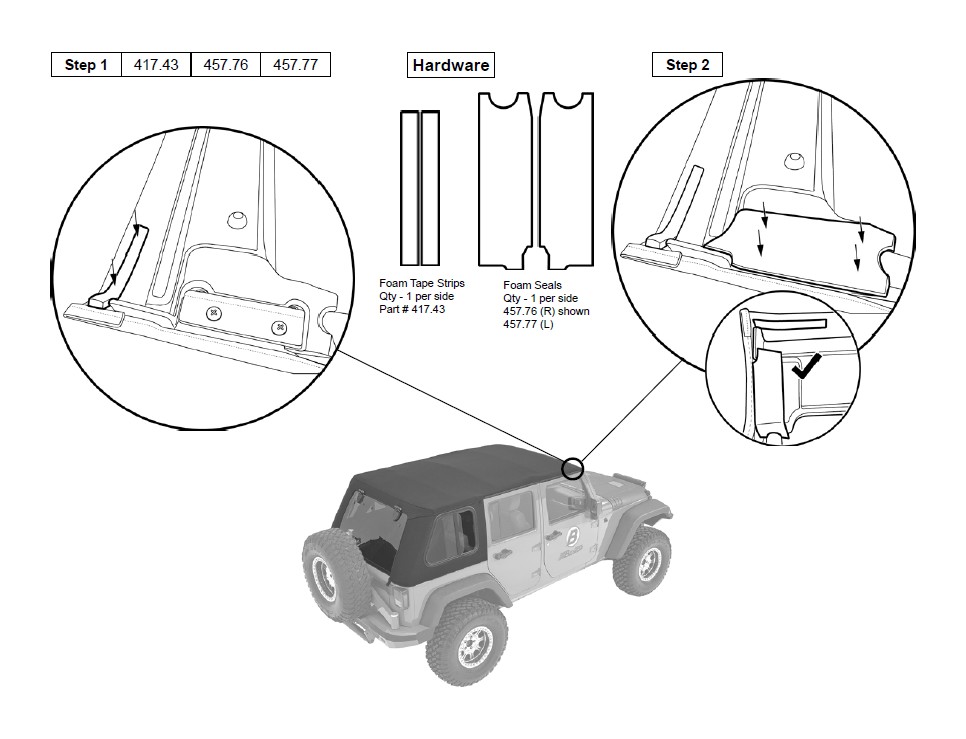
Step 1: Peel the backing off the Foam Tape Strips and install them on each side of the Header.
Step 2: Peel the backing off the Foam Seal and install it on the passenger side of the Header. Repeat on the driver side.
Section 23 Mount Header Assembly to Sunrider Bracket
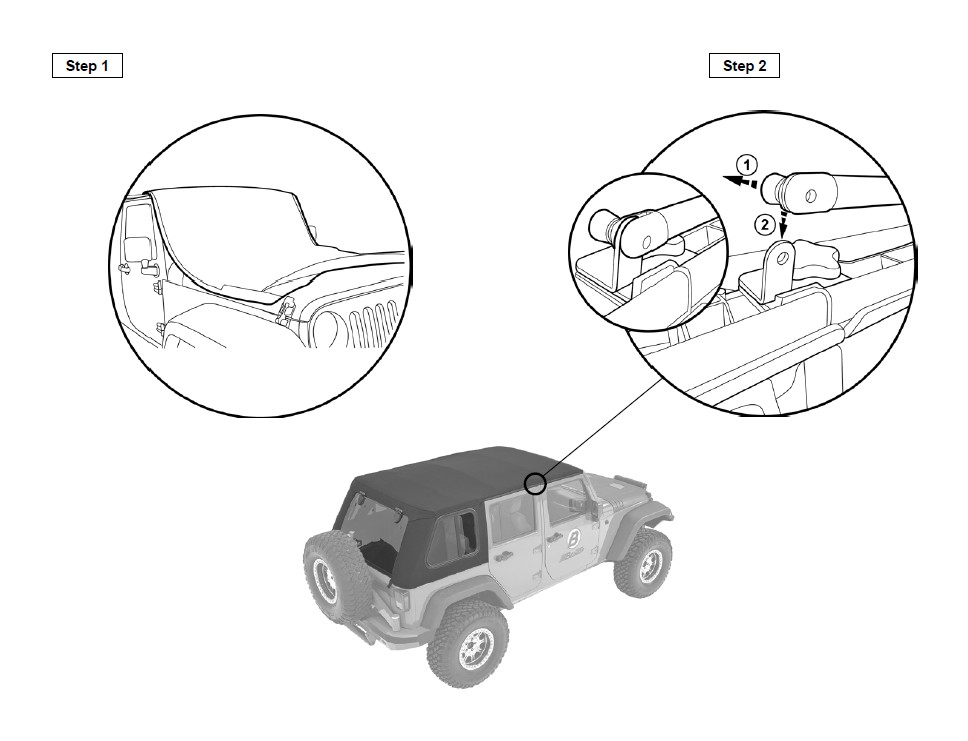
Step 1: Fold the Top Fabric toward the front of the Header. Place the Header Assembly on vehicle, with the backing up and the Side Bows on top of the Door Surrounds.
Step 2: Pull back on the quick release knob on the Side Bow and slide the Side Bow over the Sunrider Bracket. Repeat on the other side of the vehicle.
Section 23 Mount Header Assembly to Sunrider Bracket (cont.)
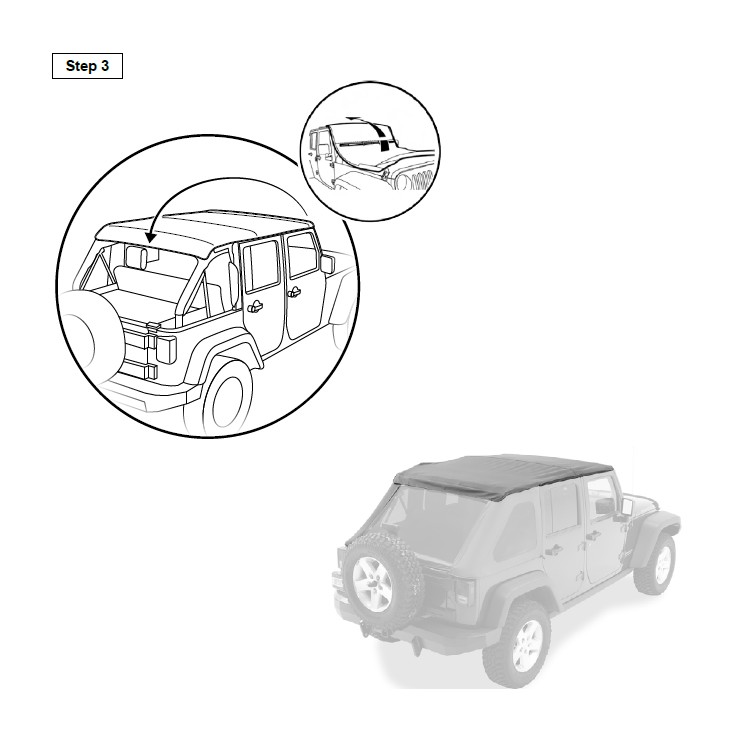
Step 3: Drape the top fabric over the Top Arches and the sport bars.
Section 24 Open Sunrider and Secure Cable Spring
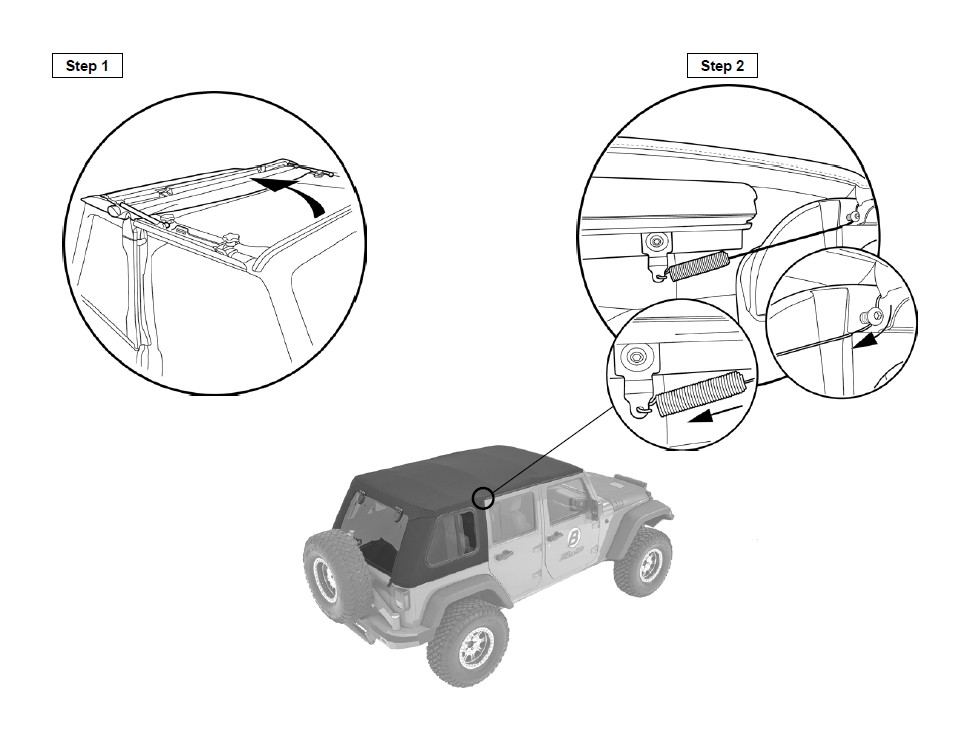
Step 1: Open the Sunrider by folding the header back.
Step 2: Run the cable under the Door Surround screw and hook into the Cable Bracket on the Window Carrier.
Repeat on opposite side.
Section 25 Install Side Windows (sometimes called Quarter Windows)
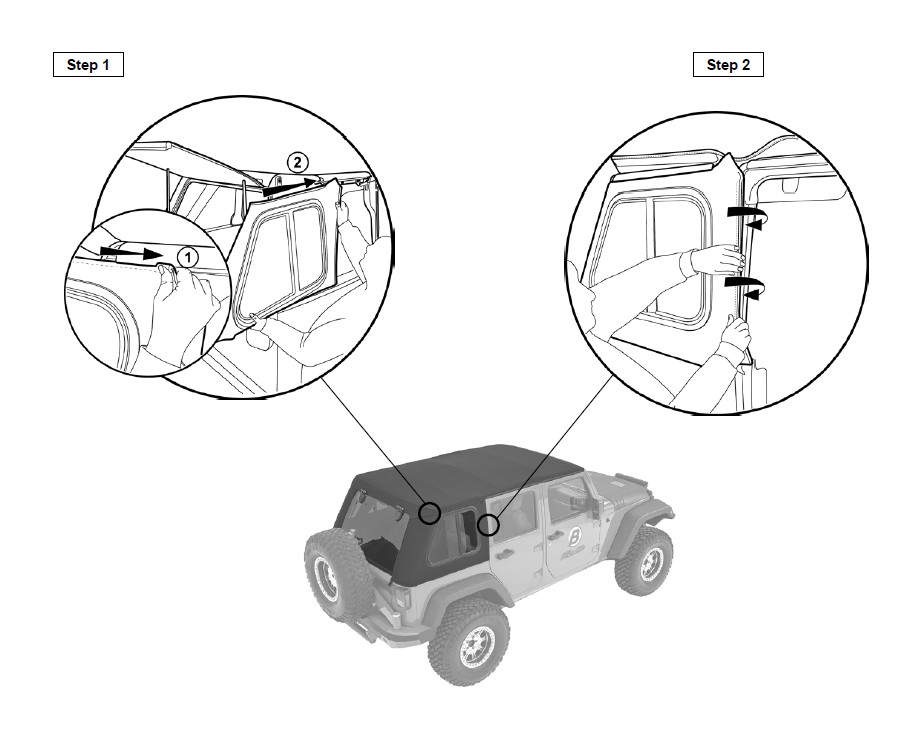
Step 1: Start at the rear of the Window Carrier and slide the tube on the top of the Side Window into the slot in the carrier.
Step 2: Roll the window retainer into the slot at the front of the Door Surround.
You can adjust the window front to back if needed but the fabric will be tight.
Section 25 Install Side Windows (cont.)
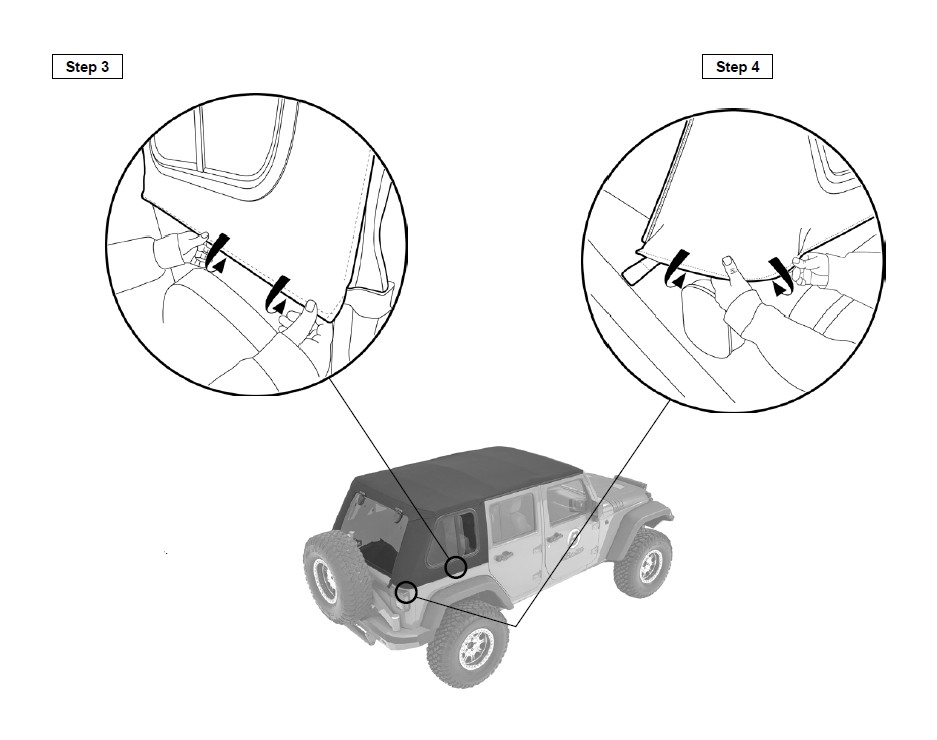
Step 3: Start at the front and work from front to back to install the retainer along the bottom of the window.
You can adjust the window front to back if needed but the fabric will be tight.
Step 4: Install the rear corner retainer. You can adjust the window front to back if needed but the fabric will be tight.
Section 25 Install Side Windows (cont.)
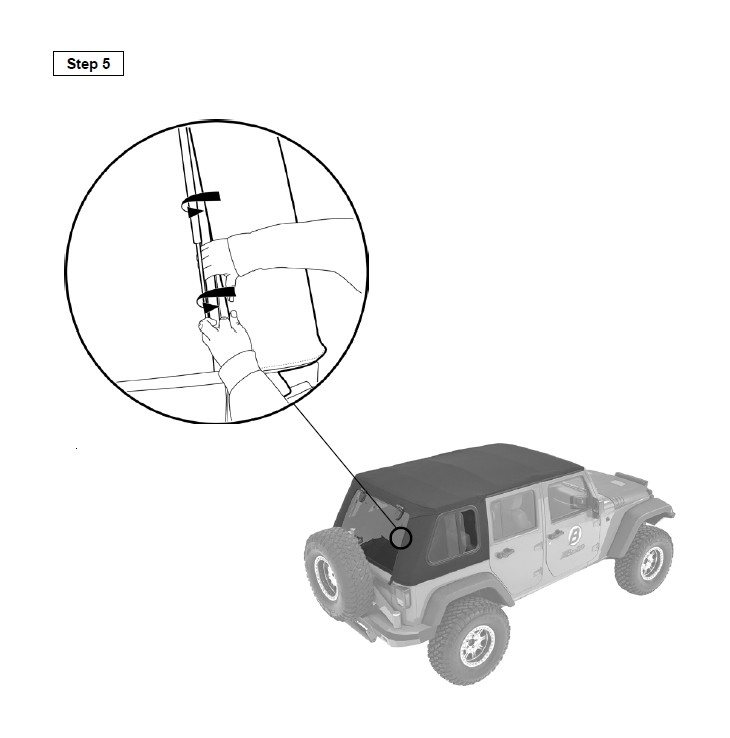
Step 5: Start at the bottom and roll the retainer into the slot in the Rear Halo. Work up from bottom to top.
Repeat Steps 1-5 on the other side of the vehicle.
Section 26 Install Top Fabric
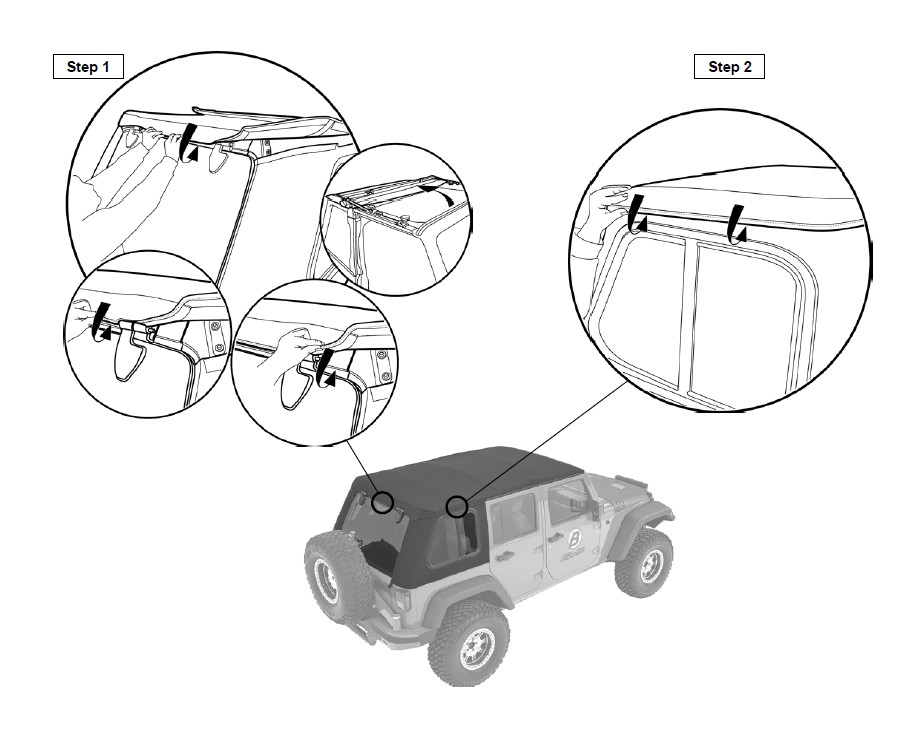
Step 1: Start in the middle and roll the retainer into the slot in the Rear Halo above the Rear Window hinges.
Operation is made easier if the top is in Sunrider mode for both installation and removal of soft goods.
Step 2: Install the side retainers into the Window Carrier.
Section 26 Install Top Fabric (cont.)
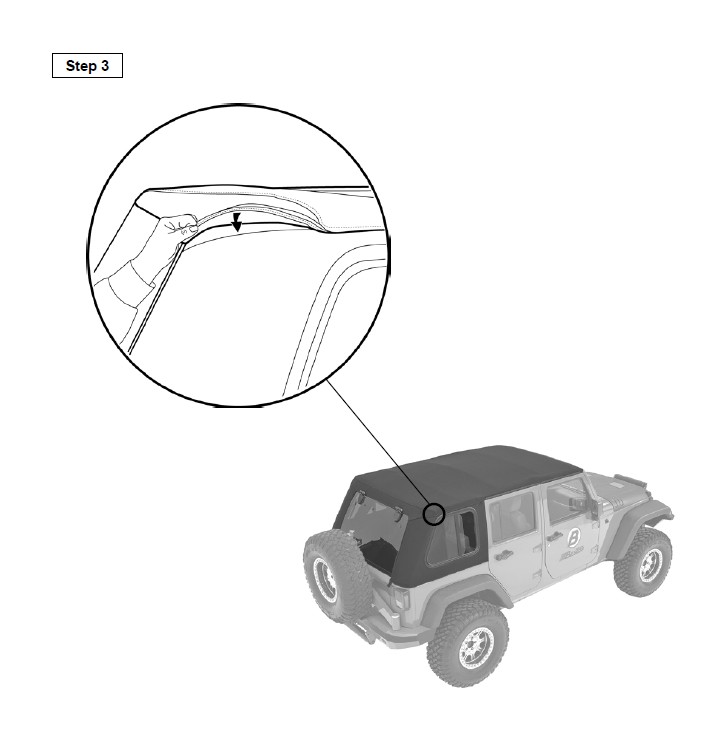
Step 3: Engage rear hook and loop on both sides of the vehicle.
Section 27 Close Top
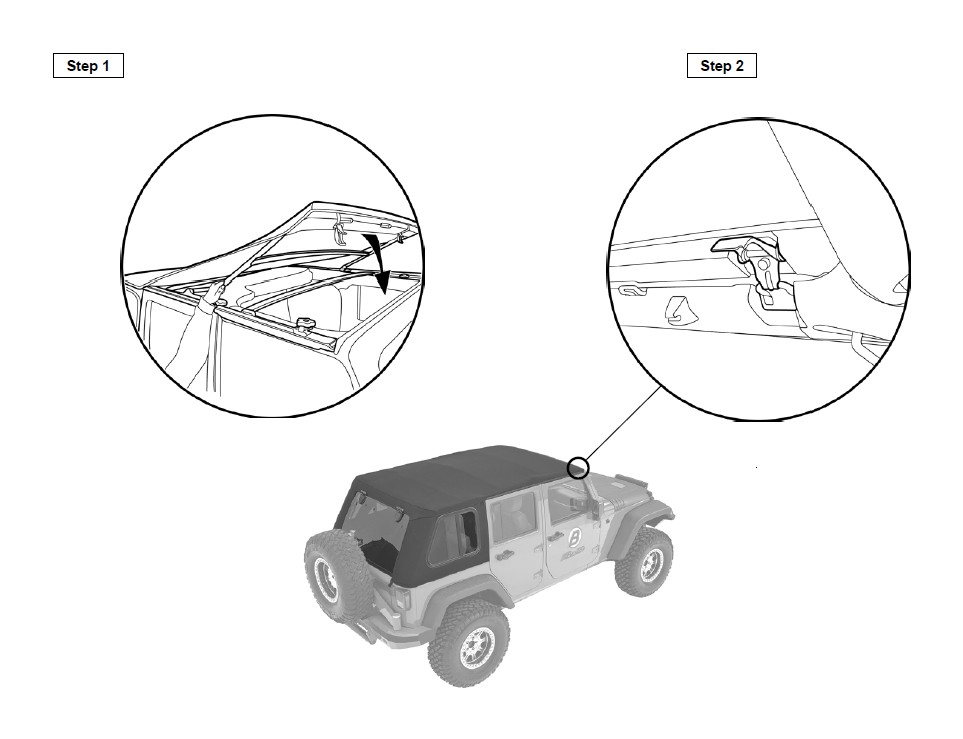
Step 1: Close the Sunrider.
Step 2: Hook the latches on the Header into the loops in the windshield.
Do not close the latch.
Repeat on the opposite side of the vehicle.
Section 27 Close Top (cont.)
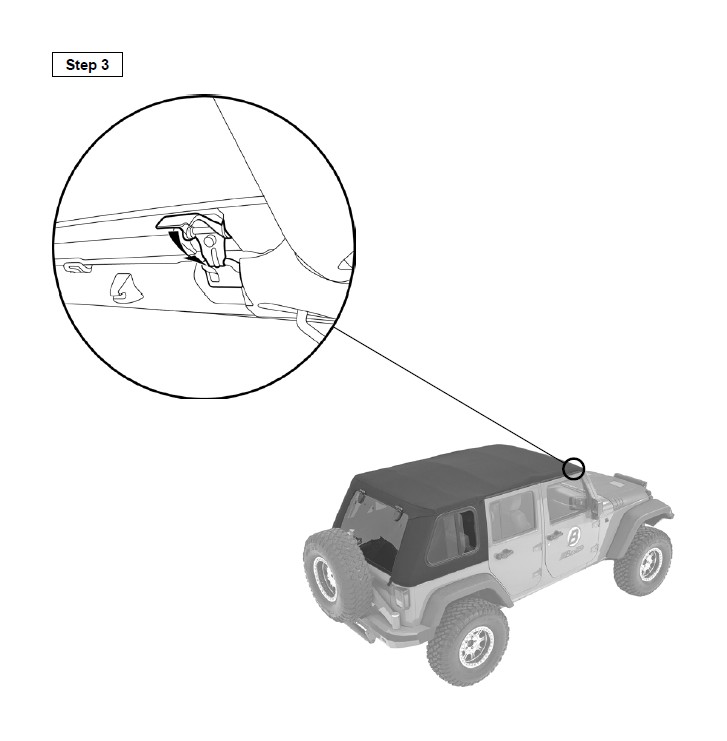
Step 3: Close the latches on both sides of the windshield header.
Step 4: Inspect the fabric fit to the vehicle.
The Trektop PRO hardware is designed for adjustment. You may find it helpful to perform some hardware adjustments to improve the fabric fit.
Make sure to tighten all fasteners once adjustments have been made.
Section 28 Install Jumper Harness for Rear Glass
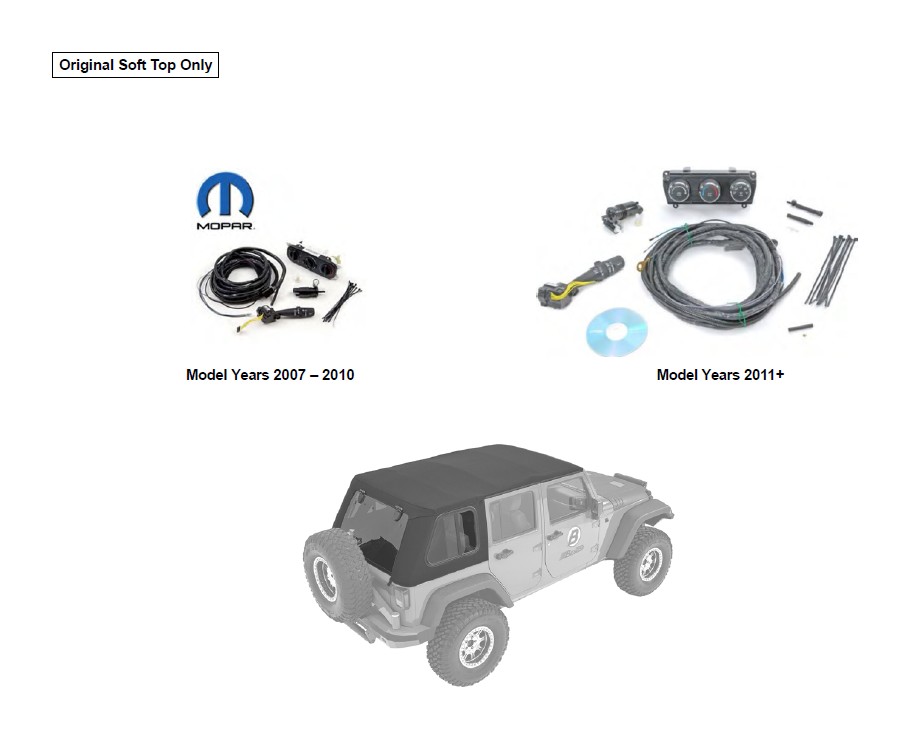
Original Soft Top Only: Purchase a MOPAR wiring harness (not Included) and install according to MOPAR directions.
Model Years 2007 to 201 0: - #82210215
Model Years 2011
- without heated mirror: - #82212859
- with heated mirror: - #82212860
Section 28 Install Jumper Harness for Rear Glass (cont.)
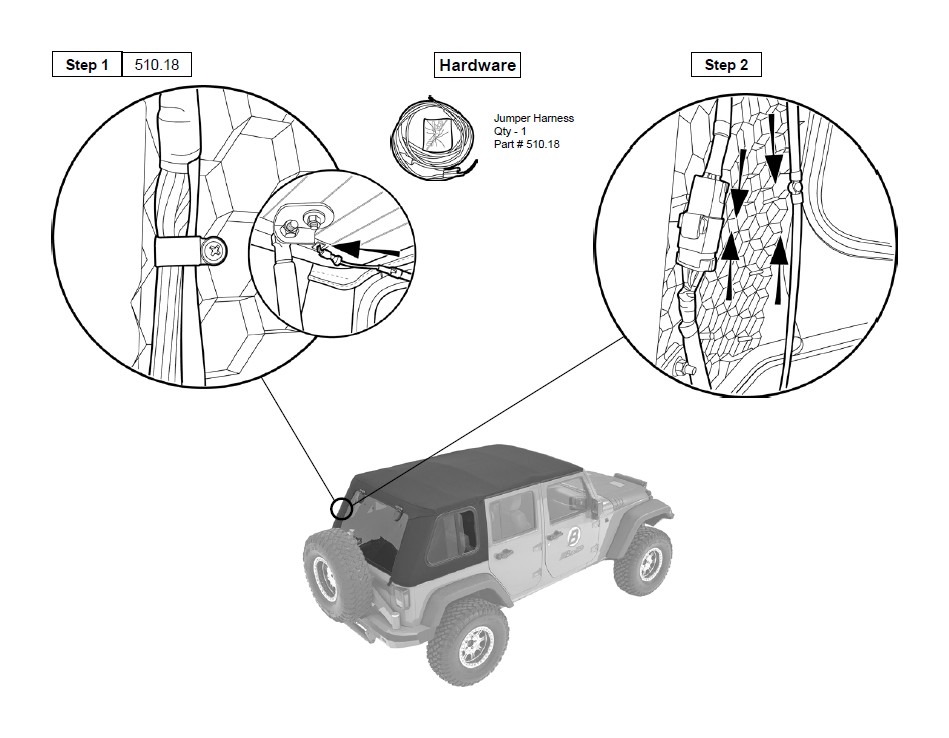
Step 1: Attach Harness to Rear Glass heater grid terminals and route the wiring back to the existing OE harness. Use the “P” clips and screws provided in the harness kit to route the wires.
Remove any caps covering the metal clip.
Step 2: Attach Jumper Harness to existing vehicle wiring harness.
You will need to reuse the original washer fluid connector for the Trektop PRO washer fluid tube.
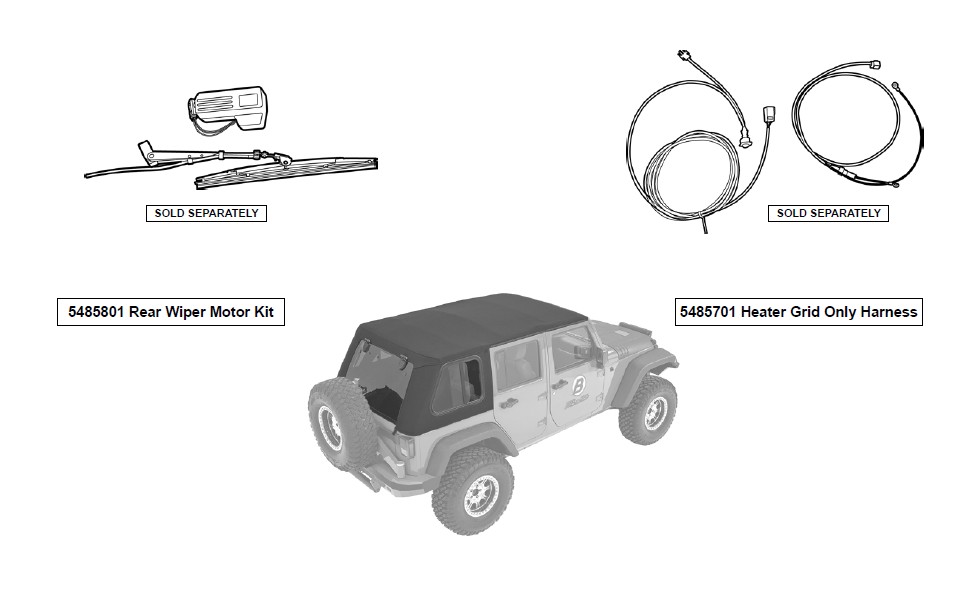
Options Available Accessories
Care and Maintenance of your Bestop Product
Your Bestop product is made of the finest materials available. To keep it looking new and for the maximum possible life, it will need periodic cleaning and maintenance.
Fabric: The fabric should be washed often using soap, warm water and a soft bristle brush. Rinse with clear water to remove all traces of soap. Bestop recommends using Bestop Cleaner (part no. 11201-00) and Bestop Twill Protectant (part no. 11207-00) which are specially formulated to provide a total cleaning and protection system
Windows: Keep windows clean to avoid scratching. DO NOT use a brush on the windows! Wash with a water-soaked cloth or sponge and a mild dishwashing detergent. Bestop recommends Bestop Vinyl Window Cleaner (part no. 11203-00), which safely cleans and protects vinyl windows and helps prevent UV damage. NEVER WIPE THE WINDOWS WHEN THEY ARE DRY. Be careful when cleaning snow or frost from the vinyl windows since they are easily scratched and may crack at low temperatures. DO NOT roll the sides or rear window in cold weather. The windows become stiff and will crack. Cracks caused by misuse in cold temperatures are not covered under warranty.
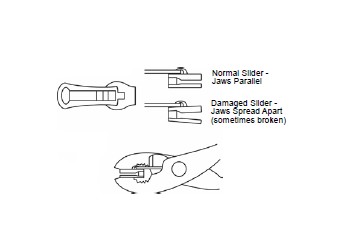
Zippers: Keeping zippers cleaned and lubricated with Bestop’s Zipper Cleaner (part no. 11206-00) will help prevent damage and keep the zippers in smooth working condition. If a zipper opens behind the slider, the slider may have been spread apart. This problem can usually be repaired by using an ordinary pair of pliers to bring the sides back into parallel. Return slider to the end of the zipper in the normal Open position. Squeeze lightly at first and test the zipper. If the zipper continues to remain open squeeze more firmly with the pliers and try the zipper again. Repeat this procedure until the zipper operates correctly.
Water: Seeping through at the seams may be stopped by applying 3-M Scotchgard® on the inside of the seams. Rips in the fabric may be repaired with Bondex® iron on patches. Iron the patches to the Inside of the top, carefully following the Bondex® instructions.
Snaps: Keep snaps cleaned and lubricated with silicone to help prevent snaps from sticking to the studs. If a snap does become stuck to a stud, use a screwdriver and GENTLY pry apart to prevent permanent damage to the snap or the top fabric.
