FREE 1 to 3-Day Delivery on Orders $149+ Details

How to Install Barricade Rivet Style Fender Flare Kit on your Wrangler
Installation Time
2 hours
Tools Required
- # 2 Philips head screwdriver
- 5/16” and 7/16” Wrench
- 5/16 “ and 7/16” Socket
- Socket Driver
- Power Drill
- 5/32” Drill Bit
- China Marker
KIT INCLUDES
2ea. Front Flares
2ea. Rear Flares
2ea. Stone Guards
HARDWARE KIT INCLUDES
28 ea. # 12 X 1 1/4" screw
4 ea. # 8 X 1 1/2 “screw
19 lf. Rubber Fender Trim
28 ea. Rubber spacers
28 ea Hinged Screw Covers
PRIOR TO INSTALLATION
Pre-fit all panels as you proceed with the installation.
If you plan on painting your Fender Flares it must be done prior to installation. All surfaces must be cleaned and prepped following the specifications required by the paint manufacturer As you remove factory parts set them aside safely for later use.
STEP 1. REMOVE THE FRONT AND REAR FACTORY FLARES
1. Start with the rear factory fender flares.
2. Locate and remove all bolts attaching the rear factory flares to the vehicle. Discard factory bolts. Repeat for other side
3. Proceed to the front fender flares and remove the factory marker lights. Set factory marker lights aside for later use.
4. Locate and remove all bolts attaching the front factory flares to the vehicle. Discard factory bolts. Repeat for the other side.
5. Proceed to the factor stone guards. Remove all bolts attaching the guards to the vehicle. Set aside factory screws for later use. Discard guards.
STEP 2. INSTALL RUBBER TRIM ON NEW FLARES
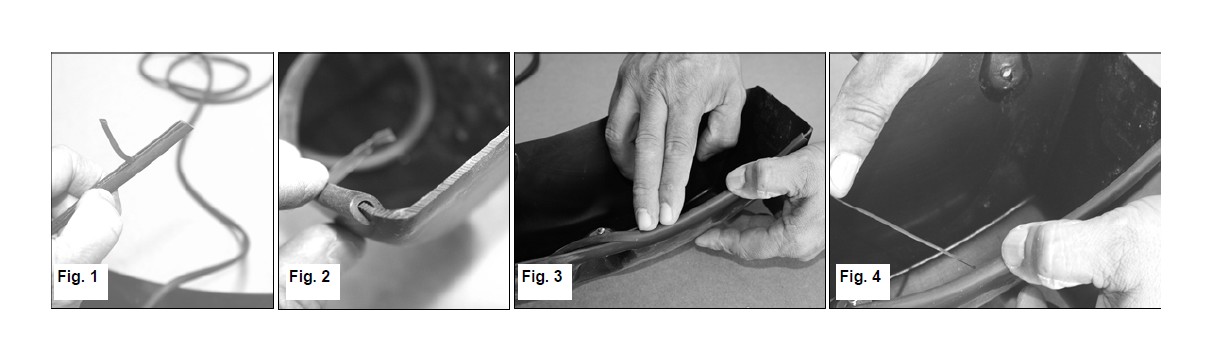
1. Locate the supplied “U” shaped rubber trim. Peel back 1 “of the red lining. Starting at one end of the flare, push the trim onto the edge of flare. NOTE: Make sure the red lining is on the inside of the flare. FIG 1 and 2
2. Continue pressing the rubber trim on to the flare in 6” increments. Fig 3
3. Peel back 6 inches of the red liner and press the trim to bond to the flare. FIG 4 Continue in this manner until you have gone completely around the flare. Cut the trim to length. Once you master the technique it will proceed quickly.
4. Repeat this process for the remaining flares.
IMPORTANT: If you are installing 33” Tires or larger TURN PAGE OVER! Proceed to “Trimming Jeep Fenders” before continuing with the installation.
STEP 3. INSTALL FLARES AND STONE GUARDS
Front Flares
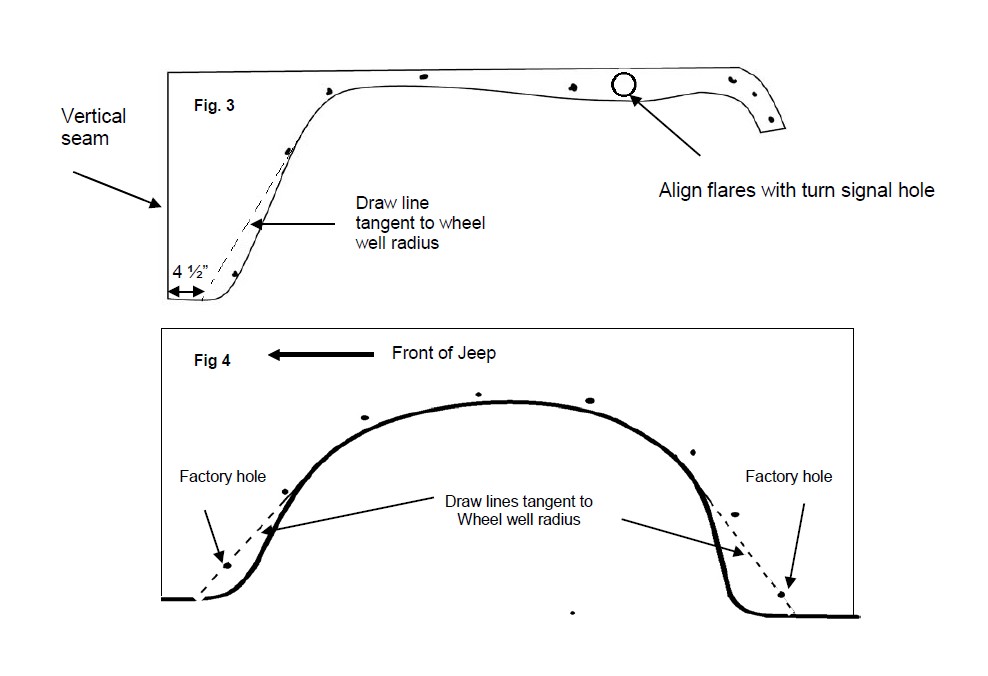
1. Position the front fender flares on the vehicle. The cut out hole in the turn signal area must align with the hole in the new fender flare. Mark mounting holes using fender flares as a guide. FIG 3
2. Center punch all marked areas and proceed to drill using a 5/32” drill bit.
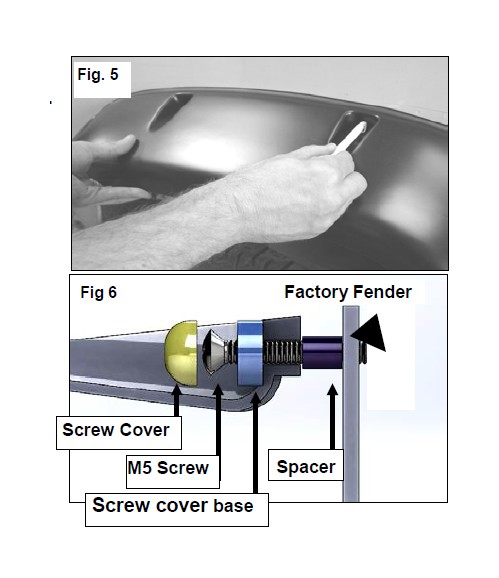
3. Slide a screw cover base onto one of the supplied # 12 x 1 ¼” screws and push the screw through the mounting hole in the flare. Push One rubber spacer onto the screw. Line up the hole previously drilled in the fender with the mounting screw and proceed to screw into the fender . Repeat until all screws and have been installed. FIG 4
CAUTION Do Not Over- tighten the screws. Over- tightening will result in stress cracks
5. Place one screw cover on each of the screw cover bases and firmly press to install.
6. Re-install the factory marker lights using the supplied # 8 x 1 ½ “screws.
7. Repeat steps 1 through 6 for the other side.
8. For YJ: Attach the new stone guards to the vehicle using the factory screws removed in step 1 (Discard stone guards for CJ7/8 and Scrambler Jeeps.)
Rear Flares
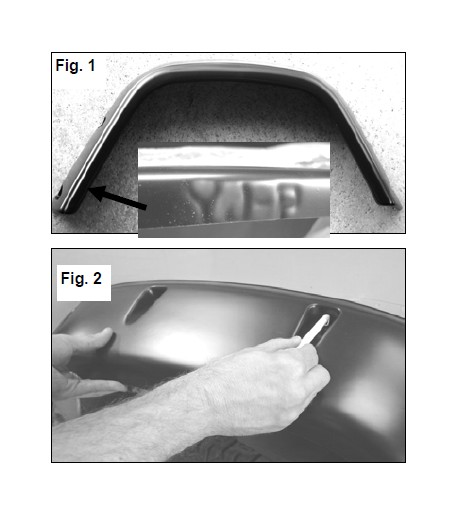
IMPORTANT: Look for an embossed mark on the front edge of the rear flares. Make sure that you are installing the Passenger side flare on the Passenger side of the Jeep and vice-versa. FIG 1
1 . Align the new rear flare with the rear vertical seam of the factory fender. For YJ only align the other end of the flare with the bottom edge of the bodywork. For CJ7 and Scrambler Jeeps Center the fender flares over the wheel opening and align the bottom edges with the bodywork. All models Mark the mounting holes using the flares as a guide. FIG 2
2. Install the Rear Flares following the same steps as the front flares. (Steps 2 through 5 above)
3. Repeat for the other side.
IMPORTANT: DO NOT OVER-TIGHTEN THE MOUNTING SCREWS. Over-tightening the screws will result in stress fractures.
TRIMMING JEEP FENDERS For YJ ONLY with 33” or larger Tires
1. Measure 4 3/4 “ from the back vertical seam of the front fender towards front of vehicle and mark this position at the bottom edge of the fender. From this measurement draw a straight line up tangent to the radius of the vehicle wheel well opening. Cut away metal using an air nibbler or other suitable tool. Coat this area with a rust inhibitor to prevent rusting. FIG 3
Proceed to the rear fender. FIG 4
2. Draw a line tangent to the radius of the rear wheel well, down through the factory screw mounting hole and ending at lower edge of fender. Repeat this procedure for the front of the wheel arch. Cut away metal using an air nibbler or other suitable tool. Coat this area with a rust inhibitor to prevent rusting.
Repeat for the other side. THIS COMPLETES THE INSTALLATION