Installation Time
(approx) 1 Hour
Difficulty Level:
Simple installation for anyone.
FREE 2 or 3-Day Delivery on Orders $119+ Details
$854.99 (kit)
FREE Shipping Market Price $1,110.99 You Save 23% ($256.00)Add Local Shop Installation
Saved - View your saved items
We're sorry. We couldn't save this product at this time.
or use
Barricade 9,500 lb. Winch with Synthetic Rope (Universal; Some Adaptation May Be Required)
Barricade HD Rear Bumper (20-23 Jeep Gladiator JT)
Smittybilt X2O Gen2 10K Waterproof 10,000 lb. Winch with Synthetic Rope and Wireless Control (Universal; Some Adaptation May Be Required)
Merideth: If you want a sophisticated yet rugged look to the front end of your 2020 or newer JT Gladiator, this Rugged Ridge Venator Front Bumper will be a great pick. Now, this will be a great addition to your JT if you're looking for a full-width front bumper for added protection while remaining incredibly functional when it comes to clearance and utility.This bumper will feature high-clearance ends for better approach angles, while still offering that full-width protection. Now, the ends will also have cutouts to save on weight to offset any sag that you may get when adding accessories. Now, speaking of accessories, this will feature a built-in winch mount capable of holding a winch up to 12,500 pounds as far as the pulling capacity is concerned, shackle mounts with a top hook, and the ability to add a 3/4-inch or 7/8-inch D-ring, as well as octagonal holes to mount up the factory halogen fog lights.And I do want to mention that this will not be compatible with the factory LED lighting, so I would keep that in mind when shopping around. As you can see, this is not going to be your average build when it comes to the construction with a modular designed and muscular stamped steel. Now, the top portion, this will also have a satin black powder coat finish to protect the steel underneath from any corrosion.Now, the lower skid plate will have that bare look for a stylish contrast but will be protected on top from the elements. Now, the winch mount will also attach directly to the frame for a solid mounting point tucked out of the way to maximize airflow to your grille, while offering protection to the winch and the line. This is also going to be completely bolt-on. But as I mentioned, again, this is going to be a modular build, so you will have a little bit more work when it comes to putting the bumper together.When it comes to price, this will come in at roughly $1,000. Now, what I will say when it comes to this bumper is that this is going to have an incredibly sleek appearance compared to other boxy front bumpers while remaining incredibly functional. Now, other choices on the page may not have cutout ends, a multi-functional shackle mount, or a drop-in winch plate like this one does.Now, I think if you're willing to spend the extra couple bucks to get all the bells and whistles that you could want out of a front bumper, then this is going to be a great pick. Install will be a straightforward one-out-of-three wrenches on the difficulty meter, taking you about an hour to get the job done with some basic hand tools. At this point, we can head over to the shop and check on a detailed breakdown of what that install looks like step by step. So that's going to wrap it up for me. Let's go ahead and jump into it.Male Speaker: Tools required for this install include an impact gun, a ratchet, a 17 and 19-millimeter wrench, a pair of needle-nose pliers, an extension, a 7, 13, deep and shallow 17 and 19-millimeter sockets, a swivel adapter, a T45 Torx Bit, and the included Allen wrench. So, our first step to uninstalling our factory bumper is to remove our splash guard. It's held in by eight push clips and two 8-millimeter bolts. So, we'll grab an 8-millimeter socket for our bolts and a clip removal tool for our clips.So our first step is to remove these two 8-millimeter bolts. And now we can remove our push clips. Now, coming back up top right in between our bumper and our grille, we have two more push clips that we have to remove. So once again I'll grab that clip removal tool and pop these out. Next, we can come behind the bumper on the passenger side. We have to disconnect our connector for our fog lights.So we'll press in back here and disconnect our harness. So now staying on the passenger side right by where we disconnected our fog light harness, we can remove this 16-millimeter bolt as well as these two 18-millimeter nuts. Now, for the top nut, we're going to leave that threaded on a few threads just to hold everything in place while we work on the other side.So, we'll take that 16-millimeter socket to remove our first bolt. And then we'll grab our 18-millimeter socket to remove our two nuts. And then once again up top, we're going to leave it on a few threads just to hold everything in place. Now, coming to the inside of our passenger frame rail, we have the same setup with a 16-millimeter bolt and two 18-millimeter nuts.So, once again, we'll grab that 16-millimeter socket for the bolt, and then we'll swap out to our 18-millimeter socket for our nuts. And on the inside of our frame rail, we can fully remove both of our nuts since we have that one supporting the weight on the other side. And then we can slide our bracket out of the way. And once we're done with the passenger side, we can repeat those same steps on the driver side.So now we can go ahead and remove our two nuts that we have left supporting the bumper and fully remove it. I'll set our bracket off to the side. So now with our factory bumper removed, the last thing we need to do on the truck is to remove this bracket at the bottom. It's held in by a 16-millimeter bolt on each side, so I'm going to grab a 16-millimeter socket to remove these two bolts. So, now we just have a couple more things we have to get off of our factory bumper. We have to remove our two fog lights, as well as our fog light harness.Now, our harness runs underneath of this metal bracket. So we have two bolts on each side. They're going to be 13-millimeters, so we can remove those with a 13-millimeter socket, remove our bracket, and then get our clip removal tool to pop out all the clips that are holding in our harness. So now we can remove our harness. So, we'll start over here with our connector. There's a tab on the top that we can press in and pull out. And then we can grab our clip tool and start popping out our clips. You can move this out of the way to give yourself a little more clearance. And then we can continue on the other side, starting with our harness. And now we can remove the three screws that hold in our fog light. If you have a non-sport model, there's going to be four. We'll grab a T20 Torx Bit to take these out. And then we can do that same thing on the other side. So our first step is to install our winch tray. Now, this is going to go into the holes on the side where our L brackets were for our frame horns.We have an M10 bolt with a flat washer that's going to be coming through the side into that hole. So we're going to come up from the bottom here, and then we can hand thread our bolts into place. So now we can just line up the holes in our winch tray with the holes in our frame horn, and then we can take a 17-millimeter socket to tighten down our bolts. So our next step is to assemble our fog light brackets. So we're going be popping off our factory bracket. Each of these little posts have two tabs on either side that we need to press in to be able to pop our bracket off. So I'm going grab some needle-nose pliers. Then we can pop our factory bracket off, and we'll be installing our new one.Next, we can install the other side of our bracket. Now, our fog light is labeled top here. On our bracket, we have two sets of holes, one that the two are pretty close and one where they're spread out. The two that are close are going be going towards the top. So that's going to come down this way, and then we're going be using our M4 hardware. So, we'll get our button head bolt with a flat washer that's going to go through the top.And then on the backside, we can add another flat washer to each side followed by our M4 locking nut. And then we can grab our included Allen wrench on our bolt side and then a 7-millimeter socket for our nut side to tighten this down. And then we can repeat that same process for our other fog light.So our next step is to install our tow hook, as well as our fog light. Now, the tow hook's going to go on the outside here. We're going to be putting four M12 bolts with flat washers through the front side. For our fog light, this is going to go on the outside of our frame horn. We have two threaded holes here to receive those bolts. And then for the other side, we have two more flat washers and a lock nut for both sides.So, we'll get two bolts to hold that in and then we can start threading them into our fog light bracket. Now, once again, on our inside bolts, we're going to be coming in with another flat washer, as well as our M12 locking nut. So now once we have our hardware hand tight, we can grab a 19-millimeter socket for our bolt side and a 19-millimeter wrench for a nut side. Going to get my knee on this just to line everything up. We do have that welded nut on the backside of our fog light bracket, so we don't have to get our wrench on our outside bolts. And then we can do that same thing on the other side.So our next step is to install our winch tray support bracket. Now, these ends, they're going to be pointed out towards the front of the car. We're going to be coming up from behind our winch tray, and then we're going be using our M10 bolts with our M10 flat washer. And on the other side, another M10 flat washer and then an M10 locking nut.Now, before we tighten down our hardware on our winch tray support bracket, we're going to install our lower support bracket. Now, there's a side with one hole and a side with two holes. The two holes is going to match up to our winch support brackets. Just going to slide right underneath like that. Then we're going to be using the same M10 bolts with our M10 flat washers going through. And then we have a bracket with two welded nuts, as well as a bracket with one welded nut for the other side. That's going to go up into the bottom slot of our frame, and then we can run our bolts through and thread them in. So we've got our bolt with our washer, so one through on each side just to hold it into place, and then we can slide our bracket up into place and thread our bolt through. And then we can grab our little bracket with the one welded nut and install that onto our outside bolt. And then we can grab our 17-millimeter socket to tighten everything down.And now we can tighten that bolt on the outside of our frame as well. And then we'll repeat that same process on the other side. And now once we have our lower brackets installed and tightened down, we can come back up top to our winch tray bracket and tighten down all of our hardware. So I've got a 17-millimeter socket for our bolt side and a 17-millimeter wrench for our nut side. Next, we can install our upper brackets. Now, we have three holes. We want the two holes pointed outside and the one hole on the inside. And then our bracket here where our bolt's going go through is going to go into that hole where we took our factory L bracket off of our frame horn. And then we're just going to be installing another M10 bolt with an M10 flat washer.Now, to tighten down our bolt, I'm using a little bit of an extension with a swivel adapter and a shallow 17 because this back peg of our fog light prevents us from getting on there straight. So we'll just hold our bracket in place and tighten that down. And then we can do that same thing on the other side. So next we can install the lower main piece of our bumper. We have these two tabs that are going to go over our tabs here.We're going to put an M10 bolt with an M10 flat washer through the top on both sides. And then in our lower brackets, we'll be installing that same hardware on both sides. So, first, we'll get our two bolts going through the top. I'll just get them started. So now with our bolts installed up top, we have two more bolt holes at the bottom that are going to mount into our lower brackets that we installed.They have that threaded hole at the front side, so we can just raise it up, grab that same M10 bolt with an M10 flat washer, and thread it into our hole. So now once we have both of our bolts on the bottom hand tight, we can take our 17-millimeter socket to tighten these down. And now coming back up top, we can tighten down our remaining two bolts using our 17-millimeter socket.Next up, we can install our main upper piece of our bumper. So we'll slide that right behind our tow hooks, and then we're going to be using our button head Torx bolts to bolt this down. And then we can grab our T45 Torx Bit to tighten these down. So next we can install our two corner pieces. Now, this side up here is going to slide in between these two pieces of metal.And then on the bottom, we're going to go on the bottom side of our under tray. And then we can take another one of our button head Torx bolts, thread that in through the top. Now, on the bottom side, we're going to be taking another one of our button head bolts with our flat washer, putting it up through the bottom, and then grab another flat washer. And then we can put our locking nut on top. And then we'll do that same thing for our other bottom hole.And now we can come back up top and take our T45 Torx Bit to tighten down our top bolts. And then on the bottom, we're going to do that same thing, except we'll have a 17-millimeter wrench for our nut. And then we can do that same thing on the other side. So next we can install our little fog light bucket. Now, this is stamped with R or L on it. The right is going to be the passenger side and the left's going to be the driver side. So we can just line this up and press it in.So now the last thing we have to do is reconnect our fog light harness. So first we're going to run our driver-side plug in to our other side. So I'm just going to go right down, tuck behind this little skid plate, just keep it out of the way, and then we'll plug in our main connector and then plug in our fog light. And then we'll plug in the other fog light on the other side the same way.So that'll wrap up this review and install of the Rugged Ridge Venator Front Bumper for your 2020 and newer Jeep Gladiator JT. Thank you for watching. And, for all things Gladiator, keep it right here at extremeterrain.com.
Subscribe to our YouTube Channel
Features, Description, Reviews, Q&A, Specs & Installation
Brand | Rugged Ridge |
Bumper Type | Modular |
Bumper Material | Steel |
Bumper Finish | Black |
Bumper Winch Mount | Winch Mount |
Bumper Fog Light Fitment | Factory |
Bumper Location | Front |
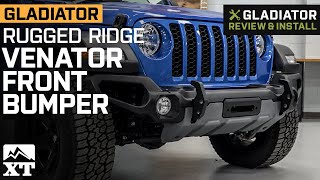
Enhances Style and Protection. If you want to make your Gladiator’s front end more appealing, then equip it with this Rugged Ridge Venator Front Bumper. Unlike other bumpers in the market, this one sports well-defined contours and chiseled facets that greatly complement your truck’s rugged build. While this bumper is heavily invested in style, it doesn’t fall short in protecting your vehicle’s front end from damaging road debris.
Light Mounts Included. This Venator front bumper includes light mounts. Its octagonal pockets are designed to accommodate your factory lights.
Sturdy Construction. For reliable performance, this front bumper is constructed with muscular stamped steel. This helps boost your truck’s front end protection without you worrying about damages and debris. Furthermore, it is completed with a powder-coat finish to resist rust and corrosion.
Easy Bolt-On Installation. If you’re geared with light-to-moderate mechanical skills, you’ll find this front bumper easy to install. Built with a bolt-on design, you can directly mount each component to your truck’s factory location points.
Backed by a Limited 5-Year Warranty. For quality assurance, this product is backed by a limited 5-year warranty. However, this warranty will be considered void if the defects are caused by improper installation, water, alteration, misuse, improper maintenance, normal wear and tear, shipping mishaps, accidents, theft, vandalism, neglect, or intentional damage. For more warranty information, please visit the official Rugged Ridge website.
Application. The Rugged Ridge Venator Front Bumper is designed to fit 2020-2023 Jeep Gladiator JTs, excluding Mojave models.
Fitment:
Rugged Ridge 11549.42
CA Residents: WARNING: Cancer and Reproductive Harm - www.P65Warnings.ca.gov
Installation Info
Installation Time
(approx) 1 Hour
Difficulty Level:
Simple installation for anyone.
What's in the Box
10 More Questions