Installation Time
(approx) 2 Hours
Difficulty Level:
Light to Moderate mechanical skill required.
Installation Guides
FREE 2 or 3-Day Delivery on Orders $119+ Details
$176.95 (kit)
FREE Shipping Market Price $202.99 You Save 13% ($26.04)Saved - View your saved items
We're sorry. We couldn't save this product at this time.
or use
Merideth: If you want an easier way to disconnect your sway bar end links on the trail for your 2020 or newer JT Gladiator, these JKS Manufacturing Quicker Disconnect Sway Bar End Links for 2.5 inches to 6 inches of lift will be a great solution. Now, disconnecting your front sway bar end links at the trailhead can usually be a pain. However, having links disconnected offers a ton of well-needed travel off-road, so having an easy way to take them off is a mod that most JT owners really look into. Now, this option by JKS has made it incredibly easy to do it, so you're ready for the trail within minutes, and don't need any tools to get it done, making your life a whole lot easier. I do want to reiterate that this set will be for JT owners with 2.5 inches to 6 inches of lift, so these will be adjustable if you are within those parameters, and you will be able to fine-tune these to your personal preference.Now, this will feature a pin-style attachment, with one anchor to the sway bar itself, and two places to mount it, whether you want your sway bar disconnected or not. Now, once you're ready to disconnect them, all you have to do is pull one of these pins. These are going to keep the sway bar end link on the post that's mounted to the axle. And then you have to just slide the sway bar end link off, and secure it to this upper bracket, and you can put the pin back on to secure them. Now, this pin is going to be very durable. It is spring-loaded, so you can rest assured that these are going to stay in place no matter where you have that your sway bar end links mounted up. Now, again, from simply disconnecting these, you will gain a lot more travel than you had before, upping the capability of your JT. And when you're finished, all you have to do is slide it off this mount, pull it down and mount it up to the post, and reinstall that pin, for comfortable street driving.Now, these will be made of a heavy-duty steel construction, with a nice black powder coat all over the sway bar end link, which is going to be tough and able to hold up to standard street wear and trail abuse, as well as resist rust very well. Now, the links will also feature self-aligning spherical bushings, and adjustability when it comes to height, for tailored fitment for any setup. These will also have grease fittings on the front, on either side, to maintain the life of the end link over time, and will be completely bolt-on, with no modification required.Now, this kit will be right around $225, which I think isn't bad for what you're getting. Now, the pure benefit of being able to disconnect your sway bar end links quickly and very easily with no tools is worth it in itself, but the added adjustability, strength, and maintenance functions add that extra bonus. Now, compared to others, these are gonna bring a lot to the table, being more of a premium option, so I think if you want an end link with a couple more bells and whistles to dial in your sway bar angles and make your life a whole lot easier, then this is gonna be a great pick.Now, install is going to be a lighter 2 out of 3 wrenches on the difficulty meter, and should take you about two hours to get the job done. But once they're on and everything is mounted up, like I said, it's only gonna take you a couple minutes to get these disconnected at the trailhead. Now, speaking of the install, one of our customers has actually installed this on their JT, and is gonna walk you through what that process looks like, broken down step by step, to get it on yours at home. So, that's gonna wrap it up for me. Let's go ahead and get into the install.Man: All right. So, for the tools used on this job was, in no particular order, the vise grips, to help pry off that bracket we didn't need, no longer needed on the passenger side. A metal cutoff tool, with a metal cutoff blade, 19-millimeter open-end wrench and socket, for the installation of new parts, 18-millimeter open-end wrench and socket, to remove the old parts, a ratcheting wrench, half-inch open-end wrench and socket, to install the retaining brackets on the coil spring housing, to hold the Quicker Disconnects when not in use. I used the diags to take off that little plastic piece that was using the hole, a torque wrench, to torque down the bolts, which, all of them seem to be 65 foot-pounds of torque, a grease gun, to grease up the new polyurethane bushings, and I believe that is it.All right. So, we are here to install the JKS Quicker Disconnects. Right now, I have installed the sway bar end links from the AEV 2.5-inch lift for a Jeep Gladiator. So, we're gonna take this piece off right here. There is one 18-millimeter bolt down here, and then another 18-millimeter nut right here that we'll take off to remove this piece. Might help if I go the right way. Had it right the first time. I feel like this should be a lot easier to get off than it is right now. All right. So, that one's done. And start with the back. All right. And, easy as that.All right. So, here we've reached the point of no return. We are going to cut this off, and try to follow this circle right here, the best we can. Here's where I have a angle grinder with the metal cutoff tool. It's probably a little too big, being 4.5-inch blade, to get in this tight area, but I am going to use this tool to cut. And, here goes nothing. All right. Obviously, that is getting pretty hot, and that's why I put the towel down there to protect everything. I still got a little bit to go. Not too much. Hopefully my head's not too bad in the way when I've taken that video, and I will keep going. And then I'm gonna use the same cutoff tool to kind of polish the end a little bit, make sure it looks nicer than what I'm leaving it right now.I'm also just trying to wiggle it free a little bit, so I can have a little bit more space in there. And there we go. Like I said, I'm gonna go change the bit on this, from a metal cutoff tool to an actual grinder, to smoothen that out just a tiny bit. All right. So, as I said, I cut that off. It's not the prettiest right now. And I'm going to be using the same tool with an actual grinder, to try to smoothen out those edges just a tiny bit. I'm actually going to change the blade again. All right. Using the vise grips again, to try to get this little piece off. All right. My tool, this is, I believe, the best I'm gonna get it. It's not the smoothest, but it will definitely be out of the way for me to get the quick disconnect off when the time is ready. So, I'm going to go grab a can of Rust-Oleum real quick, and spray paint that so I don't have any issues later with some rust.So, I stated before, the 9/16 Allen head fits in this hole very well. And I'm gonna be using that to hold it while I tighten the bolt. Now, that's getting a little tighter. They recommend you having this hole be as close to horizontal to the ground as possible, so, gonna try to keep it there, as much as I can. All right. And there is that pin.All right. So, one thing I didn't show earlier was me removing the other sway bar link on the driver side. Much easier than the first, and the reason I didn't show that is because I actually lost it on the trail. So, hence the reason I bought the JKS Quicker Disconnects after the lift. I guess I missed that bolt trying to retighten, which is obviously very important to do. So, now I'm going to be installing the long Quicker Disconnect piece, along with the nut right here. And according to the directions, the male part of this piece faces in towards the frame, as seen by the picture. Again, tighten these down to 65 foot-pounds of torque, and that will be much easier, as I can actually get a torque wrench in here. Again, it's a 19-millimeter on one side, and the hex key, through the hole in the other, to tighten it down. One thing I am noticing is I should actually be using a deep 19, as the bolt is starting to come through. So, I will be changing out to a deep 19, to finish this off and torque it down.Okay. Well, something to add to the list is a deep 19. If you'd like to do this the easier way, I would recommend getting one of those. If not, the shallow will work, just not as nice. So, just be careful about that. Again, set it to 65 foot-pounds of torque. Okay. And it is torqued. Spacer on. We are good to go. All right. And, again, the metal sleeve installed, the urethane bushing right here. We will be installing that on the actual sway bar, right there, with the bolt, washer on this side, bushing against the sway bar washer, nut. Just loosely, again, installing that, so, it's just hanging there. All right. So, we're going to torque these, both sides of these down, to 65 foot-pounds of torque again, so we'll get this started with just a regular ratchet and a wrench, both 19-millimeter. Okay. So, now that that's mostly tight, let's get my torque wrench out, and... Should probably have an extension here. Okay. Again, we're gonna do that on the passenger side as well.Okay. Mostly tightened. Get on the torque wrench. All right. Also torqued down. So, now I'm gonna install these pins, and connect the sway bar to the male end of the disconnect down here. So, just like so. Clip it in. Put it in. And clip it in. Yeah, the retention bracket is gonna mount like so. I have a plastic bracket in the way, that I will be taking out, and then putting this cord in front of the bracket so it runs along this little corner right here, out of the way of everything up there, and it should line up fairly well with where it was before, and out of the way, which is what they're trying to keep it. So, I'll be using little diags to cut this, right here. Okay.For this, I will be using a half-inch ratchet, to go with the smaller bolts and nut provided. So, you will need a half-inch wrench and a half-inch ratchet. That's pretty tight back there, so I [inaudible 00:19:44] So, change of plans. I should put the bolt in on the inside, up there. I'm holding it, and I will use the provided nut and washer, and tighten this down, at least get it started. Okay. I will say, this is probably a little bit easier without gloves. Okay. All right. Now that that's started, if I knew where I put my half-inch wrench... Put that on the inside. Okay. So, there's one. We're gonna do the same exact thing on the other side.As you can see on this side, there is no plastic retaining clip, so this one should be a little bit easier to install, mostly because I don't have to take that off. It is still going to be a pain in the rear end to get the bolt up there in the coil housing. Tricky, but not impossible. Actually, that's pretty good. Actually, just like the other side. Half-inch wrench. That should tighten it. Okay. All right. So, those are there, and I think they're actually pretty slick, because, and this would be a lot easier if I had the tires on, but for video purposes, wanted to show you what it looked like. Disconnected both sides. Put that up. And now, they're in, the sway bar is out of the way, so is this, for off-roading. That is all of the installation for this project.Merideth: So, that's gonna wrap it up for my review and the install of these JKS Manufacturing Quicker Disconnect Sway Bar End Links for the front, for 2.5 to 6 inches of lift, fitting all 2020 and newer JT Gladiators. And remember, for all things Gladiator, keep it right here at extremeterrain.com.
Subscribe to our YouTube Channel
Features, Description, Reviews, Q&A, Specs & Installation
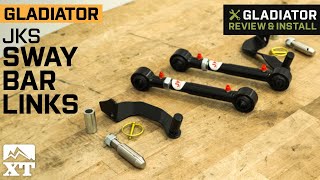
Greater Wheel Travel. Improve your Gladiator's off-road performance by installing these JKS Sway Bar Disconnects for 2.50-6-Inch Lift. These sway bar disconnects help maintain your tires in contact with the ground, resulting in greater wheel travel.
Quick Disconnect Design. JKS made these sway bar disconnects with a quick disconnect design. This allows you to connect or disconnect your sway bars depending on your driving needs.
Heavy-Duty Construction. For extreme toughness, these sway bar disconnects are constructed using heavy-duty materials. With their durable build, they are able to withstand your Jeep’s tough driving demands. Furthermore, each disconnect is coated with a black finish to resist rust and corrosion.
Self-Align Spherical Bushings. To guarantee excellent performance, these sway bar disconnects come with self-align spherical bushings. With these bushings, you’ll be able to achieve a more flexible suspension system.
Bolt-On Installation. Setting up these sway bar disconnects offers a bolt-on process. They can be installed to your sway bars and axle housing using a few basic hand tools. To ensure proper installation, a moderate to a high level of mechanical expertise is required.
Backed by a Limited Lifetime Warranty. JKS is backing this product with a limited lifetime warranty. However, the warranty may be considered void if you are unable to meet their warranty terms and conditions. For more information, you may visit their official website.
Application. These JKS Quicker Sway Bar Disconnects for 2.50 to 6-Inch Lift are created to fit 2020-2023 Jeep Gladiator JT models.
Fitment:
JKS Manufacturing JKS2033
CA Residents: WARNING: Cancer and Reproductive Harm - www.P65Warnings.ca.gov
Installation Info
Installation Time
(approx) 2 Hours
Difficulty Level:
Light to Moderate mechanical skill required.
Installation Guides
What's in the Box
10 More Questions