


Installation Time
(approx) 2 Hours
Difficulty Level:
Light to Moderate mechanical skill required.
Installation Guides
No guide available for this part yet.
 FREE 1 to 3-Day Delivery on Orders $149+ Details


$449.95 set
CONFIRM THIS FITS YOUR VEHICLE!
Saved - View your saved items
We're sorry. We couldn't save this product at this time.
or use

Features, Description, Reviews, Q&A, Specs & Installation
| Brand | Flowmaster |
| Exhaust System Type | Cat-Back System |
| Exhaust Tip Finish | No Tips |
| Exhaust Tubing Diameter | 3.00 Inch |
| Exhaust Material | Stainless Steel |
| Exhaust Tip Outlet Style | No Tip |
| Exhaust Exit Location | Turn Down |
| Exhaust Loudness | Moderate |
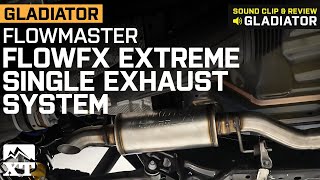
Performance Exhaust Upgrade. The Flowmaster FlowFx Extreme Single Exhaust System Turn Down is designed to enhance the sound and performance of the Jeep Gladiator JT with a 3.6L engine. It delivers a deep, aggressive tone and improves exhaust flow, which can aid in increasing engine power and efficiency during driving.
Construction and Appearance. Crafted from durable 409 stainless steel with 3.0-inch mandrel-bent tubing, this system ensures maximum exhaust flow and resistance to corrosion. The Flow FX absorption-style muffler features a turndown dump exit designed for improved ground clearance and a refined aggressive sound.
Installation. Installation is straightforward, utilizing factory hanger locations and including all necessary hardware for a hassle-free, direct-fit setup without any drilling or modifications required.
Warranty. This exhaust system is backed by a lifetime limited warranty, providing long-term assurance against manufacturing defects.
Application. Specifically designed to fit 2020-2026 Jeep Gladiator JT models equipped with the 3.6L V6 engine, ensuring precise compatibility and optimal performance for these vehicles.
Flowmaster 717969
CA Residents:  WARNING: Cancer and Reproductive Harm - www.P65Warnings.ca.gov
Installation Info
Installation Time
(approx) 2 Hours
Difficulty Level:
Light to Moderate mechanical skill required.
Installation Guides
No guide available for this part yet.
What's in the Box
Sponsored