 FREE 1 to 3-Day Delivery on Orders $149+ Details

How to Install Rough Country Front Stainless Steel Brakelines for 4-6 in. Lift (87-06 Jeep Wrangler YJ & TJ) on your Jeep Wrangler
Installation Time
45 minutes
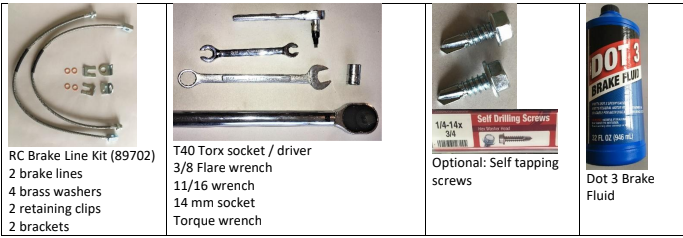
Tools Required
- Wheel Chucks
- Jack
- Lug Wrench
- 3/8 Flare Wrench
- 11/16 or 17mm Wrench
- 14mm Socket
- Torque Wrench
- T40 Torx Socket /Driver
- Brake Fluid
- Brake Line Bleeding Kit

Shop Parts in this Guide
Note: This installation is on a 1995 Jeep Wrangler YJ with a 2.5-inch lift. This should be similar for all Wranglers in the YJ line (1987 – 1995).
1. Prepare car: Park on a clean, level and dry surface. Put transmission in park, engage emergency brake, chuck back wheels. Loosen lug nuts. Lift car with jack so one tire is off the ground. Remove lug nuts and remove tire.
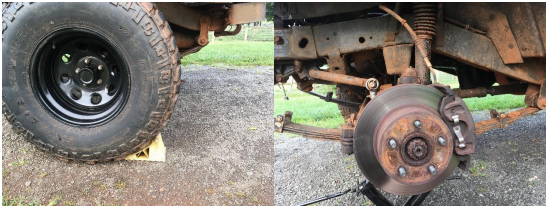
2. Remove the old brake line from the brake caliper using a 14mm socket. Keep the bolt (banjo bolt) that is removed. This bolt will be reused. Carefully catch all brake fluid that leaks from the brake line and caliper.

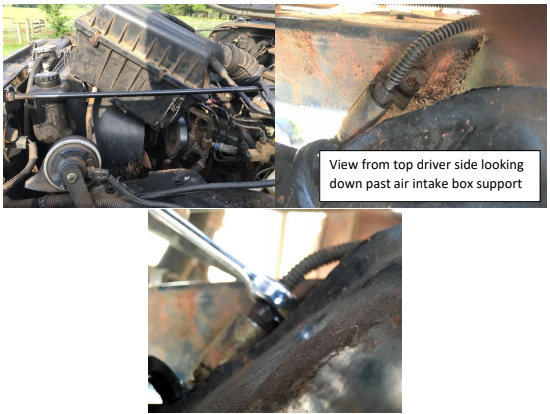
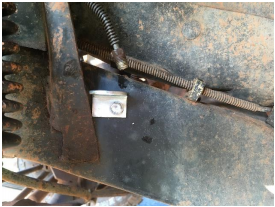
3. Use 3/8 Flare wrench to remove the solid brake line from the bracket on the frame just in front of the shock absorber mount. You will likely need to move the air intake box out of the way to access this brake line from above on the driver’s side. Clean up any spilt brake fluid.
4. Remove old flexible brake line and bracket. Bracket is held to frame with a T40 Torx bolt. I was unable to remove the bolt on the driver’s side, so I simply removed the old bracket with a hammer and chisel. You could also leave the bracket and simply cut off the flexible line.
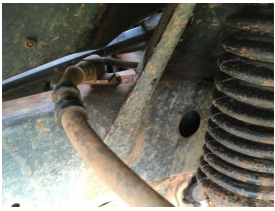
5. If you were able to remove the T40 bolt and old bracket, you may install the new bracket in the same location with the T40 Torx bolt. Otherwise, find a good location to mount the bracket that may be reached by the solid brake line. Use a self-tapping screw to mount the bracket to the frame in the location you have determined. It is possible on the driver’s side to carefully reroute the solid brake line to a location on the frame behind the shock absorber mount. This new location allows for a more direct routing of the new brake line between the bracket and caliper. On the passenger side, the solid brake line will not reach to the rear of the shock absorber. My lift came with a short brake line extension that allowed me to mount behind the shock on the passenger side.
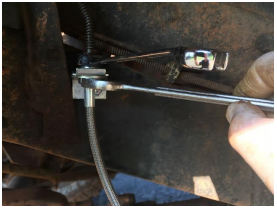
6. Insert the new brake line from below the bracket and slide retaining clip into place on top of the bracket to hold the new brake line to the bracket. Attach the solid brake line to the new brake line. Use 3/8 flare wrench on the solid brake line (top) and 11/16 or 17mm wrench on new brake line (bottom) to tighten the connection. Torque to 25 ft-lbs. (I don’t know how to use a torque wrench here, so I tightened by hand until very tight.)
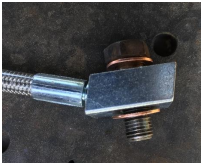
7. Clean the banjo bolt and caliper surface. Attach the new brake line to the caliper. Be sure to use two of the new brass washers on each brake line. Place in this order: caliper-washer-brake line-washer-banjo bolt. Torque the banjo bolt to 23 ft –lbs. Correcting torque on this bolt is very important to prevent a leak.
8. Bleed the brake lines. Clean any spilt brake fluid (brake fluid will quickly remove paint from frame). Check all connections for leaks and tighten if needed. Top off brake fluid.
9. Replace tires, hand tightened the lug nuts, lower vehicle off the jack, Torque lug nuts to 75 ft –lbs.
10. Repeat on other side.
Installation Instructions provided by ExtremeTerrain Customer W.D. McRae on 07/28/2018.

