Talk to a Wrangler Sales Tech
1-877-870-8556
M-F 8:30A-11P, Sat-Sun 8:30A-9P
Logo Image
$20K Sweeps! 10 Chances to Win! Enter Daily >

C&L Super Sport HD Cross-Drilled and Slotted Rotors; Front Pair (07-18 Jeep Wrangler JK)

Item J138716
Verify parts fit and get product recommendations.
Wrangler Sales Techs: Connect Now M-F 8:30A-11P, Sat-Sun 8:30A-9P
$0.00
Our Price

$99.99 (pair)

FREE Shipping on orders over $119 Market Price $117.99 You Save 15% ($18.00) Up to 10% off for Military & First Responders! See Details

Will this fit your Vehicle?

Select a different vehicle Help?
Update or Change Vehicle
Ship to: Ashburn - 20149
Sorry, please enter a valid US or CA postal code
We're sorry, zip can't be updated at this time.
    Create a list
    Add to New List

    Saved - View your saved items

    We're sorry. We couldn't save this product at this time.

    or use

      Product Videos

      Merideth: Hey, guys. So, today we're checking out the C&L Super Sport HD Cross-Drilled and Slotted Front Rotors, fitting all 2007 to 2018 JK Wranglers. So, if you're in search of some better braking performance and a sporty appearance for your JK at a pretty affordable price point, this kit by C&L will be a good choice to take a look into. Now, this set of rotors will be great for really any JK owner who wants to enhance their braking power, whether that's driving on the street or when you're taking your Jeep offroad. This kit will come with the front two rotors with a five-by-five bolt pattern, being a direct replacement to your factory ones, and will come with a slotted and drilled surface. That's going to be the big upgrade in comparison to your factory plain-faced rotor.Now, the holes and slots will offer better cooling to your brakes, which is especially useful if you're working them really hard, like braking at higher speeds. And they're also going to make sure that the surface of the rotor is free from any moisture, gases, or any dust, sweeping it away and keeping it clean, for optimized contact between the pad and the rotor. Now, the pair will also have a high-quality construction, made of heavy-duty materials, to resist any cracking or warping, and will be mill-balanced, to eliminate any vibration, noise, or any uneven wear. Not to mention these are just going to look cool, adding a sporty look to the inside of that wheel well area.I would like to mention that this kit is just for the front, so if you want to upgrade the back as well, we do have those available on the site, but you will be looking about double the price point now. Nonetheless, for these slotted and drilled rotors, these are going to be generally affordable, at roughly $125, and when comparing these to other choices on the page, you'll see that some other options may be set up a little bit differently. So, some may have slots on the rotor, instead of this option that will have both drilled holes and slots. They may have a blank-face rotor, which is very similar to your stock setup, and then you'll even see some big brake kits. However, I think if you are in search of an affordable kit, and you like the look and the performance that a drilled and slotted rotor offers, then this is gonna be a great kit.Now, install is going to be a two out of three wrenches on the difficulty meter, taking you about two hours to get the job done. And speaking of the install, one of our customers here has completed this on their Jeep, and is gonna walk you through that process step by step. So that's gonna wrap it up for my review. Let's go ahead and get into the install.Man: All right. Let's talk a little bit about some of the tools we're gonna need. I got a torque wrench. That's really when you're putting the wheel back on. I got a lug nut wrench. I got a half-inch breaker bar. I got a little bit of leverage. Sometimes you might need that to get those lug nuts off, depending on, you know, who put them on. I got a deep 19 for the lug nuts. And then I got a shallow 19 as well for the lug nuts. Moving on to what you need for the brakes, I have a couple different ratchets. I have a 3/8 and half-inch. Again, half-inch, gonna be for the 20-millimeter, which is holding the calipers.The 13 is holding the piston. I got a little lever here, just in case I need to pop something out. Another 13. Just a open-end box, with a little ratchet here. And then I got this handy-dandy piston compressor tool. It's a life-saver. If you don't have that, C clamps work fine. I got a wire brush, to kind of clean things up. Loctite, for some of the bolts that go back on. A little bit of persuasion, or a hammer, mallet, in case anything needs to get off a little bit easier. Some lubricant, and some handy-dandy nitrate gloves, to keep your hands from this, getting dirty. So, that's the tools that I'm gonna be using for the brakes.As you can see, I'm gonna do this in the garage. Doesn't matter if you do it in the garage or outside, as long as you have some proper space. But today, I'm gonna work in the garage. First thing I like to do before I work on brakes is uncap the brake fluid reservoir. This will allow any pressure that's in the system to be released when I'm compressing the pistons of the brake calipers.So, one of the first things we're gonna do is locate the jacking points on your vehicle. This could be found in your owner's manual, on page 98, at least for mine, on the 2013. Now that those are loosened, I'm gonna proceed with jacking up the vehicle. Now that the vehicle's raised off the ground a couple inches, I could proceed with removing all of the lug nuts. Sometimes these wheels are a little stuck to the hub, so some of you might have to bump it, maybe pound it with a little mallet. See what happens with this one. Came off pretty easily.Okay, so, this is the rotor and pad that we're gonna replace. As you could see, my vehicle has a hub spacer on, a wheel spacer on it. Yours might not. Trying to show, kind of, the old version of the rotors. Little bit of grooving on it. Not so much meat left on the pad. So, we're gonna proceed with taking off the rotor, but in my case I have to take off the wheel spacer first. Like I mentioned, I have wheel spacers on here. Most vehicles don't have that. Definitely not stock. So I'm gonna have to remove these nuts first. So, I'm gonna use an impact wrench, because when I put these nuts on, I used Loctite, so they're gonna be pretty tough to get off.Now this exposes the rotor, which we can take off, but before we do, we have to remove the caliper. Caliper has to come back, then the rotor could come off. Before we get to remove the rotor, we need to remove the caliper bracket, which holds in the caliper. In order to do that, we first have to take out the caliper. There's two bolts that go in here, that hold the caliper into the caliper bracket, so we need to loosen those first. You could do that with a 13-millimeter socket, or an open-end box wrench. And I'm using a small, thin 15-millimeter wrench, just to hold this nut back. As you can see, both are turning. Just wanna hold that back while I take out that nut. These open-end box wrenches with the ratchet are life-savers. Once I finish the top one, I will move on to the bottom. Same sort of procedure.Okay. So, these nuts are out. As you can see, there was a little bit of Loctite on there, so we just have to make sure that we put Loctite back on when we're reinstalling, and you can also see how now the caliper is away from the caliper bracket. So, now we're gonna start removing the caliper. As you can see, I have an extra jack stand here. This really is just to hold the caliper from dangling. You can use a string, a wire hanger, whatever you have handy. I just have an extra jack stand, which makes it a little easier, and you just don't wanna put a lot of pressure on the brake hose. I'm also gonna use this little pry bar, just to pull back on the caliper, just make it a little easier to pop out. If you don't have a pry bar, you can use a screwdriver, or you could just use some old-fashioned [inaudible 00:09:24]Now the caliper is removed from the caliper bracket. Just gotta get this out of the way a little bit more. And I'm gonna proceed with taking off the pads. Pads, they've still got some life left, but probably best to replace them at this point. And we have a Shim. We gotta check the box to make sure that we have a shim, otherwise we might need to reuse that. And these are those little clips that were in the box as well. We'll replace these with the new ones. So, on to removing the caliper bracket.So, the top one doesn't really have a lot of clearance to put my socket in there, so I'm gonna try to use an open-end box wrench, and just some brute force. There we go. Okay. So, after a handful of minutes slowly taking off this top bolt, I can get it off. You can see that caliber bracket pops right off, and my rotor's popping right off. Again, sometimes these rotors are rusted on. Might have to bang it. If you have a mallet, that comes in handy. Now we'll take a look at this rotor and compare it to the new one.Okay. So, here's the old rotor. We have some grooving on it. You know, obviously a lot of rust. You know, the old one was vented, which is great for front brakes. And here's the new one. Slotted. A little bit of cross-drilling going on. So we should be definitely getting a lot better brake performance out of the vehicle now. Let's also look at the pads for comparison. Obviously a new pad. Very thick. Old pad, not too bad. Still a little bit of life left in it. But definitely the new pad will allow me to not worry for a bunch of miles.Okay. Remember what I said about the brake shims on here. Well, it looks like the new ones already have the shims in place, so we don't have to worry about reusing these old ones. We also have the sensor, brake sensor wear thingy as well. So, we're good on that. So, we'll get that rotor installed, and put those pads on, and the new clips as well.Before we start the process of putting the caliper back on, and the caliper bracket, you can see the piston has been pushed out, doing its job. But in order to put the new pads in, I need to push the piston down. Bunch of ways to do it. Sometimes you can use, like, a C clamp, and just squeeze it down. But I like this caliper service tool. This will compress it for you. So, we'll get that going in a minute. Now that I got some tension on it, you should see, I'm pushing this in, twisting. Caliper should be...or, excuse me, the piston should be just sliding in a little bit.Now that that is compressed, I can go about replacing these things these little clips. Okay. We're gonna put the clips on on the bench. I just took off the old ones. See, kind of, they're rusty. One thing to note, there is a left and a right clip, so make sure you are putting the right ones on the right side. If we look at the profile of the clip... I don't know if you can really see that, profile the clip. There's a longer lip on the bottom part. So, that goes on the bottom of the caliper bracket. However, there's also this little removal clip, and that has to go on the proper side of the bracket. Excuse me, on the outside of the bracket. So, in this case, I have the longer bottom lip. I have the little clip on the outside. That's gonna go on this one here. Whereas this clip will go in this one. So, just make sure you're seating them correctly. And when you're finished, bottom part, that little clip there. Bottom part, little clip there. Same thing on the other side. Make sure that they're seated in correctly, so that the pads can fit.While we're still in the bench, I'm gonna take a little bit of this lube, and get a little bit of this lube, and put it on the inside of these clips. Let me get a little closer. And just squeeze just a little bit on the tip of my finger. Just put it inside here, just so that the pads are not squeaking when they're moving along this caliper. Other thing you might wanna do is use your wire brush, clean up [inaudible 00:14:51] of the threads on the bolts, make sure there's no gunk. And wire brush and clean any parts that are on the caliper, caliper bracket, etc.Next thing I'm gonna do is use some Loctite thread sealer, and put the thread sealer on the threads before I put the caliper bracket back on. Okay. Before I put the caliper bracket back on, I need to put the rotor on. And what I'm probably gonna do is use one of these nuts, just... Well, maybe not. Was gonna use it to hold it in place, but I think it'll be okay. I did put the Loctite on the bolts, caliber bolts. I'm gonna put this over the rotor, and just hand-tighten this in for now. See if I can get a thread or two, just to hold it in place. Looks like I got it, hopefully. Yep. Then I do the bottom. Try to get that thread or two in place before I start cranking it down. Gonna try not to get grease or gunk on the rotors. Don't want to start off squeaky, which I, looks like I already got some on there, so I'm gonna have to wipe that off.All right. So, I'm gonna proceed to tighten these down. All right. Now that I got those sort of tight, I'm gonna use my box wrench to really tighten these guys up. Got the bottom one. Let's get the top. All right. The rotor's in place. And we're good. So, the next step is to get the pads in. But actually, before I do that, I got a little bit of grease on this rotor, and over here too, so I gotta wipe that off. All right. So, I got this pad in. Gonna pop that one in place in the back here. Just slide it in from the back. And then put this one in the front. Remember, the one that has the wear sensor needs to go in the back. Put that in there, squeeze that in. Okay. So, now I got both pads in place. Remember, make sure those points are greased. Probably even put a little grease, some touch points over here, and on the back as well. I'm going to do that next.All right. So, now I'm gonna put the caliper on the bracket over here. The one thing I forgot to mention, aside from just cleaning the caliper, you know, inspecting this rubber boot, rubber, you know, bushing, to see if it's cracked or anything like that is probably the best thing to do, obviously, right now, before you install anything. That way, if you need to replace the caliper, you could do that at this time. So, now that the caliper's slid in, I'm gonna go get those bolts from before. I gotta put some Loctite on them, and tighten them up.All right. So, I got my thin wrench, just to hold back on that inner. Got my 13 open-end box, just to tighten this guy up. Just gonna snug it, and then move on to the bottom. Okay. So, this is the finished product, what it all looks like. So, I'm gonna put everything back together, the wheel on, tighten it all up, get rid of that jack stand, and jack it down, and we should be good to go on this side. The other side is the same procedure. No real differences.Merideth: So, that's gonna wrap it up for my review and the install of the C&L Super Sport HD Cross-Drilled and Slotted Front Rotors, fitting all 2007 to 2018 JK Wranglers. For more videos and products just like this, remember to always keep it right here at extremeterrain.com.

      Product Information

      Features, Description, Reviews, Q&A, Specs & Installation

      Features & Specs

      • Enhanced Braking Capacity
      • Ideal for Street and Off-Road Driving
      • One-Piece Rotors with Drilled Holes and Precision-Milled Slots
      • Vented Vane Design
      • High-Quality Construction
      • Corrosion-Resistant Finish
      • Direct-Fit Replacement Upgrade
      • Front Pair - Driver and Passenger Sides Included
      • Designed for All 2007 to 2018 Jeep Wrangler JK Models

      Description

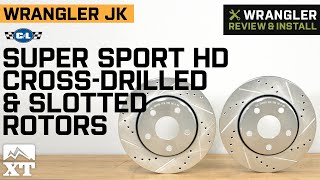
      Enhanced Stopping Power. Experience bolder driving confidence by equipping your JK with these C&L Series Super Sport HD Cross-Drilled and Slotted Front Rotors. This pair of front rotors are engineered with superior dimensional accuracy and excellent design to give you more control in braking operations while reinforcing your Jeep Wrangler’s overall performance.

      High-Quality Construction. These Super Sport HD Cross-Drilled and Slotted Front Rotors are crafted using heavy-duty materials to ensure long service life and powerful performance. These rotors are mill balanced to eliminate vibration, noise, and uneven wear. Moreover, the premium finish provides additional ability to withstand high temperatures and harsh outdoor elements, while adding some accents to your wheels.

      Drilled and Slotted. Engineered for reinforced braking performance, these Super Sport HD Rotors come with drilled holes to provide superior cooling under the most extreme conditions. The precision-milled slots offer consistent contact between the rotor and pad, while significantly reducing harmonic resonance issues. This design combination also facilitates easy sweeping away of gases and dust for enhanced friction. Furthermore, the vented vanes help expel hot gasses more efficiently for enhanced braking performance.

      Bolt-On Installation. These Super Sport HD Drilled and Slotted Rotors install with standard hand tools and moderate mechanical skills. They are designed to directly replace your vehicle’s factory front rotors.

      Application. This pair of C&L Series Super Sport HD Cross-Drilled and Slotted Front Rotors is intended for use on all 2007 to 2018 Jeep Wrangler JK models.

      C&L

      Fitment:

      C&L J138716

      CA Residents: WARNING: Cancer and Reproductive Harm - www.P65Warnings.ca.gov

      Installation & What's in the Box

      Installation Info

      What's in the Box

      • (1) Driver Side Front Rotor
      • (1) Passenger Side Front Rotor
      4.9

      Customer Reviews (23)

        Questions & Answers

        10 More Questions