 FREE 1 to 3-Day Delivery on Orders $119+ Details

How to Install Poison Spyder Dana 30 Bombshell Diff Cover - Black on your Wrangler
Installation Time
30 minutes
Tools Required
- 1/2” (D30 & D44) or 9/16” (D60) box end wrench or socket & ratchet
- Medium shop hammer
- Chisel or pry bar
- 3/8” hex key
- Oil drain pan
- Gasket scraper or wire wheel
- Brake cleaner
- Gear oil
- Teflon tape or pipe thread sealer

Shop Parts in this Guide
Poison Spyder Customs’ Bombshell differential covers are designed to protect your differential’s internals from damage due to menacing trail obstacles. Bombshells prevent cover peel back and fluid loss from broken seals. The design of the Bombshell also protects the bolt heads from trail damage while acting as a ramp, or skid, to help ease you over obstacles. Bombshells are available for Dana 30, Dana 44 (shown below) and Dana 60.
IMPORTANT: Bombshell Diff Covers are thicker than most aftermarket diff covers, and may not be compatible with the stock suspension components on some vehicles. Specifically, we know that the Dana 44 Bombshell can interfere with the stock track bars on Jeep JK (rear and Rubicon front) and TJ (Rubicon front). Fortunately, most aftermarket trac bars allow for more clearance with the differential, and most are compatible with the Dana 44 Bombshell.
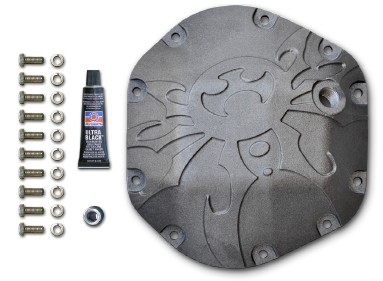
PARTS LIST
(1) Bombshell differential cover
(1) Fill plug
(1) Tube silicon sealant
Hardware for D30 & D44:
(10) 5/16-18 X 7/8” gr8 hex head cap screws
(10) 5/16” gr8 split lock washers
Hardware for D60:
(10) 3/8-16 X 7/8” gr8 hex head cap screws
(10) 3/8” gr8 split lock washers
INSTALLATION PROCEDURE
1. Park vehicle on flat level surface. Position an oil drain pan under the differential.
2. Remove all original differential cover bolts and set aside. Using a medium hammer hit the side of the diff cover to break the seal. If necessary, use a chisel or pry bar to break the seal and separate the cover from the housing. Be careful not to gall the sealing surface of the housing.
3. Let the gear oil drain from the housing into a pan (please recycle or dispose of your used oil properly). Clean out the inside of the housing with brake cleaner and wipe dry. Remove all of the old gasket material off of the housing. Use a wire wheel, gasket scraper or razor blade to clean ALL debris off the sealing surface of the differential housing.
4. You can use either a gasket or silicon sealant on the differential (we provide silicon as it is our preferred choice) . It is usually easiest to put the silicon on the housing first. If you choose to use a gasket it is usually easier to install the gasket onto the Bombshell.
5. Place the Bombshell onto the axle housing with the gasket (if used) and bolt holes properly aligned. Install the new Grade 8 hex head cap screws and lock washers in all mounting locations. Use the wrench to tighten the bolts in an alternating pattern until even factory torque spec is achieved.
6. Refill your differential with gear oil according to your owners manual. IMPORTANT: The fill hole should NOT be considered the full line. In some cases filling to the fill hole will result in an over-full situation, and may result in blowing fluid out through the breather. Consult your owner’s manual or manufacturer’s documentation to determine the appropriate volume of fluid to use.
7. Install fill plug using teflon tape or pipe thread sealer on the threads.
8. Check for proper clearance with all chassis components by cycling suspension/steering in all directions.
9. Periodically re-torque cover bolts (make it a normal part of your routine maintenance regimen).
