FREE 1 to 3-Day Delivery on Orders $119+ Details

How to Install Barricade Rivet Style Fender Kit on your Wrangler
Installation Time
3 hours
Tools Required
- #2 Philips head screw driver
- Socket Drive with 5/16” and 7/16” Socket
- 5/16” Wrench
- 7/16” Wrench
Shop Parts in this Guide
PRIOR TO INSTALLATION MAKE CERTAIN YOU HAVE THE CORRECT KIT FOR YOUR YEAR JEEP
Pre-fit all panels as you proceed with the installation.
If you plan on painting your Fender Flares it must be done prior to installation. All surfaces must be cleaned and prepped following the specifications outlined by the paint manufacturer. As you remove factory parts set them aside safely for later use.
STEP 1. REMOVE THE FRONT AND REAR FACTORY FLARES
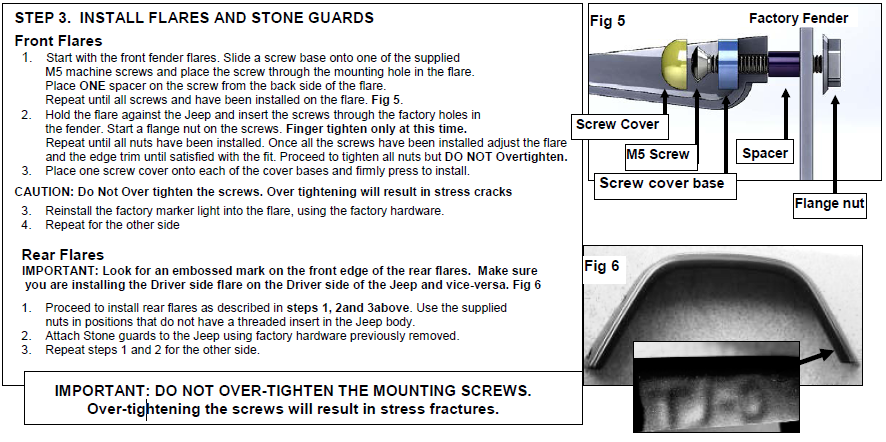
1. Start with the rear fender flare. Remove the rear wheel well cowling by prying back the Christmas tree fasteners with pliers or a pry tool. Locate and remove the 8 factory bolts holding the factory fender flare Repeat for other side
2. Proceed to the front flares and remove the two screws holding the marker lights on the factory fender flares. Disconnect the wiring and set the marker light aside. These will be reused in the new flares.
3. Locate and remove the 10 factory bolts holding the factory fender flare. Repeat for the other side
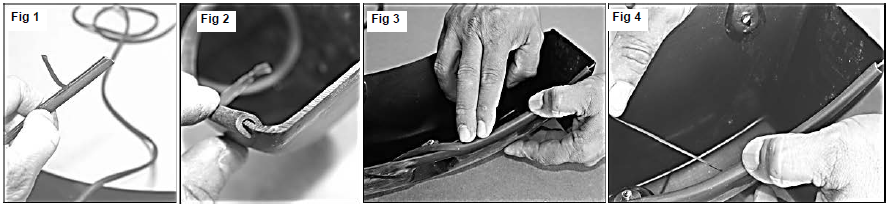
STEP 2. INSTALL RUBBER TRIM ON NEW FLARES
1. Locate the supplied “U” shaped rubber trim. Peel back 1 “of the red lining. Starting at one end of the flare, push the trim onto the edge of flare. NOTE: Make sure the red lining is on the inside of the flare. FIG 1 and 2
2. Continue pressing the rubber trim on to the flare in 6” increments. FIG 3
3. Peel back 6 inches of the red liner and press the trim to bond to the flare. FIG 4 Continue in this manner until you have gone completely around the flare. When you reach the end cut the trim to length. Repeat this process for the remaining flares.